


14
REMOTE CONTROL
One feature of the remote control is that you can enter a track number
directly. Since the numeric section of the remote handset can be used for the
Compact Disc, Preamp and Tuner functions, to link the numbers to the
KARIK player the previous button pressed has to be one from the Compact
Disc section of the handset.
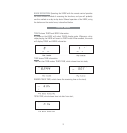
To enter a track number from 1 to 9, press the corresponding digit on
the remote control for less than 0.5 seconds. When the digit is pressed it is
shown on the display. When the button is released, the KARIK plays the
selected track.
To enter a track number from 10 to 99, press and hold down the button for the
first digit. The digit will be shown on the display. After 0.5 seconds, the
displayed digit will move one place to the left and a dash appears in the
original digit position. Press the button for the second digit. The dash on the
display is replaced by the second digit of the track number and the KARIK
plays the track.
NUMERIK OPERA
TION To switch the NUMERIK on, press the POWER
button. The power indicator light will illuminate. After about five seconds, the
audio output will unmute, and the NUMERIK is ready for operation.
Channel 1 is selected if there is an S/P-DIF signal on the Channel 1 input,
otherwise Channel 2 is selected. This allows the
DIGITAL AUDIO OUTPUT
enable facility on the KARIK to be used as an input selector on the NUMERIK.
44.1 kHz or 48 kHz sample rates are automatically selected.
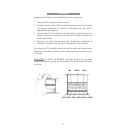
The KARIK’s
SYNC Input connection is made from the NUMERIK with a high
quality audio phono-phono lead. With this lead in place the NUMERIK adopts
‘master’ mode operation and superior audio performance is achieved.
When this lead is not in place the NUMERIK will adopt ‘slave’ mode and will
operate in a conventional manner. If the currently selected input has the
Master Mode (CD Sync) link connected, Master Mode will be selected.
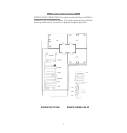
In case of difficulty when setting up the NUMERIK, indicator lights are
provided on the rear panel. See the SET-UP section for details.