


- 4 -
5# RANDOM - switches random playback on/off
5$ 4; - CD playback start/stop
5% EQ - activates the sound settings
5^ 9- CD title skip backwards
Station search down
5& INTRO - controls the Intro mode
5* VOLUME — - reduces the volume
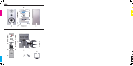
5( Battery compartment (rear panel)
6) USW (FM) dipole antenna
Inserting the batteries
You can equip the micro system with 3 x 1,5 V Type AA bat-
teries so that in the event of a power failure the saved time and
timer information will not be lost. The remote control requires 2
x 1,5 V Type AAA. batteries (not supplied) for data preservation
during a power failure.
Open the battery compartment on the underside of the
>
device 1& and on the rear side of the remote control 5(.
Insert the batteries, ensuring that you observe the polarity
>
markings as indicated in the battery compartment.
Carefully close the corresponding battery compartment
>
lid until it locks into place.
Handling of batteries
Depleted batteries can cause damage to the micro system and
the remote control.
If you do not intend to use the micro system and the remote
>
control for an extended period, remove the batteries.
Always change both batteries in the remote control and/or
>
all 3 batteries for the memory retention at the same time. Al-
ways use only batteries of the same type together.
Should the batteries leak, wear protective gloves and clean the
>
battery compartment with a dry cloth.
Do not attempt to recharge the batteries.
>
Connecting the components
Loudspeakers
Connect the speaker wires of the right speaker to the
>
right speaker terminals:
• connect the white lead of the speaker wire to the
+ terminal
3#.
• connect the black lead of the speaker wire to the
— terminal
3@.
Connect the speaker wires of the left speaker to the
>
left speaker terminals:
• connect the white lead of the speaker wire to the
+ terminal
3).
• connect the black lead of the speaker wire to the
— terminal
3!.
Connecting and adjusting the MW and USW antennas
For the reception of medium wave radio stations please
connect the supplied MW antenna
3$ to the micro system.
Remove the medium wave antenna from the packing.
>
Unwind the connection lead from the antenna.
>
Unbend the ring as far as necessary until it audibly locks
>
into place on the base of the antenna.
Insert the plug on the antenna lead into the medium wave >
antenna
2( connection.
Adjust, i.e. by turning, the medium wave antenna
> 3$ so as
to achieve optimal radio reception.
For the reception of Ultra Short Wave radio stations please
connect the dipole antenna
6) to the micro system.
In order to achieve a good reception with the micro system
>
unwind the dipole antenna 6) completely.
Insert the antenna plug of the dipole antenna
> 6) on the
pole of the connection socket 2* on the micro system.
If the reception is inadequate change the position of the di-
>
pole antenna. Secure the dipole antenna, if necessary, with
sticky tape.
Additional antenna via 75 ohm connection
When the reception via the supplied dipole antenna 6) is inad-
equate you can connect a house antenna to the micro system.
For this insert the antenna plug of the house antenna into
>
the connection socket 2* on the micro system.
Power supply
Connect the power plug of the power cord
> 3% to a properly
connected power socket 230 V
~
/50 Hz.
Becoming acquainted with the remote control
Point the remote control towards the device when you activate its
buttons. The remote control functions at a distance of approx. 5m
from the device and at an angle of at least 60°.
For transmission of the signal there must be no objects placed
between the device and the remote control. If the remote con-
trol functions unreliably please change both batteries at the
same time.
Switching the device on and o, standby
To switch the device on set the power switch, > 3& on the rear
panel of the micro system, to the "ON" position.
The micro system is now in standby mode (ready for opera-
tion). The red standby indicator 2% as well as the blue back-
ground lighting of the display e illuminates.
To activate the device whilst in standby mode press the
> -
button 2^ on the micro system or the STANDBY button 4(
on the remote control.
To switch the device to the standby mode press the
> -
button 2^ on the micro system or the
STANDBY button 4(
on the remote control.
To switch the device o altogether set the power switch
> 3&
on the rear panel of the micro system to the "OFF" position.
Selecting the programme source
You can select between the following programme sources:
• CD - Playback of compact discs
• TAPE - Playback of cassettes
• TUNER - Playback of radio stations
For this press the FUNCTION button > 2$ or 4& repeatedly
until the desired sound source is indicated in the display.