


11
INSTALLATION
Tools You Will Need
These tools are specific to Q450rs and more may be
required depending on speakers and peripherals used.
Screwdriver
A small flat head screw driver with a blade that is about
3.5mm (1/4”) is ideal. This is for terminating the speakers
into the Q450rs speaker or Phoenix connector. Too big
won’t fit in the opening, too small won’t allow for enough
torque for a good seating of the speaker wire.
Wire Strippers
Suitable for stripping speaker wire.
Multi-meter or Impedance Meter
This is required to avoid damage to Q450rs and the
speakers and will save much time and frustration should a
speaker wire be damaged during installation. Do it.
Cat5/RJ45 Crimper Tool
This must be top quality. The ‘Ideal’ by ‘Telemaster’ is a
very good choice. Most calls to tech support are a result
of poor connections caused by an inferior crimper tool
used for cat5 termination.
Cat5 Tester
Until we figure out how to see electricity, we need a way
to ensure that it’s being transported correctly. A cat5
tester that shows that not only continuity of the wire, but
shows that they are going to the correct pins. This is very
useful and highly recommended.
Labeling Medium
Some method to identify the different cables from one
another and apart from other systems/networks. During
installation other trades people can move or even remove
the ends of long wires. Two labels on both ends can offer a
little redundancy.
Note: It is important you know where you’ll run
the various wires required operate Q450rs. You
cannot run a cat5 or speaker cable parallel to a high
voltage AC mains cable. This may cause problems
with the operation of Q450rs. Q450rs needs to be a
safe distance, about 1m (3’) from any large AC
motors, like in an air conditioner or fridge/freezer, or
breaker panels.
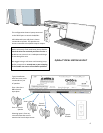
INSTALLATION PROCEDURE
Installing the Q450rs is intended to be a relatively
easy procedure with no programming required.
Part One - Planning
Before installing we recommend you make an
installation plan. This involves deciding where the
speakers will go, and if you’re intending to, where to
place the local zone inputs, or BIX as we call them
and of course the various music sources. There are
up to four pairs of speaker wire (one pair per zone)
and up to four cat5 for the BIX/BIB’s.
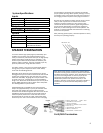
Part Two - Prewire
Prewiring is a very important step. The effort you put
into planning should make this step easier. When
running wire, leave an extra 1m (3’) on both ends.
Terminate all Cat5 wires with RJ45 connectors.
Part Three – Installation or Trim Out
You should now install the speakers and install the
wires in them. Take care to ensure the speaker wire
polarity is correct (in phase), the wire is neat and no
wire fibers are outside the connectors.
At the Q450rs terminate the speaker wires with the
supplied connector. Check each speaker circuit for
shorts and proper impedances. Take extra care at
this step to ensure your twisted pairs are correctly
routed and that the phasing is correct. A fault here
can seriously damage Q450rs and its peripherals.
Check this three times!
Mount the Q450rs. Plug in all connectors except for
the powers supply unit (PSU). Double check that the
connectors are routed to the correct Q450rs
terminals.
Plug in a known working audio source directly to
Q450rs. Preferably, use a source input that is not
being used for a BIX. Plug in the Q450rs power
supply. Check Q450rs to see that the power LED is
illuminated. Press play on your known working audio
source and head to your closest zone.
Select the audio source on your control device you
activated in previous step. Turn up volume and listen
for signal. Check signal for distortion or clipping.
Move to next zone, rinse, repeat until all zones are
active.
Bring a known working audio source to BIX locations
to test for signal. After completing this test, perform
the same test on BIX/BIB in other zones. Grab a soda
and pat yourself on the back. Throw on a tune and
enjoy your hard work.