


THX ULTRA2 LOUDSPEAKERS
of binding posts until the holes through the metal posts are exposed, then insert the bare
wire through the holes. Screw the nuts down finger-tight on the wire. Make sure that no
strands of wire are touching from one binding post to the other or to any strands from the
other conductor. Failure to observe this precaution at either end of the connection can result
in amplifier malfunction or dama
ge.
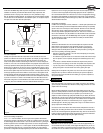
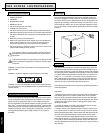
Pins. Many pre-made speaker cables are terminated with metal pins. Loosen the nuts on a
pair of binding posts until the holes through the metal posts are exposed, then insert the
pins through the holes. Screw the nuts down finger-tight on the pins — do not overtighten.
Make sure that there is no metal-to-metal contact between the two pins or binding posts.
Failure to observe this precaution at either end of the connection can result in amplifier
malfunction or damage.
Spade lugs. Some speaker cables are terminated with U-shaped connectors called spade
lugs. Loosen the nuts on a pair of binding posts and slip the spade lugs around the metal
posts. Screw the nuts down finger-tight on the lugs and inspect to ensure they have
remained firmly in place. Make sure that there is no metal-to-metal contact between the
two lugs or binding posts. Failure to observe this precaution at either end of the connection
can result in amplifier malfunction or damage.
Other types of specialty connectors are available to facilitate hooking up your speak-
ers. Please consult your authorized Klipsch dealer for suggestions and further details.
SPEAKERS TO AMPLIFIER: KEEPING IT STRAIGHT
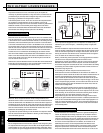
One of the most important things about hooking up your speakers is keeping them in the
same polarity, or phase. If they are connected out of phase, bass and sound imaging will be
degraded.
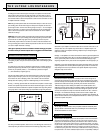
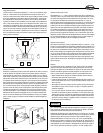
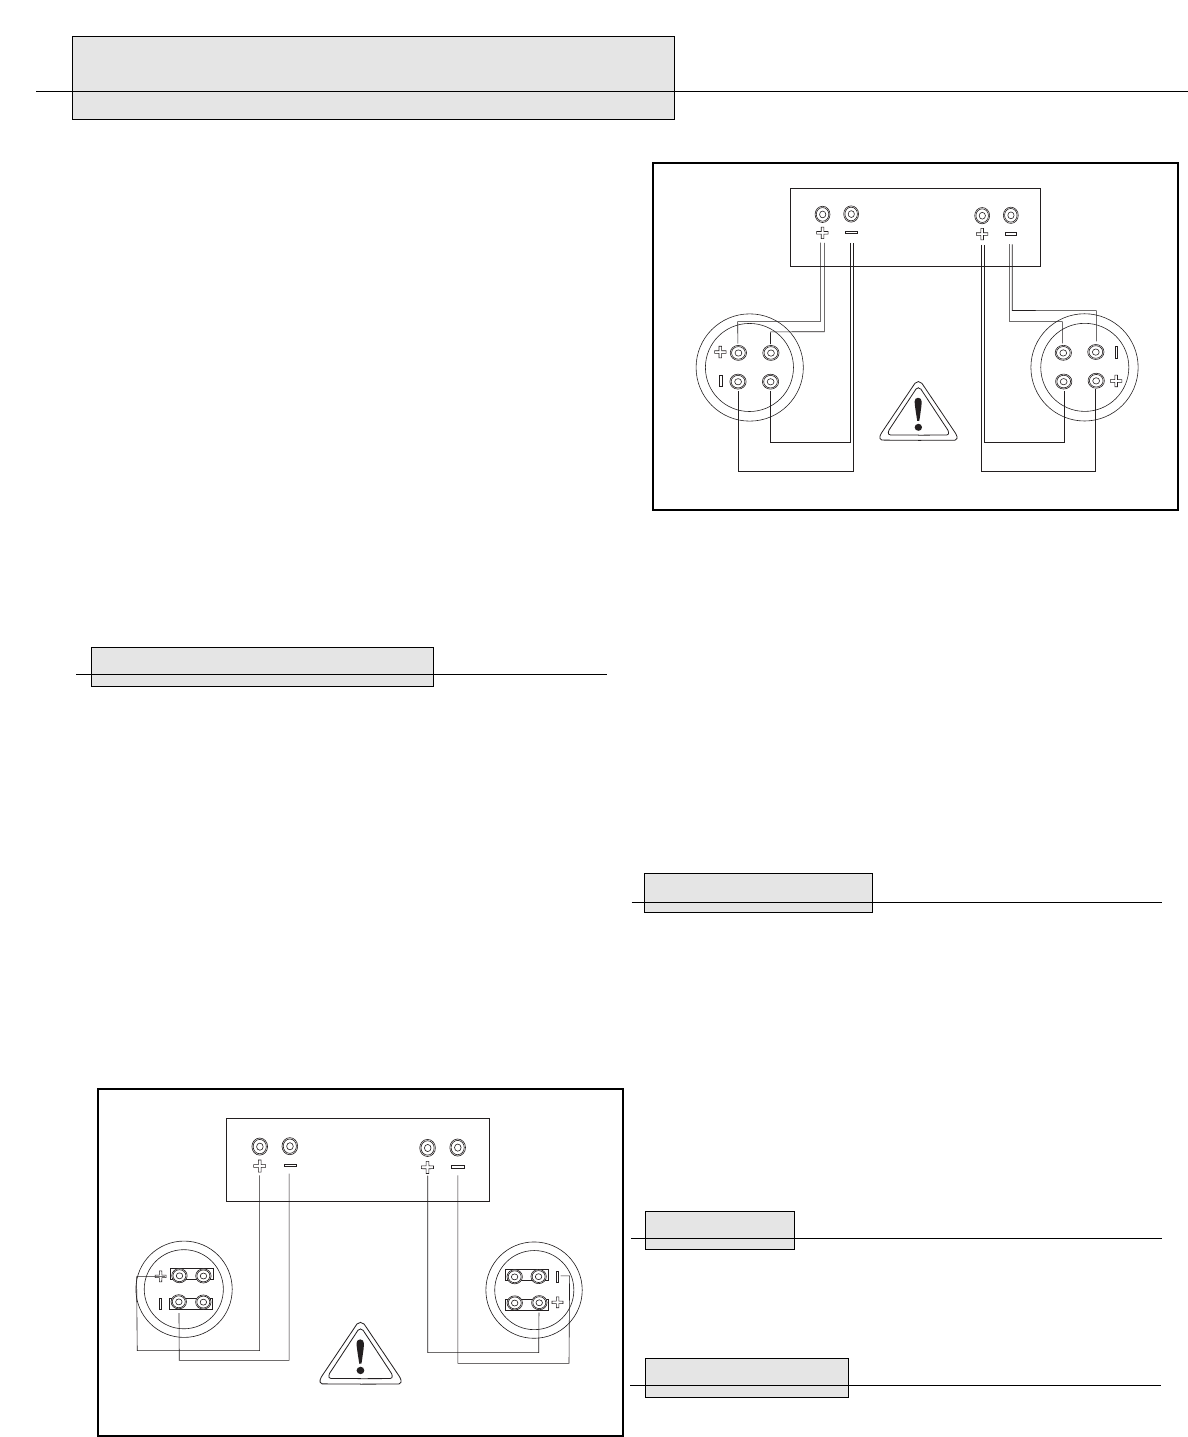
The easiest way to ensure that your speakers are wired in phase is to always connect the
positive and negative output terminals on your amplifier or receiver to the matching input
terminals on your speakers: positive (“+,” color-coded red) to positive and negative
(“–”, color-coded black) to negative (Figure 4).
Most pre-made speaker cables have color-coded connectors that make it easy to match
output and inputs correctly. If yours do not, or if you are making your own out of paired,
two-conductor wire, look for identifying marks on the insulation of the two conductors.
Normally there will be printing, a stripe or a molded ridge along one of the conductors.
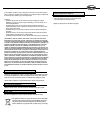
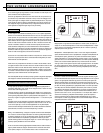
Bi-wiring – In bi-wiring, separate cables are connected from the amplifier or receiver output
terminals to the speaker input terminals for the tweeter and woofers (Figure 5). This results
in lower electrical resistance between the amplifier and speaker than single-wiring with the
same gauge cable. In some cases bi-wiring may be preferable to single-wiring with lower-
gauge cable, which will be thicker and probably less flexible.
To bi-wire your THX Ultra2 speakers, loosen the nuts on the binding posts and remove the
metal straps linking the woofer and tweeter terminals. Observing proper polarity, connect
one cable to the tweeter binding posts and another to the woofer binding posts. Run both
cables back to your amplifier or receiver and attach them to the same channel. (Do not, for
example, attach one to an A speaker output and the other to a B speaker output on an
amplifier or receiver with A/B speaker switching.) Amplifiers may be severely damaged if
straps are not removed.
Biamping – In biamplification, the tweeter and woofers are driven by separate amplifiers fed
from the same preamplifier output. We do not recommend biamplifying any of our speakers,
since in general it will produce no benefit that could not be obtained simply by using a
single larger amplifier and may cause severe sound degradation if not done properly. If you
do biamplify, use the same model amplifier for the tweeter and woofer sections (to prevent
frequency-response errors caused by different amplifier gains) and be sure to remove the
straps linking the two sets of input terminals on the speaker. Amplifiers may be severely
damaged if straps are not removed.
BASS MANAGEMENT SETTINGS
Surround-sound receivers and processors use what is known as bass management to
ensure that low frequencies in the various channels are sent to speakers that can handle
them well and away from small speakers that cannot. Klipsch THX Ultra2 loudspeakers are
optimized for the THX crossover setting. (Technically, that’s an 80Hz crossover with a
12dB/octave high-pass section feeding the amplifiers for the satellite speakers and a
24dB/octave low-pass section feeding the subwoofer amplifier.) All THX-certified receivers
and processors incorpora
te this crossover in their bass-mana
gement systems.
Non-THX
surround-sound components usually have crossovers somewhere from 80 to 100Hz and
with slopes of 12 to 24dB/octave. Although the THX crossover is ideal for Klipsch THX
Ultra2 speakers,
these other crossovers will usuall
y give acceptable results. Regardless, all
Klipsch THX Ultra2 LCR and surround loudspeakers should be set to “Small” in your receiver
or processor’s speaker setup menu.
CARE AND CLEANING
The only thing you should ever need to do to your speakers is dust them occasionally. Never
apply any abrasive or solvent-based cleaner or any harsh detergent. You can clean the grilles
with the brush a
ttachment of a vacuum cleaner.
W
ARRANTY – U.S. AND CANADA
Klipsch warrants to the original retail purchaser that this product is to be free from defective
materials and workmanship for a period of five (5) years, from the date of purchase, if it is
properly used and maintained.If this product proves defective in either material or workman-
ship, Klipsch, at its option, will (a) repair the product, or (b) replace the product, at no charge
for parts or labor. If the product model is no longer available and cannot be repaired effectively
or replaced with an identical model, Klipsch at its sole option may replace the unit with a cur-
rent model of equal or greater value. In some cases, modification to the mounting surface may
be required where a new model is substituted. Klipsch assumes no responsibility or liability for
All power off!
Left Speaker
Right Speaker
AMP
Figure 4
All power off!
Left Speaker
(remove strap)
Right Speaker
(remove strap)
AMP
Figure 5