


Sometimes things just don’t seem to be working right.
When this happens:
• First, look back over this manual to find the instruc-
tions for what you’re trying to do. You may find the
solution to your problem right there.
• If that doesn’t work, look for the problem in this
Troubleshooter’s guide.
• If you have a problem with another component,
check the manual for that unit.
• If you still can’t solve the problem, call the store
where your purchased your system, or call a
Kenwood Authorized Service Center.
To find a Kenwood Authorized Service Center
• Call 1-800-536-9663, in the continental US, 24 hours
a day, 7 days a week.
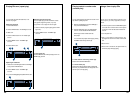
Receiver
Remote doesn’t operate
• Check the batteries, and replace them if needed.
• Check that the remote is close enough to the system;
that the controlling angle is small enough; that there’s
no obstacle in between.
• Check that you’ve placed your CD, videotape, laser
disc, or other source in the proper player.
• Check to make sure that the audio cables and system
control cables are connected properly.
No sound from the system
• Check that the volume is set at a proper level.
• Check that the mute is OFF.
• Check that the speakers are turned ON. If the speak-
ers are ON, the speaker indicator is ON.
• Check that all your power cords are connected prop-
erly.
• Check that the speaker cables are connected prop-
erly.
• Check that the input cable from the source compo-
nent is connected properly.
• Check that the shorting plugs have not been removed
from the ADAPTER loop jacks.
No sound from one of the speakers
• Check that the balance between the left and right
speakers isn’t set too far to one side.
• Check that the audio and speaker cables are
connected properly.
The STANDBY light blinks, but there is no
sound
• Check that the speaker cables aren’t short-circuited—
that is, the (+) and (-) wires aren’t touching each
other. If they are, separate the wires.
A hum when you select the PHONO input
• Check that the audio cables are plugged securely into
the PHONO jacks.
• Check that the turntable is grounded on the rear
panel. The ground wire should be connected to the
screw labeled GND.
None of the functions operate, or the display
shows wrong information
• Reset the unit’s microcomputer by unplugging the
power cord from the AC outlet and plugging it back
in while holding down the POWER button.
Troubleshooting guide
37.
Performing routine maintenance helps keep your
cassette deck operating at peak performance.
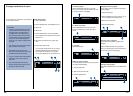
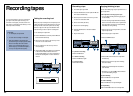
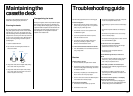
Cleaning the heads
We recommend that you clean the head assemblies,
tape guides, capstans, and pinch rollers of both cassette
wells after every 10 hours of use. For best results, use
tape head cleaning fluid and long-handled cotton swabs.
(Using alcohol to clean the pinch rollers may cause them
to dry out over a long period of time.) Be careful not to
press too hard during cleaning, because the parts are
precisely aligned.
1 Open the cassette well doors.
2 Dip a swab into the cleaning fluid, and clean the
surface of the heads.
3 Using a clean swab, clean the capstan shafts, making
sure to clean all the way around them.
4 Using a clean swab, clean the pinch rollers, making
sure to clean all the way around them. Use a clean
swab to keep them from turning.
Demagnetizing the heads
Since tape is magnetic, when the tape heads and capstan
shaft contact the tapes, they become magnetized over
time, increasing distortion. Playing tapes on a player with
magnetized heads and capstans can also deteriorate the
recordings on the tapes. For best performance, use a
head demagnetizer to demagnetize the heads and
capstans of both cassette wells.
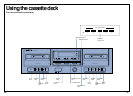
Maintaining the
cassette deck
36.
Heads Capstan shaft
Pinch roller