22
English
■■
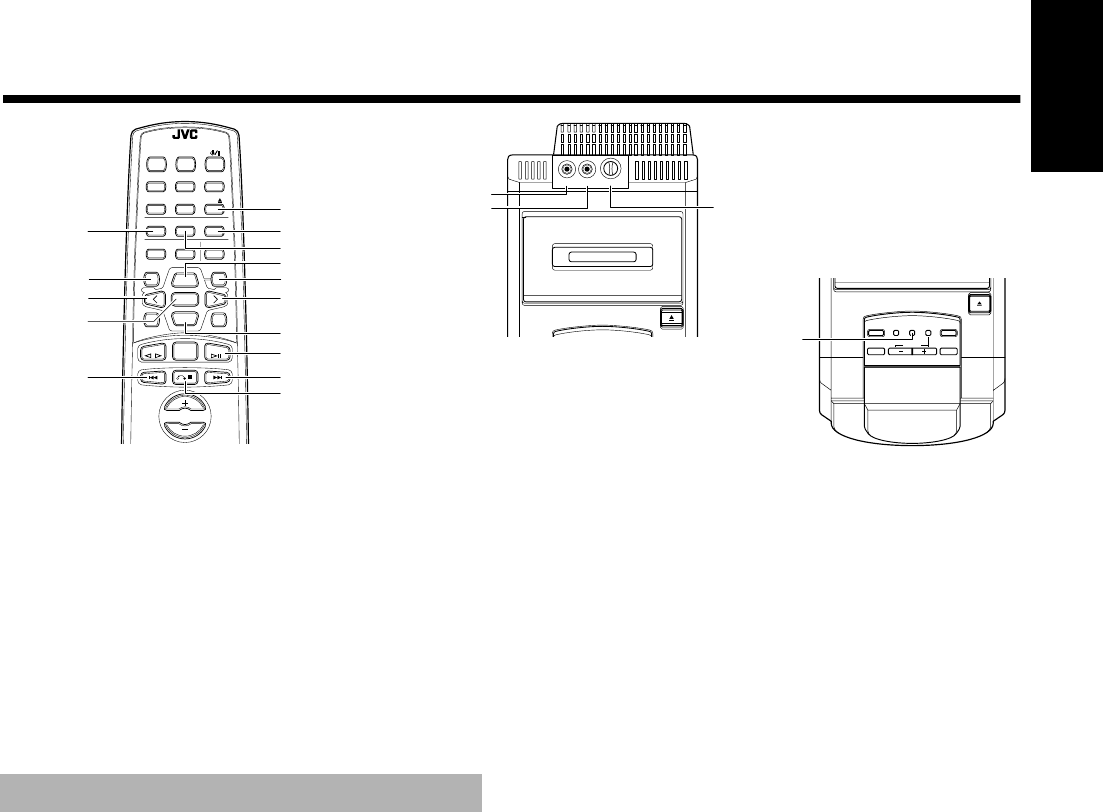
Using the Microphone
AUTO TAPE SELECTOR
CLOCK
TIMER/
SNOOZE
REC
AHB PRO
AUTO REVERSE
VOLUME
REV.
MODE
VCD
NUMBER
KARAOKE
MODE/MPX
REMOTE CONTROL RM-RXUV6V
DIMMER SLEEP
DISPLAY FM MODE MD/AUX
AHB PRO
AUTO
PRESET
CD
PROGRAM RANDOM REPEAT
BASS TREBLETREBLE
SELECTPREV NEXT
VCD NUMBER
VCD NUMBER
CANCEL
KEY
CONTROL
DIGITAL
ECHO
ON SCREEN V. INTRO
UP
SET
DOWN
TUNER
BAND
TAPE
VOLUME
CD
AUTO TAPE SELECTOR
AUTO REVERSE
MIC1 MIC LEVELMIC2
MIN MAX
PROGRAM
REPEAT
DIGITAL
ECHO
¢
CD
0
RANDOM
KEY CONTROL
KARAOKE
MODE/MPX
< PREV
SELECT
SET
> NEXT
VCD NUMBER
DOWN
CD
#8
4
MIC LEVEL
MIC2 jack
(Use a 3.5 mm
diameter mini plug)
MIC1 jack
(Use a 3.5 mm
diameter mini plug)
&
7
VCD NUMBER UP
The System includes two microphone terminals, MIC 1 and MIC 2.
By attaching a microphone to one or both these terminals, you can
use the System for Karaoke or microphone mixing. You can also
add an echo to the microphone’s sound except when Tuner is select-
ed as a source.
■
The MIC LEVEL control adjusts the volume for both MIC 1
and MIC 2 at the same time.
■
When you will not be using the microphone, keep the MIC
LEVEL control set to MIN, and disconnect the microphone.
CAUTION: Always set the MIC LEVEL control to
MIN when connecting or disconnecting the micro-
phone.
You can enjoy singing along using audio CDs, video CDs and CD-
Gs. (Koraoke does not function for other sources such as tape.)
While singing along, you can apply echo and adjust the music key.
Singing Along with Audio CDs-Vocal
Masking ——————————————
When playing an audio CD, you can reduce the lead vocal and re-
place it with your voice by singing into the microphone(s).
The following CDs are not suitable for Vocal Masking.
• Monaural CDs
• Multiplex Karaoke CDs
• CDs recorded duets, strong echo, a chorus, or only a few
instruments
■
1. Set the MIC LEVEL control to MIN by turn-
ing it counterclockwise.
■
2. Connect a microphone (not supplied) by
plugging it into the MIC 1 and/or MIC2 jack.
■
3. Press the KARAOKE MODE/MPX button on
the Unit until “V.MASKING” appears on the
display.
Each time you press the button, Karaoke mode changes as fol-
lows.
Lch MONO = Rch MONO = V. REPLACE = V.MASKING
= NORMAL = (back to the beginning)
• You can also select “V.MASKING” during playback.
■
4. Play an audio CD.
■
5. Adjust the main volume and the MIC LEVEL
control, as you sing into the microphone.
• If you want to record on a tape, carry out CD Direct Record-
ing or One Track Recording. (See page 18.)
To cancel the Karaoke mode, press the KARAOKE MODE/
MPX button until “NORMAL” appears on the display.
Notes:
• After finishing singing along, always cancel the Karaoke
mode. Karaoke mode will be also cancelled if you change the
function or turn off the power.
• If “howling” occurs, keep the microphone away from the
speakers.
• When digital recording is made to an external equipment
through the OPTICAL DIGITAL OUT terminal using an audio
CD, the microphone sound is not recorded.
• During recording, you cannot change the Karaoke mode.
Singing Along with Multiplex Kara-
oke CDs-MPX (Multiplex)/Vocal Re-
place Sound —————————————
If the source you are going to play is a multiplex Karaoke CD, you
can use the two functions; Multiplex Sound and Vocal Replace.
What is Multiplex Sound?
In a multiplex Karaoke CD, the instrumental parts are recorded on
the left channel and the vocal parts are recorded on the right chan-
nel. With this system, you can select the playback sound with your
voice through the microphone (With this system, you can select
each channel separately.).
What is Vocal Replace?
By using this function, you can replace the lead vocal (recorded on
the right channel) with your voice as you sing into the microphone.
If you stop singing, while a source is still playing, the original vocal
sound automatically resumes.
■
1. Turn on the TV and select the video input
on the TV.
■
2. Set the MIC LEVEL control to MIN by turn-
ing it counterclockwise.
■
3. Connect a microphone (not supplied) by
plugging it into the MIC 1 and/or MIC2 jack.
Singing Along-Karaoke
UX-V6V(U)-eng.fm Page 22 Thursday, August 5, 1999 2:59 PM


