


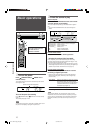

14
Basic settings
To obtain the best possible sound effect from Surround/DSP
modes (see pages 25 to 29), you need to set up the speaker and
subwoofer information after all the connections are completed.
From pages 14 to 19, how to set speakers and other basic items
of the receiver are explained.
Setting the speaker information
automatically—Smart Surround Setup
The distance from your listening point to the speakers is one of
the important elements to obtain the best possible sound effect for
the Surround/DSP modes.
By using Smart Surround Setup, the following are automatically
calculated by one simple action—clapping hands.
• Speaker distance (compared to that of the closest speaker)
• Speaker output level
NOTES
• To set the speaker information effectively using Smart Surround
Setup, unplug the power cords of all the components connected
to this receiver and the subwoofer which may cause noise.
• Before starting Smart Surround Setup, set the speaker
information correctly (SML, LRG, or NO) according to your
speakers except the subwoofer (see page 16).
• When the setting is made by Smart Surround Setup, the
speaker distance and output level you have set before will be
inactive.
• If you have turned off the display, cancel the Dimmer (see page
12); otherwise, you cannot see the information on the display
during Smart Surround Setup.
• Smart Surround Setup will not be done correctly if you or other
object blocks the sound.
• When you change your speakers, do the following procedure
again.
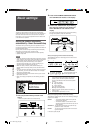
From the remote control ONLY:
2
Press and hold SMART SURROUND SETUP
until “SETTING UP” flashes on the display.
3
Confirm that “SETTING UP” stops flashing,
then clap your hands over your head once
while “SETTING UP” still remains on the
display.
The receiver starts detecting the level of the sound coming
through each speakers (except the subwoofer).
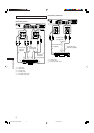
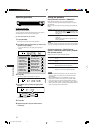
When your clapping sound is detected successfully,
“SUCCESSFUL” appears on the display, then the values set are
shown as follows:
Ex.:
Then the receiver returns to
normal operation mode.
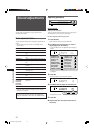
*1 Standard channel (the closest speaker).
This speaker position now works as the reference
position (“0m/ft”) and other speakers’ distance is
shown by the difference with this reference speaker
position.
*2 L: Left front speaker
R: Right front speaker
C: Center speaker
LS: Left surround speaker
RS: Right surround speaker
*3 Difference of each speaker position in distance (in
meters or feet).
*4 Each speaker’s output level (–6 to +6).
When your clapping sound is not detected correctly,
“SETTING UP” appears again after one of the following messages
appears on the display.
SILENT: • The receiver detects sound from only the left
and right front speakers.
• The receiver detects no sound from the front
speakers and detects sound from at least one of
other speakers.
SILENT-ALL: The receiver cannot detect any sound from any
speakers for about 15 seconds.
FAILED: The receiver cannot detect sound from the left or
right front speaker.
In this case, repeat step
3
.
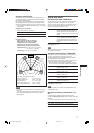
1
Take your position where you listen to the
sound.
• Make sure speaker cables are connected firmly.
EQ
LPCM L
LS SB RS
S . WFR
PL
NEO : 6
DSP 3D
LFE
C R
DOLBY D
DTS AAC
96 / 24
AUTO SR
C.TONE VIRTUAL SB AUDIO P. BASS TA NEWS INFO RDS TUNED ST SLEEP
AUTO MUTING AUTO MODE
ATT
HP
MHz
kHz
Basic settings
*3*2
*1
*4
L
R
LS RS
C
When operating the receiver
using the remote control, set
the mode selector to
“AUDIO/TV/VCR/DBS.”
EN14-19RXE11S[US_UX]2.p65 06/12/2004, 21:3814