37
Reference
When the TV set or device to be connected is a
JVC product equipped with the AV COMPU LINK-
II or -III jack, connecting them to the AV COMPU
LINK jack on the system will allow you to control
the other devices by operating one device.
NOTE
• Refer to “Others” (
A
page 31) to set the AV
COMPU LINK mode.
• Also carefully read manuals of devices to be
connected.
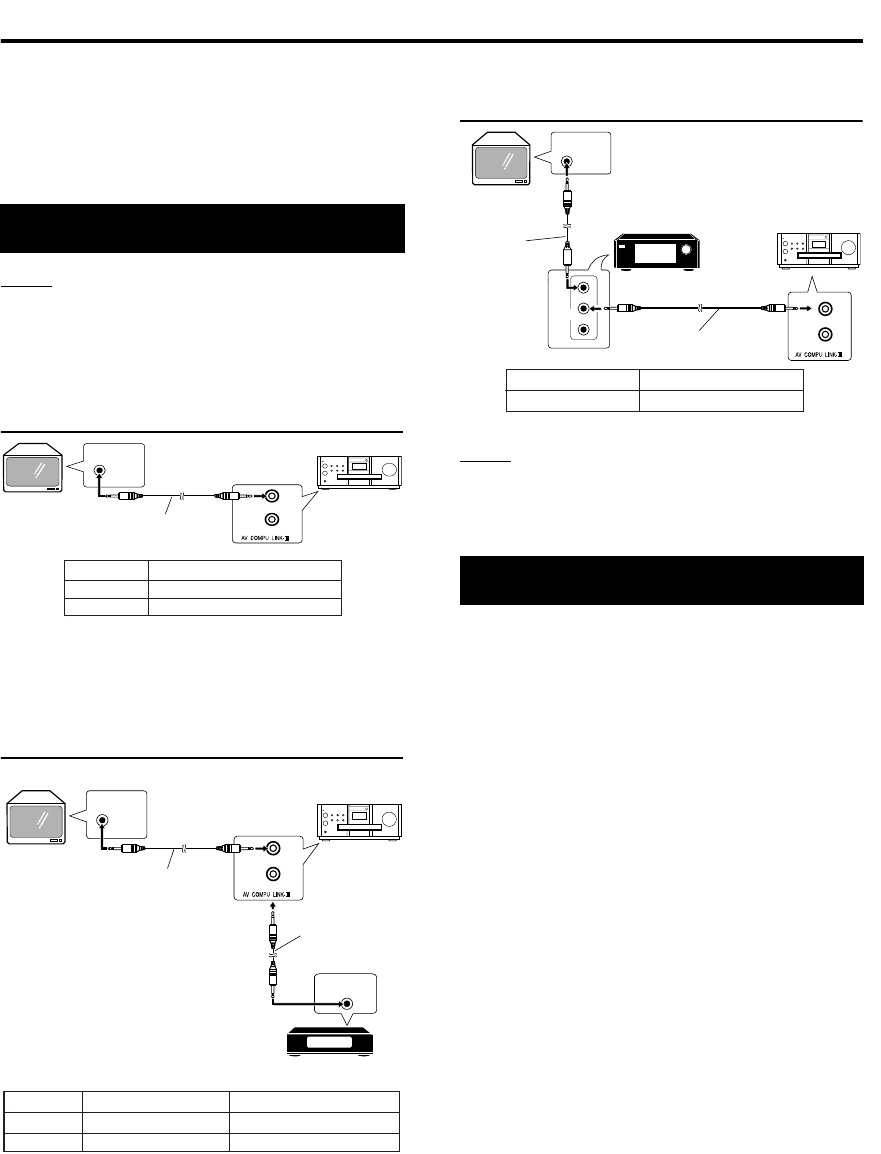
Connection with a TV set
• Connect to the Video 3 (DVD) input jack on your
TV set. If Video 3 is for DV/Movie input, read the
following descriptions:
Connection with a TV set and a VCR
• When using with initial settings, connect to Video
3 (if not set to DV/Movie input). Set the remote-
control code to “A”.
Connection with a TV set and an AV
amplifier
NOTE
For proper operation, be sure to connect the DIGITAL
OUT jack to the DVD sound input terminal on the AV
amplifier.
1 Turn on the main power of the
TV set.
2 Insert a disc or videotape into
the source device (the system
or a VCR).
3 Press the play button on the
source device.
• The TV set will be turned on.
• TV input will be switched to external input
(Video 1, 2 or 3) of the source device.
• The AV amplifier will be turned on.
• The source of the AV amplifier will be
switched to the device on which the play
button has been pressed.
Connection and setting
JVC
JVC-made
TV set
Connection cord
(sold separately)
Main unit
TV input jack
Video 1
Setting of AV COMPU LINK mode
DVD 2
AV COMPU
LINK-II or -III
Video 3 DVD 1
JVC-made VCR
DVD 2
DVD 3
Remote-control code of VCR
B
A
AV COMPU
LINK-II
TV input jack
Video 1
AV COMPU LINK mode
Video 2
AV COMPU
LINK-II or -III
Connection cord
(sold separately)
Main unit
Connection cord
(sold separately)
JVC
JVC-made
TV set
Operations
DVD
1
AV
COMPU LINK
AV COMPU
LINK-II or -III
Connection
cord (sold
separately)
Connection cord
(sold separately)
AV COMPU LINK mode
JVC
JVC-made
TV set
Main unit
AV amplifier
Input jack of AV amplifier
DVD
• Also read manuals of the
AV amplifier.
Using AV COMPU LINK
EXA1mkII[UJ]-06.fm Page 37 Tuesday, October 19, 2004 1:35 PM


