


HTS-20 Home-Theater System – Owner’s Manual
◆
9
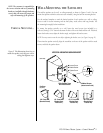
NOTE: The customer is responsible for
the correct selection and use of mounting
hardware (available through hardware
stores) that will ensure the proper and
safe wall-mounting of the speakers.
V
ERTICAL
M
OUNTING
...
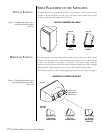
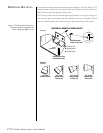
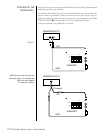
Figure 5. This illustration shows how to
mount the speaker vertically on a wall or
ceiling four different ways.
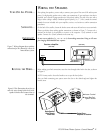
WALL-MOUNTING THE SATELLITES
The satellite speakers can be wall- or ceiling-mounted, as shown in Figures 5 and 6. You can
mount the speakers with #6 wood screws (not included), using the built-in mounting bracket.
Use the enclosed template to mark the desired position of each speaker on a wall or ceiling.
Locate a stud for secure mounting and use heavy-duty wood screws with long threads. Test
the mounting thoroughly before installation.
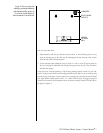
To mount the speaker vertically on a wall, fasten the wood screws (not included) to a
wall stud, leaving a 3⁄16" clearance between the base of the screw head and the wall. If desired,
loosen the bracket screw, adjust the bracket angle, and tighten the bracket screw.
NOTE: You may want to route the wires before tightening the bracket screw (see Figure 8 on page 11).
Then orient the speaker vertically, align the crossholes on the rear of the speaker with the wood
screws, and slide the speaker down.
#6 Wood Screws
(fasten to wall stud)
VERTICAL MOUNTING USING BRACKET
Slide Speaker Down
Onto Wood Screws
(rear view)
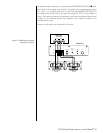
Screw
(inside hole)
Positions
(top view)
45° From Wall
(Bracket Open,
Position #1)
20° From Wall
(Bracket Closed)
67.5° From Wall
(Bracket Open,
Position #2)
90° From Wall
(Bracket Open,
Position #3)
❶ Loosen Screw
❷ Rotate Bracket
❸ Tighten Screw
3/16"
wall
wood
screw
(side view)