


TV FUNCTIONS 43
ENGLISH
TV Functions
TV Functions
The Digital Lounge system offers several TV func-
tions that require special attention. Please make
yourself familiar with these functions by reading
the chapter below.
To switch on the TV, press the TV Button
0
on the remote control. The Digital Lounge sys-
tem will switch on, shown by the amber Power
On indicator switching to blue. Please note that
for all the functions described below, the system
needs to be in TV mode. When TV tuner signal is
not shown on the screen, press the TV button
again.
Changing Channels
Once the TV has been selected as input, chan-
nels can be changed by pressing the number of
the TV channel using the numeric keys
S
on
the remote control. For any of the channels that
are stored at preset 10 and above, first press the
first digit, quickly followed by the second digit.
Channels can also be changed with the Preset
Up and Down Buttons
LJ
. Each press of
these buttons will select the next or previous TV
channel. When you are changing a TV channel, a
mini bar will appear on the right top of the
screen, showing the selected TV channel and it's
name.
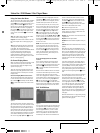
Picture in Picture (PIP) Function
With this function you can watch two video
inputs simultaneously on your Digital Lounge
display. The second video input can either be
shown in the right corner of the display, or the
display can simply be divided in two equally big
squares, each of them showing another video
input. All video inputs that are connected to the
display can be selected to run as a second video
source, however there are some exceptions. If
the HDMI, DVI, or YUV inputs have been chosen
as main video input, the second video input can
not be HDMI, DVI or YUV. Please note that only
the analog TV tuner can be used in connection
with PIP functions. The Digital (DVB-T) Tuner is
not available for PIP use, even if it has been
selected during Setup.
To activate the function, press the Picture in
Picture (PIP) Button
b
on the remote con-
trol. You will see that the second source will
appear in a square on the right top of the
screen. At the same time a mini bar will appear
showing the two video inputs currently watched.
The video input shown on the top is the original
video input, and the one shown below is the
second video input. Pressing the PIP Button
b
again will show both video inputs in the
same size. Pressing the PIP Button
b
a third
time will de-activate the Picture in Picture
function.
When the Picture in Picture function is active,
the main picture can be selected by the
Numeric Key Buttons
S
(when TV tuner is
source) and the secondary picture by the
Presets Buttons
L
while pressing the PC or
VIDEO Source Selection buttons
0
will tog-
gle through all available PC and Video sources.
Aspect Ratio
The Digital Lounge display allows for watching
video sources in several aspect ratios. The
default setting is Fill All and can be set to your
personal taste for each individual input, as
described on page 29. Should you wish to tem-
porarily change the aspect ratio of a video input,
press the Screen Format Button
X
repeatedly until you have found your preferred
picture format. With each press of the button,
the current aspect ratio will be shown in the
mini bar on the right top of the screen. Below is
a short description of the different picture
formats:
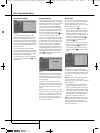
Available picture formats for TV signals
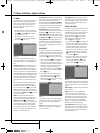
Normal: This format setting displays a PAL 4:3
picture with the correct side ratio. Dark stripes
are visible on the left and right-hand edges of
the picture.
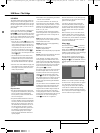
Fill all: In this format setting the picture is
adapted in horizontal direction until the screen's
width is filled completelly. This format is needed
to display all so called "Widescreen" (also
named "16:9" or anamorphic) movies with opti-
mal size and aspect ratio that will be streched
vertically in the "Normal" mode (see below).
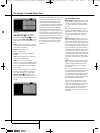
16:9: In this mode the picture is scaled horizon-
tally to the complete picture width, approx. 25
%in total being cut off the top and bottom of
the picture recorded with 4:3 format.
Available picture formats for PC signals
over the DVI input
When you have a computer connected to the
DVI input, the following picture formats can be
chosen:
Normal: Displays the PC picture filling the com-
plete height of the screen, without changing the
side ratio. Dark stripes are visible on the left and
righthand edges of the picture depending on the
input format of the PC picture.
Fill All, 16:9: These are the same settings as
with TV source described above.
14:9: With a 14:9 zoom the picture is enlarged
vertically by a total of 15 %, i.e. approx. 15 % of
the picture content is cut off vertically.
Horizontally the picture is reduced in size in
comparison with the full picture display by 15
%, i.e. narrow bars are displayed on the right
and left. This mode is a good compromise to
enlarge "4:3" video material (like e.g. from the
TV tuner) and keeping the correct aspect ratio
without cutting too much on top and bottom of
the picture. It can also be used with non-
anamorphic pictures that will show a small
frame around in Normal mode.
One to one: With this setting the number of
visible screen pixels is adapted to the input sig-
nal, i.e. 1366 x 768 pixels are always repro-
duced by the PC picture for a screen resolution
of 1366 x 768 while e.g. the frequently used PC
graphics card resolution 1024 x 768 will fill the
height of the screen and keep big black bars on
the sides (as with a 4:3 video). This PC mode is
recommended for getting PC Pictures with opti-
mal performance.
Available picture formats for all other
video sources
Normal, Fill All, 16:9, 14:9: These are the
same settings as with TV and PC source
described above.
Auto zoom: This function is available with TV
and analog inputs only. With the SCART inputs
selected it evaluates the current picture format
and switches automatically between normal
mode and Fill All depending of the signal format
(4:3, 16:9) received and the settings for the
Aspect Ratio Detection made in the Scart Setup
menu (see page 29). With other analog inputs
selected, this function will sense black bars
around the movie and, after some seconds,
zoom it in all directions, filling the width of the
screen while keeping the aspect ratio of the
original.
This mode should be used for the full screen dis-
play of any non-anamorphic letterbox video
material (with a black frame around).
16:9 Top: Select with picture in letterbox format
as described above but with subtitles below. This
will zoom the video and shift it upwards.
14:9 Top: Select with same pictures as above
but with subtitles below. This will zoom the
video and shift it upwards.
Panorama: This format setting scales the input
signal automatically in horizontal direction to fit
the full screen, but not linearly. i.e. the picture
contents in the centre of the screen are dis-
played as the original and towards the edges
more intense scaling takes place. This mode can
be used to fill the screen horizontally with "4:3"
material without affecting the centre part of the
video too much.
0007CSK - DigitalLounge 632_640_646 ENG v11.qxp:0007CSK - DigitalLounge 632,640,646 UK 12/06/08 11:11 Side 43 (Sort/Black plade