


16 REMOTE CONTROL
Remote Control
W
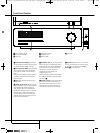
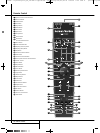
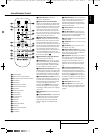
IR Transmitter Window: Point this window
towards the Digital Lounge system when pressing
buttons on the remote to make certain that
infrared commands are properly received.
X
Aspect Button: Press this button to scroll
through the available screen formats. The default
setting is Fill All.
Y
Screen Power Buttons: Use these buttons
to temporarily switch on or off the screen when
listening to audio-only sources. This could be
helpful for instance for scrolling through the con-
tents of MP3 discs or portable hard disk devices.
Z
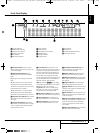
INFO: Press for detailed informations on the
disc playing (Video/Audio Bit rate, Movie aspect
ratio and others), and for current player settings
made. Press again to remove information from
screen.
a
Teletext Buttons: Press these buttons with
Teletext activated (by button
B
) to select the
different Teletext functions. Pressing the 100-
Button will always call up the main Teletext page.
Pressing the Sub Page Button consecutively will
scroll through the available sub pages of a page.
b
Picture in Picture Button: Press this button
once to activate the Picture in Picture function.
Press it again to activate the picture out of picture
function (split screen).
Note: When Picture in Picture is activated the
main picture can be selected by the numeric
buttons
S
(when TV tuner is source) and the
secondary picture by the PRESET Buttons
L
while pressing the PC or VIDEO button will toggle
through all available PC and Video sources as
secondary picture.
c
Mode Button: This button enables you to
switch the remote to another mode so that it
operates another device without selecting it as
the source. Each press of the Mode button
changes the remote’s mode in this order: TV,
DVD, VIDEO, PC, HDMI 1, HDMI 2 and HDMI 3.
And then back to TV again. The corresponding
Source Selector will light to indicate the mode.
Important Note: When toggling through the
resolution modes by pressing this button
repeatedly be sure to have your screen connected
via HDMI or Component cable, otherwise you will
not see a picture with the progressive or the HD
modes. Note that via HDMI the Standard
interlaced signals (480/576i) will not appear.
Important notes.
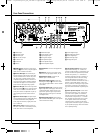
The large system remote control contains several
buttons that have more than one function. The
Set-up Button
8
is a good example. It can
both access the set-up menu of the TV and the
set-up menu of the DVD receiver. The final func-
tion of the button depends on the button pressed
prior to pressing the Set-up Button. Pressing the
TV, VIDEO or PC Source Selector Button
0
before the Set-up Button will access the TV
Set-up Menu. Pressing any of the other Source
Selector Buttons
0K
will access the Set-up
Menu of the DVD receiver.
There are two ways to switch on the system. For
those sources that require the screen to be
switched on (TV, DVD, VIDEO or PC), pressing
one of the System On/Source Selector Buttons
0
will power on the complete system.
For those sources that do not necessarily require
the screen to be switched on (CD, RADIO, AUX,
D-IN, USB 1 and USB 2) pressing one of the
Audio System On/Source Selector Buttons
K
will power on the DVD receiver and the speakers,
but will leave the screen in stand by mode. In this
mode the screen can be switched on and off
temporarily by pressing the Screen Power On or
Off Buttons
Y
.
For correct functioning of the remote control, it is
important NOT to switch on or off the DVD
receiver with the front panel Power On/Off
switch, but only to use the remote control's
System On
0K
and System Off
1
Buttons.
0007CSK - DigitalLounge 632_640_646 ENG v11.qxp:0007CSK - DigitalLounge 632,640,646 UK 12/06/08 11:10 Side 16 (Sort/Black plade