


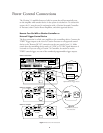
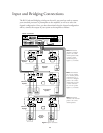


icons next to each pair of terminal posts will guide you to the correct connections.
When the connections are made, twist the cap back so that the connection is
secured, but do not overtighten or use tools, as this may break the delicate wire
strands and decrease system performance. Also, make certain that the wire strands
connected to one terminal do not contact the other terminal or wires. This will
result in a short circuit.
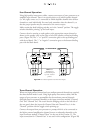
If you are using spade lugs, connect them to the wire using the manufacturer’s
instructions, and then loosen the caps on the speaker terminals. Place lugs between
the plastic cap and the back of the terminal, as if it were a horseshoe on the game’s
post. Be sure to observe proper polarity, using the appropriate speaker hookup
icons for your system’s configuration. Tighten with your fingers to obtain a
positive contact.
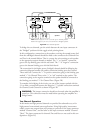
When banana plugs are permitted, connections may be made by simply inserting
the jack affixed to your speaker wire into the hole provided on the rear of the col-
ored screw caps on the binding posts. Before using banana-type jacks, make certain
that the plastic screw caps are firmly tightened down by turning them in a counter-
clockwise direction until they are snug against the chassis. This will insure that the
maximum surface area of the plug is in contact with the jack. Be certain to observe
proper polarity.
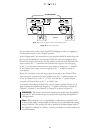
Finally, run the cables to the speaker locations. It is highly recommended that the
length of cable connecting any pair of speakers is identical. For example, make cer-
tain that the cable length connecting left and right front, or left and right rear (sur-
round) speakers are identical, even though one speaker may be physically closer to
the amplifier than the other. Do not coil any excess cable, as this may become an
inductor that creates frequency response variations in your system.
Finally, connect the wires to the speakers, again being certain to observe proper
polarity. Remember to connect your “negative” or “black” wire to the matching ter-
minal on the speaker. Similarly, the “positive” or “Red” wire should be connected
to the like terminal on the speaker.
Note: While most speaker manufacturers adhere to an industry convention of
using black terminals for negative and red ones for positive, some manufacturers
may vary from this configuration. To assure proper phase connections, and opti-
mal performance, consult the identification plate on your speaker terminals, or
the speaker’s manual to verify polarity. If you do not know the polarity of your
speaker, ask your dealer or installer for advice before proceeding, or consult the
speaker’s manufacturer.
18