


SW6 VGA Audio • Installation and Operation
Installation and Operartion, cont’d
2-10
SW6 VGA Audio • Installation and Operation
2-11
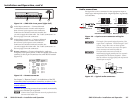
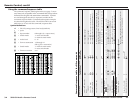
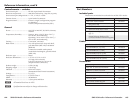
Audio level control
The audio level setting for the
selected input can be viewed
and changed (within a range of
-15 dB to +9 dB), to ensure that
there is no noticeable volume
difference among sources.
Adjusting the audio level
View or change the audio input
level as follows:
1
. Select an input.
2. Press and hold the Audio
Configuration/Save
button until the Audio
Configuration/Save LED
blinks. Release the button.
The Input LEDs indicate
the audio level. The +dB
and –dB LEDs display
the polarity (+ [gain] or
– [attenuation]).
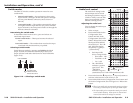
• Each Input LED
shows a range of 3 dB:
°
Slow blink = 1 dB
° Fast blink = 2 dB
° Lit = 3 dB
• The +dB LED lit
indicates a positive
(gain) level. The
–dB LED lit
indicates a negative
(attenuation) level. Both LEDs lit indicate 0 dB.
3
. Press and release the
>
(Input 5) or
<
(Input 6) buttons to
increase or decrease the audio level by 1 dB.
4
. Press and hold the Audio Configuration/Save button until
the Audio Configuration/Save LED goes out. Release the
button.
N
• There is one audio gain or attenuation setting per input.
The setting is shared by the left and right audio inputs.
• The input audio gain or attenuation settings are stored
in non-volatile memory. When power is removed and
restored, the audio level settings are retained.
Switch modes
The SW6 VGA Audio switcher operates in manual or auto
switch mode.
• Manual switch mode — Input selection is done using
Input buttons 1 through 6 on the front panel or through
the rear panel Remote connector (contact closure or
RS-232).
• Auto switch mode — The switcher automatically selects
the highest number input that has sync pulses available.
Input selection by the front panel switches or through the
Remote connector is blocked.
Determining the switch mode
To determine which mode is active, press and release an
unselected input button.
Normal switch mode — That input becomes the selected
input.
Auto switch mode — The switcher does not select the input
associated with the button that you pushed.
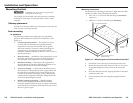
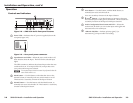
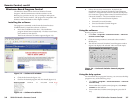
Selecting a switch mode
Switch between modes by pressing and holding the Mode
(Input 1 button) and either the Normal (Input 2) or Auto
(Input 3) button until either the Normal or Auto LED blinks
(figure 2-10).
Press and HOLD.
1 sec.
The blinking LED
indicates the mode.
Release the buttons.
Figure 2-10 — Selecting a switch mode
+dB
Input LED
dB
+9
+8
+7
+6
+5
+4
+3
+2
+1
0
-1
-2
-3
-4
-5
-6
-7
-8
-9
-10
-11
-12
-13
-14
-15
S
F
S
F
S
S
F
F
S
-dB
+dB
-dB
654321
654321
F
S
F
S
F
S
F
S
F
= off, = blinking slowly,
= blinking fast, = on