


RGB 109xi and RGB 112xi • Installation
Controls and Installation, cont’d
2-10
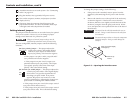
Through-desk mounting
To mount the interface through a desk or table using the
through-desk mounting kit (Extron part number 70-077-02), do
the following:
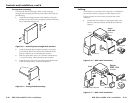
1. Attach the mounting brackets to the interface using four
machine screws and washers (supplied with the mounting
kit), as indicated in figure 2-8.
Figure 2-8 — Attaching the through desk brackets
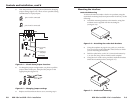
2. Using the through-desk template on page A-6 to guide
you, mark the four screw holes on the underside of the
surface to which you are mounting the interface.
3. Drill four pilot holes, each 3/32" (2.4 mm) in diameter by
1/4" (6.4 mm) deep, where marked on the template.
4. Using the four wood screws provided, attach the brackets
to the mounting surface, as shown in figure 2-9.
Figure 2-9 — Through-desk mounting
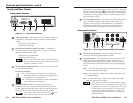
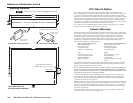
Cabling
Each interface can connect to the computer or workstation’s
local monitor and to a projector or other display device.
Figures 2-10 and 2-11 show how to connect each of the
interfaces.
1. Connect the local monitor’s video signal cable to the
interface connector labeled “Buffered Local Monitor
Output”.
PC
Monitor Projector
Sound System
Power
Local Monitor
or
O
U
T
P
U
T
SOG OUT
DDSP
SERR
SPARE
Rear
5
0
/
6
0
H
z
1
0
0
-
2
4
0
V
0
.
5
A
L
E
V
E
L
/
P
E
A
K
0
.
8
V
5
0
%
U
N
I
T
Y
0
.9
V
1
0
0
%
B
U
F
FE
R
E
D
L
O
C
A
L
M
O
NI
TO
R
O
U
T
P
U
T
IN
P
U
T
H
.
S
H
IF
T
R
G
B
109
x
i
V
G
A
IN
T
E
R
FA
C
E
W
/A
D
S
P
Front
Extron
RGB 109xi
Interface
I
D
P
I
N
4
I
D
P
I
N
1
1
Figure 2-10 — RGB 109xi installation
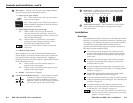
SUN or SGI Computer
Monitor
Projector
Sound
System
Power
or
O
U
T
P
U
T
SOG OUT
DDSP
SERR
SPARE
Rear
5
0
/
6
0
H
z
1
0
0
-
2
4
0
V
0
.
5
A
L
E
V
E
L
/
P
E
A
K
0
.
8
V
5
0
%
U
N
I
T
Y
0
.
9
V
1
0
0
%
B
U
F
F
E
R
E
D
L
O
C
A
L
M
O
N
I
T
O
R
O
U
T
P
U
T
I
N
P
U
T
H
.
S
H
I
F
T
R
G
B
1
1
2
x
i
V
G
A
I
N
T
E
R
F
A
C
E
W
/
A
D
S
P
Front
Extron
RGB 112xi
Interface
I
D
P
I
N
4
ID
P
IN
1
1
or
MFTA
Figure 2-11 — RGB 112xi installation
RGB 109xi and RGB 112xi • Installation
2-11