4
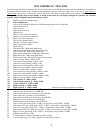
DTS SYSTEM TEST
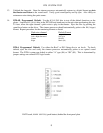
6. Index Switch. A small black momentary push button switch located below the TIMECODE HEAD
OFFSET
switches (behind the plate and under the LEDs). It is commonly called the “index switch”.
This button can be used to increment to the next track being played. This feature works on the DTS
6-TRACK SET UP
discs RevC and Rev.DS1 only. On shows of serial number 1009 and higher, the
momentary button also bypasses the DTS processor to allow checking of the optical bypass function.
NOTE: All DTS-6D units have this switch, but all DTS-6 units under serial number 1000 do not.
The index switch can be added by installing DTS kit D475.
7. Mono Surround. For those theaters with mono surround only, wait for either the left -or- the right
surround PINK noise when adjusting the MONO SURR trimpot for 82dB SPL.
8. Subwoofer. The DTS subwoofer output level ranges from 20Hz to 80Hz.. Observation of your
subwoofer’s specifications must be taken to avoid damage to the speaker. If a subwoofer is
driven below its cutoff frequency, its driver may become unloaded. When unloaded, the voice coil
can travel outside of the magnet’s gap, thus overheating or causing mechanical damage to the
speaker. A high pass filter should be installed on those speakers with high cutoff frequencies.
Contact the speaker’s manufacturer for details.
DTS Subwoofer in the Surrounds?
The DTS subwoofer signal is derived by filtering out the surround signals from 80Hz and below.
That signal is put on its own “subwoofer” output on the DTS player. You may verify this while
tuning (EQ-ing) a theater. Insert the DTS Setup disc into the player and play the subwoofer pink
noise off the disc. Turn off the subwoofer speaker and look at the pattern on the RTA (real time
analyzer)
. On a DTS-6D, you’ll see a dramatic roll-off at 80Hz (on a DTS-6, its less of a roll-off). It is
normal to hear DTS subwoofer, above 80Hz, in the surrounds. For that reason, you may choose to
turn off the surrounds when adjusting the DTS subwoofer SPL.
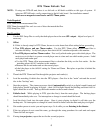
9. Remove the Setup Disc and insert the “Buzz and Bill Show” Disc. Once threaded and the DTS
“SYSTEM” light flashes, start running the DTS demo film.
10. Verify the DTS system automatically switches the cinema processor to the correct sound format
and the DTS digital sound track is playing:
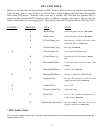
* The DIGITAL, CD-ROM, and TIMECODE lights on the player should be on steady
* The
SYSTEM light on the player should be flashing
* The
CD-ROM drive light (that is playing the disc) should be flashing sporadically
* The green light on the reader should be glowing steadily and not flashing
11. Verify the digital sound track is playing by turning off the (sound) exciter lamp. The sound track
should still be heard. Once verified, turn the exciter lamp back on.
12. Fail-safe. Block the timecode and verify the cinema processor automatically switches to a stereo
optical (sound) format. There should not be a significant level difference between optical and digital
sound (in a quite scene). If there is, recheck the “B” chain and the DTS player level settings.


