


17
ENGLISH
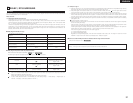
NOTES:
• When you adjust the channel levels while in the SYSTEM
SETUP CHANNEL LEVEL mode, the channel level
adjustments made will affect ALL surround modes.
Consider this mode a Master Channel Level adjustment
mode.
• After you have completed the SYSTEM SETUP
CHANNEL LEVEL adjustments, you can then activate the
individual surround modes and adjust channel levels that
will be remembered for each of those modes. Then,
whenever you activate a particular surround sound mode,
your preferred channel level adjustments for just that
mode will be recalled. Check the instructions for
adjusting channel levels within each surround mode on
page 23.
[5] After completing system setup
• Once the speaker settings, delay time setting and channel
level adjustments are made, there is no need to reset them
unless the AV components or speakers are changed or the
speakers are moved to different positions.
• Change the DVD auto power off settings as necessary.
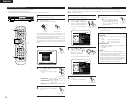
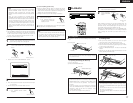
1
At the SYSTEM SETUP MENU,
press the SETUP button.
• The changed settings are
entered and the on-screen
display turns off.
SETUP
Remote control unit
This button can be pressed at any time during the system
setup process to complete the process.
NOTE:
• If the quick system settings are selected after setting up
the system using the system setting change menu, the
speaker and delay time settings are changed to the
values preset for the quick system settings.
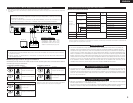
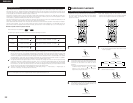
[4] Setting the DVD auto power off
• The ADV-1000 is equipped with a function that automatically
switches the power to standby if no operation is performed
for 30 minutes while in the stop mode with the function set
to DVD. Here, set whether to turn this function on or off.
• The factory default setting is “NO”.
1
2
To perform these operations from places other than the
system setting change menu, see page 15.
• At the “SYSTEM SETUP MENU” screen, select
“DVD AUTO POWER OFF” and press the ENTER
button.
ENTER
Remote control unit Remote control unit
• Switch to the “DVD AUTO POWER OFF” screen.
B
FINISH: ENTER BUTTON
DVD AUTO POWER OFF
SELECT :
YES NO
(DVD FUNCTION ONLY)
AUTO POWER OFF
\
11
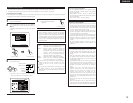
PLAYBACK
(1) Before Operating
2
MENU
FUNCTION
DISPLAY RETURN INPUT MODE SURROUND
TV/VCR
CH
VOL
SLEEP
ON
OFF
2
3
4
56
8
9
CLEAR
CALL
0
+10
7
1
VCR POWERVCR POWER
TV POWERTV POWER
TV
VCR
POWERPOWER
CH
CH
CH
2
1
2
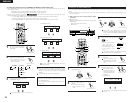
Refer to “CONNECTIONS” (pages 6 to 9) and check
that all connections are correct.
Turn on the power.
Press the POWER
button.
ON / STANDBY
ON
POWER
Light
(green)
Main unit
Remote control
unit
When pressed, the power turns on and the display lights. The
sound is muted for several seconds, after which the unit
operates normally. When pressed again, the power turns off,
the standby mode is set and the display turns off.
Whenever the ON/STANDBY button is in the STANDBY state,
the apparatus is still connected on AC line voltage. Please be
sure to unplug the cord when you leave home for, say, a
vacation.
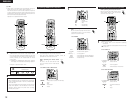
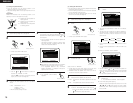
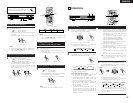
(2) Loading Disc
2
Set discs in the disc tray with the labeled (printed) side facing
up.
C
8
1
:
0
2
:
4
6
D
V
D
A
U
T
O
D
IG
D
IG
IT
A
L
8 cm disc guide
Disc tray
12 cm disc guide
NOTE:
• Do not move the this unit while a disc is playing. Doing so
may scratch the disc.
(1) Opening and Closing the Disc Tray
q Turn on the power.
w Press the OPEN/CLOSE button.
C
8
1
:
0
2
:
46
D
V
D
A
U
T
O
D
IG
D
IG
I
T
A
L
Disc tray
Power button
OPEN/CLOSE button
NOTES:
• Even when the power is in the standby mode, when the
OPEN/CLOSE button is pressed, the ADV-1000’s power
turns on and the disc tray operates. (Auto power on
function)
• Even if the function is set to something other than DVD,
when the OPEN/CLOSE button is pressed, the function
switches to DVD and the disc tray operates. (Auto
function select function)
• Do not strike on the button with a pencil, etc.
(2) Loading Discs
• Pick up the disc carefully so as not to touch the signal
surface and hold it with the labeled side facing up.
• With the disc tray fully open, set the disc in the disc tray.
• Set 12 cm discs in the outer tray guide (Figure 1), 8 cm discs
in the inner tray guide (Figure 2).
• Press the OPEN/CLOSE button. The disc is automatically
loaded.
• The disc tray can also be closed automatically to load the
disc by pressing the PLAY button.
C 8 1:02:46
DV
D
A
U
T
O
DIG
D
IG
ITA
L
Figure 1
Outer disc tray
12 cm disc
C 8 1:02:46
DV
D
A
U
T
O
DIG
D
IG
ITA
L
Figure 2
Inner disc tray
8 cm disc
NOTES:
• If a foreign object is caught in the disc tray during closing,
simply press the OPEN/CLOSE button again and the tray
will open.
• Do not press the disc tray in by hand when the power is
off. Doing so will damage it.
• Do not place foreign objects in the disc tray. Doing so will
damage it.
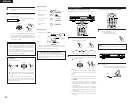
3
Select “YES” or “NO”.
• YES: The auto power off function is active when the function
is set to DVD.
• NO: The auto power off function does not work.
4
Enter the setting.
• The SYSTEM SETUP MENU
reappears.
ENTER
Remote control unit