


DPH910 11
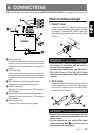
6. CONNECTIONS
Note: Please read this chapter referring to “2. INDENTIFICATION OF PARTS” at the beginning of this manual.
How to make wirings
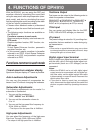
1. CeNET Cable
Orient the CeNET 3 cable in the direction
shown in the figure and insert it until it is locked
in position. To remove the CeNET cable, pull
it by lightly grasping the slide cap A in your
fingers.
CAUTION
• Wire the CeNET cable so that there is mini-
mal tension in the cable, and the connec-
tion part will not come off.
• To extend the CeNET cable, use either CCA-
520 (98.4˝/2.5m) or CCA-521 (23.6˝/0.6m)
(both are separately sold CeNET extension
cables.).
2. RCA Cable
Attach the supplied name plate 2 on the RCA
cable to show where to connect it. After check-
ing where to connect it from the name plate,
connect the RCA cable.
F
R
O
NT
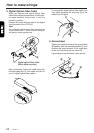
CAUTION
• Do not remove the insulating cap of the RCA
cable that is not to be connected, to prevent
short-circuit.
• Fix the connection part of the RCA cable
with insulating tape
BB
BB
B so that it will not
come loose and disconnect.
FRONT
REAR
FRONT
REAR
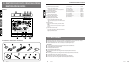
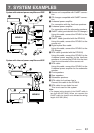
1
3
5
6
2
4
DPH910
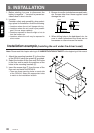
1 RCA cable (2)
Connect it to the source unit’s front input ter-
minals (gray) to use the source unit’s built-in
amplifier or to the amplifier’s front input ter-
minals.
2 RCA cable (2)
Connect it to the source unit’s rear input ter-
minals (black) to use the source unit’s built-in
amplifier or to the amplifier’s rear input termi-
nals.
3 RCA extension cable (sold separately)
Connect it to the subwoofer amplifier.
4 CeNET cable (3)
Connect it to the source unit, CD changer or
MD changer.
5 Digital optical fiber cable (sold separately)
Connect it to the source unit, CD changer or
MD changer.
6 Ground lead (4)
Connect it to vehicle chassis ground.