


25 Sp
Advertencias de
seguridad generales
para herramientas
eléctricas
(continuación)
s) Asegúrese de que el cable
esté ubicado de tal manera
que nadie lo pise ni se
tropiece con él, y que no esté
sujeto de alguna otra manera
a algún daño o tensión.
t) No guarde el cargador ni la
batería en lugares donde la
temperatura pueda alcanzar
o exceder los 120ºF (49ºC),
como un cobertizo para
herramientas de metal o un
automóvil en verano. Esto
puede provocar el deterioro
de estos componentes.
u)Para lograr una carga óptima
de la batería, la carga se debe
realizar a temperaturas
entre 32°F y 86°F (0°C a 30°C).
El cargar la batería fuera de
este rango recomendado
puede afectar el rendimiento
de la batería de manera
adversa.
v)No cargue la batería en
lugares mojados ni húmedos.
w) No cargue la batería si se
siente caliente al tacto.
Espere que se enfríe.
x)Como esta herramienta está
equipada con baterías de
níquel-cadmio, la batería
debe reciclarse o desecharse
de manera que no dañe el
medio ambiente. Consulte al
Departamento de Obras
Públicas de su condado para
obtener información sobre
cómo reciclar baterías de
níquel-cadmio. Antes de
desecharla, aísle los
terminales metálicos de la
batería cubriéndolos en forma
segura con cinta aisladora
resistente para evitar un
posible cortocircuito.
y)No incinere la batería ya que
podría explotar en el fuego.
5) Servicio
Haga que una persona
calificada en reparación le
realice el servicio a su
herramienta eléctrica usando
únicamente piezas de repuesto
idénticas. Esto asegurará que se
mantenga la seguridad de la
herramienta eléctrica.
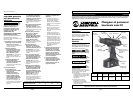
Funcionamiento de
la herramienta
La fuente de energía de este taladro
proviene de las baterías que se
proporcionan. Es importante que el
usuario comprenda lo siguiente a fin
de obtener el mayor rendimiento de la
batería y del cargador de la batería.
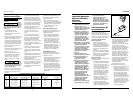
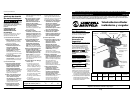
Instalación / Remoción de la
batería del taladro
• Para instalar la batería en el
taladro, introduzca la porción
protuberante de la batería dentro
del mango del taladro. Empuje la
batería hasta que escuche que la
misma queda enganchada en el
taladro.
• Para retirar la batería del taladro,
presione los dos botones circulares
(estriados) que se encuentran en la
batería y luego tire de la batería
para separarla del taladro.
Carga de la batería
Instalación / Remoción de la batería del
cargador de batería
• La batería está diseñada para que
únicamente calce en el cargador
en una sola orientación, por lo
tanto, no hay ningún motivo para
forzar la batería dentro del
cargador. Para instalar la batería
en el cargador, introduzca la
parte protuberante de la batería
dentro del cargador. La saliente
en uno de los lados de la batería
debe quedar alineada con la
muesca en el cargador de la
batería. Una vez que se realiza
esta alineación, empuje
suavemente la batería hasta que
toque el fondo en el cargador.
• Para retirar la batería del
cargador, simplemente tire de la
batería en dirección vertical hacia
afuera del cargador de batería.
Carga inicial
Antes de usar el taladro por primera
vez, cargue la batería por completo.
Para hacer esto enchufe primero el
cargador de la batería en un
suministro de corriente de 120V (60
Hz) e introduzca la batería
totalmente dentro del cargador,
prestando atención a que la saliente
de la batería quede orientada de
modo que calce en la muesca del
cargador de la batería. Cuando se
presiona suavemente la batería para
que la misma toque el fondo del
cargador, la luz roja del cargador
debería iluminarse. Esto indica que
la batería se está cargando. Una vez
que la batería esté totalmente
cargada, se debería iluminar la luz
verde del cargador. Este proceso de
carga debería llevar
aproximadamente una hora.
Notas adicionales sobre la carga
• Durante el uso normal, la batería
perderá eventualmente su
capacidad y cuando esto suceda,
habrá una diferencia notoria en
el rendimiento del taladro. Es en
este momento que la batería
está casi descargada y debe
volver a cargarse. Si la batería
está tibia o caliente al tacto, deje
que se enfríe antes de colocarla
en el cargador. Esto permitirá
que la batería acepte una carga
completa mientras que no podrá
hacerlo si se introduce en el
cargador mientras tiene una
temperatura elevada.
DG201900CK
Carga Rápida y Batería
General Driving
Screws Instructions
Safety
glasses
must be worn during driving
operations.
Always
be alert
and brace yourself against the twisting
action of the drill. A firm hold should
always be administered when driving
screws. Failure to do so may result in
bodily injury.
• Drill a pilot hole of a size
recommended by the screw
manufacturer prior to driving the
screws in place.
• Adjust the drill’s chuck collar so that
arrow on the drill body points to the
desired torque setting. A lower
number will cause the drill to ratchet
sooner, that is, it will not drive the
screw into the workpiece as far as if
a higher clutch collar setting is used.
• Set the speed selector to the low
speed “1” setting.
• Install the proper screwdriver bit and
insure that this bit is securely
gripped in the chuck.
• Make sure that the FWD button is
fully depressed. This should make
the drill rotate in the forward
direction, that is, clockwise as
viewed from the user’s vantage
point.
•
Make
sure that the workpiece is secured.
This might entail clamping it in a vise
or held securely by other clamping
means. A loose workpiece may spin
and cause bodily injury.
• Using one’s fingers, place the tip of
the screw in the pilot hole and turn
clockwise so as to start the screw
squarely.
• Place a properly-sized screwdriver bit
on the screw and while exerting
pressure on the drill, actuate the
switch trigger to drive the screw in
place. It is important that the screw
be driven squarely from the start, so
a constant square pressure should be
administered in order to drive the
screw properly in place. If too little
pressure is put on the drill during
this driving operation, the
screwdriver bit may not be retained
in the screw head- this could
damage or strip the end of the
screw.
• As soon as the screw has been
seated, release the switch trigger
and lift the screwdriver from the
screw head. If the drill ratchets
before driving the screw to the
desired depth, remove the drill from
the screw head and increase the
clutch collar setting. Then repeat the
driving process.
• A lubricant, such as soap or wax,
may be used on screw threads for
ease of driving. This is particularly
important when dealing with hard
wood.
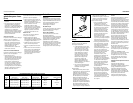
• Screws are typically comprised of a
threaded section, a shank section in
which there are no threads, and the
screw head. Sometimes it is
advantageous to drill
holes/countersinks in one operation
and there are different combination
bits (e.g. pilot drill/shank, pilot drill
bit/countersink, etc.) available at
local supply houses for doing these
combinations.
Driving Wood Screws
In addition to the guidelines given in
the General Driving Instructions, the
following also apply:
• Prior to driving a wood screw in
place, it is recommended that a pilot
hole (and shank hole if necessary) be
first drilled. See the table below for
recommendations when using
common screw sizes.
Driving Self-tapping Screws
In addition to the guidelines given in
the General Driving Instructions, the
following also apply:
• Prior to driving the self-tapping
screw in place, drill a pilot hole of
the recommended size by the
manufacturer. Place the tip of the
screw in the pre-drilled hole and
while gently holding the screw
square, slowly start driving the
screw. Once it has properly started,
discontinue holding the screw
threads and finish driving the screw.
As soon as the screw is seated,
release the switch trigger and lift
the drill from the screw head.
Driving Machine Screws
In addition to the guidelines given in
the General Driving Instructions, the
following also apply:
• Prior to driving the machine screw in
place, drill and tap a hole of the
recommended size by the
manufacturer. Start the threads of
the screw in the tapped hole by
hand and once squarely in place,
discontinue holding the screw and
then start to slowly drive the screw
with the driver. Once the screw has
been fully seated, release the switch
trigger and lift the drill from the
screw head.
8
Operating Instructions
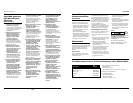
RECOMMENDATIONS FOR DRIVING WOOD SCREWS
SCREW PILOT DRILL DIAMETER SHANK SCREWDRIVER BIT TIP
SIZE (FOR SOFT WOOD) (FOR HARD WOOD) PILOT HOLE SLOTTED BIT PHILLIPS BIT
#6 1/16" (0.063") 5/64" (0.078") 9/64" (0.141") 3/16" #2
#8 5/64" (0.078") 3/32" (0.094") 11/64" (0.172") 1/4" #2
#10 3/32" (0.094") 7/64" (0.109") 3/16" (0.188") 5/16" #2 OR #3*
#12 7/32" 0.219") 1/8" (0.125") 7/32" (0.219") 3/8" #3
* Some head styles in this size take a #2 Phillips bit and others #3.