


29 Sp
Instrucciones
generales para
atornillar tornillos
(continuación)
•
Asegúrese de que la pieza de
trabajo esté asegurada.
Esto puede implicar sujetarla
en una prensa o sostenerla con
seguridad por otro medio de
sujeción. Una pieza de trabajo
floja puede girar y causar
lesiones corporales.
• Usando sus dedos, coloque la punta
del tornillo en el orificio piloto
y gírelo hacia la derecha para
comenzar a atornillarlo
perpendicularmente.
• Coloque la punta del destornillador
del tamaño adecuado sobre el
tornillo mientras ejerce presión
sobre el taladro, active el gatillo
para atornillar el tornillo en su lugar.
Es importante que el tornillo se
atornille perpendicularmente desde
el inicio, por lo tanto se debe aplicar
una presión perpendicular constante
para atornillar el tornillo
adecuadamente en su lugar. Si se
ejerce muy poca presión sobre el
taladro durante esta operación de
atornillado, puede que la punta del
destornillador no permanezca sobre
la cabeza del tornillo, esto podría
dañar o estropear el extremo del
tornillo.
• En cuanto el tornillo quede apoyado,
suelte el gatillo y levante el
destornillador de la cabeza del
tornillo. Si el taladro se desembraga
antes de atornillar el tornillo hasta la
profundidad deseada, retire el
taladro de la cabeza del tornillo y
aumente el valor del collar de
embrague. Luego repita el proceso
de atornillado.
• Se podrá usar un lubricante, como
jabón o cera, sobre las roscas de los
tornillos para atornillar con más
facilidad. Esto es particularmente
importante cuando se trabaja con
maderas duras.
• Generalmente los tornillos están
compuestos por una sección roscada,
una sección de espiga en la que no
hay roscas y la cabeza del tornillo.
En ocasiones es preferible taladrar
orificios/avellanados en una
operación, y hay diferentes brocas
de combinación (por ej. brocas para
orificios piloto/de paso, brocas para
orificios piloto/avellanados, etc.)
disponibles en las tiendas de
suministros locales para hacer estas
combinaciones.
Cómo atornillar tornillos para
madera
Además de las pautas proporcionadas
en las instrucciones generales de
atornillado, también se aplica lo
siguiente:
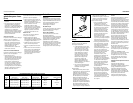
• Antes de atornillar en su lugar un
tornillo para madera, se recomienda
que se perfore un orificio piloto
(y un orificio avellanado si es
necesario). Consulte la tabla que
aparece a continuación para ver las
recomendaciones cuando se utilizan
tamaños comunes de tornillos.
Cómo atornillar tornillos
autorroscantes
Además de las pautas proporcionadas
en las instrucciones generales de
atornillado, también se aplica lo
siguiente:
• Antes de atornillar en su lugar el
tornillo autorroscante, taladre un
orificio piloto del tamaño
recomendado por el fabricante.
Coloque la punta del tornillo dentro
del orificio pretaladrado mientras
sostiene suavemente el tornillo en
posición perpendicular, comience a
atornillar lentamente el tornillo.
Una vez que se haya iniciado
adecuadamente, deje de sostener las
roscas del tornillo y termine de
atornillarlo. En cuanto el tornillo
quede apoyado, suelte el gatillo y
levante el taladro de la cabeza del
tornillo.
Cómo atornillar tornillos para
metales
Además de las pautas proporcionadas
en las instrucciones generales de
atornillado, también se aplica lo
siguiente:
• Antes de atornillar en su lugar el
tornillo para metales, taladre y
rosque un orificio del tamaño
recomendado por el fabricante.
Comience a atornillar con la mano
las primeras roscas del tornillo en el
orificio roscado y una vez que esté
perpendicularmente en su lugar,
deje de sostener el tornillo y
comience a atornillarlo lentamente
con el destornillador. Una vez que el
tornillo quede apoyado totalmente,
suelte el gatillo y levante el taladro
de la cabeza del tornillo.
Cómo quitar tornillos
Para quitar un tornillo de una pieza de
trabajo, siga los siguientes pasos:
• Coloque el collar de embrague
ajustable en su valor más alto y fije
el selector de velocidad en su valor
más bajo “1”.
• Instale la punta de destornillador
adecuada en el portabrocas del
taladro.
• Presione totalmente el botón de
retroceso (REV).
• Coloque la punta de destornillador
en la cabeza del tornillo y ejerciendo
suficiente presión sobre el taladro
como para que no zafe de la cabeza
del tornillo, encienda el taladro para
retirar el tornillo.
DG201900CK
4
General Power Tool
Safety Warnings
(Continued)
h)When the battery pack is not
in use, keep it away from
metal objects such as paper
clips, coins, keys, nails,
screws, or the like so there is
no risk of the battery
terminals being connected
(that is, “shorted”) together.
Shorting the battery terminals
together may cause sparks,
burns, a fire, a shock, or damage
to the battery.
i) Do not use if the chuck jaws
or other parts are cracked or
worn.
j) Verify the drill’s rotation
before starting to drill/drive,
so that it is correct for the
operation being performed.
k)Do not use the drill as a
router or try to elongate or
enlarge holes by twisting the
drill. Drill bits may break and
cause injury.
l) Each drill is equipped with a
chuck capable of handling
bits up to a certain size. For
the DG2019 drill, bits with
shaft diameters greater than
3/8" [10mm] should not be
used.
m) Ensure the switch is in the
off position before inserting
the battery pack. Inserting the
battery pack into power tools
that have the switch on invites
accidents.
n)Recharge the battery pack
only with the charger
supplied with this tool. A
charger that is suitable for one
type of battery pack may create
a risk of fire when used with
another battery pack.
o)Use this drill only with the
supplied battery pack or the
recommended replacement
pack as specified by the
manufacturer. Use of any other
battery packs may create a risk
of injury or fire.
p)Charge the battery pack in a
well-ventilated area. Do not
allow any object to cover the
charger and/or battery pack
while charging.
q)Do not operate the battery
charger if its plug or cord has
been damaged. If these
components are damaged,
have them replaced
immediately by a qualified
repair person.
r) Do not operate the charger if
it has been dropped, received
a sharp blow, or otherwise
been damaged. If damaged,
have it serviced by a
qualified repair person.
s) Make sure the cord is located
so that it will not be stepped
on, tripped over, or
otherwise subjected to
damage or stress.
t) Do not store the battery
charger or battery pack in
locations where the
temperature may reach or
exceed 120°F [49°C], such as
in a metal tool shed or in a
car during the summer. This
can lead to deterioration of
these components.
u)For optimal charging of the
battery pack, charging should
take place in temperatures
ranging from 32°F to 86°F
[0°C to 30°C]. Charging the
battery pack outside this
recommended range can
adversely affect the battery’s
performance.
v)Do not charge the battery
pack in damp or wet
conditions.
w) Do not charge the battery
pack if it feels hot to the
touch. Wait for it to cool.
x)Since this tool is equipped
with nickel-cadmium
batteries, the battery pack
must be recycled or disposed
of in an environmentally
sound manner. Check with
your county’s Public Works
Department for information
on recycling nickel-cadmium
batteries. Prior to disposal,
insulate the metal battery
pack terminals by covering
them securely with heavy
insulating tape in order to
prevent any possible
shorting.
y)Do not incinerate the
battery pack as it may
explode in a fire.
5) Service
Have your power tool
serviced by a qualified repair
person using only identical
replacement parts. This will
ensure that the safety of the
power tool is maintained.
Tool Operation
The power source for this drill comes
from the supplied battery packs. It is
important that the user understand
the following in order to get the most
of the battery pack and the battery
charger.
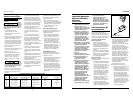
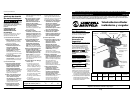
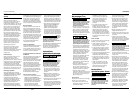
Installing / Removing the Battery
Pack to / from the Drill
• In order to install the battery pack to
the drill, insert the tower potion of
the pack into the drill handle. Push
the battery pack until you hear the
pack latching to the drill.
• In order to remove the battery pack
from the drill, depress both of the
circular (ribbed) buttons on the pack
and then pull the pack from the
drill.
Operating Instructions