


28 Sp
Manual de Instrucciones
Instrucciones
generales de
taladrado
(continuación)
• Cuando la broca haya penetrado la
pieza de trabajo por completo y esté
girando libremente, retírela de la
pieza de trabajo mientras el motor
aún está en funcionamiento y luego
apague el taladro.
Cómo perforar madera
Además de las pautas proporcionadas
en las instrucciones generales de
taladrado, también se aplica lo
siguiente:
• Cuando taladre madera más blanda,
generalmente se usan velocidades
más altas.
• Cuando taladre madera usando una
broca helicoidal, retírela
frecuentemente del orificio para
quitar las láminas que se acumulan
en las estrías. Esto ayuda a evitar el
sobrecalentamiento y quemar el
material a la vez que acelera el
proceso de taladrado.
• Si se utiliza un bloque de apoyo para
que la parte trasera de la pieza de
trabajo no se astille, sujételo en su
lugar en forma segura. Si no se usa
un bloque de apoyo con las brocas
de paleta o brocas de campana,
libere la presión ejercida sobre el
taladro en cuanto la punta de la
broca perfore la pieza de trabajo.
Quite la broca y usando el orificio de
salida, vuelva a colocar la broca en el
lado opuesto de la pieza de trabajo y
termine la operación de taladrado.
Taladrado en metal
Además de las pautas proporcionadas
en las instrucciones generales de
taladrado, también se aplica lo
siguiente:
• Use únicamente brocas para alta
velocidad, de buena calidad y
afiladas cuando taladre metal.
• Cuando se taladra metal,
generalmente se usan velocidades
más bajas. Cuanto más duro sea el
material, más baja debe ser la
velocidad de taladrado.
• Comience a taladrar con una
velocidad baja y aumente
paulatinamente la velocidad a
medida que el taladro corta.
• Cuando taladre un orificio grande,
es más fácil perforar primero un
orificio más pequeño (piloto) y
después agrandarlo al tamaño
necesario.
• El uso de un lubricante, como el
aceite, en la punta del taladro ayuda
a mantener la broca fría, aumenta la
acción de perforación y prolonga la
vida útil de la broca.
Instrucciones
generales para
atornillar tornillos
Se
deben usar gafas de seguridad
durante las operaciones de
atornillado.
Siempre
esté
atento y contrarreste la acción
giratoria del taladro. Cuando se
atornillen tornillos siempre debe
usarse un asimiento firme. El no
hacerlo podría ocasionarle lesiones
corporales.
• Perfore primero un orificio piloto
del tamaño recomendado por el
fabricante del tornillo antes de
introducir el tornillo en su lugar.
• Ajuste el collar del portabrocas del
taladro de modo que el cuerpo del
taladro apunte al valor de torsión
deseado. Un número más bajo hará
que el taladro se desembrague más
pronto, es decir, no atornillará el
tornillo en la pieza de trabajo hasta
la profundidad que lo haría si se
usara un valor más alto en el collar
de embrague.
• Ajuste el selector de velocidad al
valor de velocidad bajo “1”.
• Instale la punta adecuada del
destornillador y asegúrese que esta
punta esté fijada con seguridad en
el portabrocas.
• Asegúrese de que el botón de
avance (FWD) está totalmente
presionado. Esto hará que el taladro
gire en la dirección de avance,
es decir, hacia la derecha cuando
se mira desde el punto de vista del
usuario.
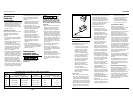
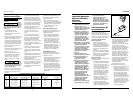
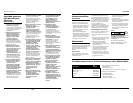
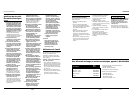
RECOMENDACIONES PARA ATORNILLAR TORNILLOS PARA MADERA
TAMANO DIÁMETRO DE BROCAS
DEL PARA ORIFICIOS PILOTO ORIFICIO PUNTAS DE DESTORNILLADOR
TOMILLO (MADERA BLANDA) (MADERA DURA) PILOTO AVELLANADO PUNTA DE PALETA PUNTA PHILLIPS
#6 1/16" (0.063") 5/64" (0.078") 9/64" (0.141") 3/16" #2
#8 5/64" (0.078") 3/32" (0.094") 11/64" (0.172") 1/4" #2
#10 3/32" (0.094") 7/64" (0.109") 3/16" (0.188") 5/16" #2 or #3*
#12 7/32" 0.219") 1/8" (0.125") 7/32" (0.219") 3/8" #3
* Algunos estilos de cabeza en este tamaño requieren una punta Phillips Nº2 y otros Nº3.
Tool Operation
(Continued)
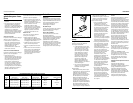
Charging the Battery Pack
Installing/Removing the Battery Pack
from the Battery Charger
• The battery pack is designed
so that it can only fit into the
charger in one orientation,
therefore, there is no reason
to force the pack into the
charger. To install the battery
pack in the charger, insert the
tower end of the pack into
the charger. The protruding
rib on one side of the battery
pack should be aligned with
the notch in the battery
charger. Once this alignment
is done, lightly push the
battery pack until it bottoms
out in the charger.
• To remove the battery pack
from the charger, simply pull
the battery straight out of the
battery charger.
Initial Charging
Before using this drill for the first
time, charge the battery fully. This
can be done by first plugging the
battery charger into a 120V (60 Hz)
power supply and then inserting the
battery fully into the charger, noting
that the battery pack rib is oriented
so that it fits into the notch of the
battery charger. When the battery
pack is pressed slightly so that the
pack bottoms out in the charger, the
red charger light should then
illuminate. This indicates that the
battery is being charged. Once the
pack is fully charged, the green
charger light should illuminate. This
charging process should take
approximately one hour.
Additional Charging Notes
• During normal use, the
battery pack will eventually
lose its capacity and when this
happens, there will be a
noticeable difference in the
drill’s performance. It is at this
point that the battery pack
approaches its discharged
state and needs to be
recharged. If the pack is
warm-hot to touch, let the
battery pack cool down
before placing it in the
charger. This will allow the
pack to accept a full charge
whereas it might not do so if
inserted in the charger in an
elevated-temperature state.
• With the type of battery
supplied with this drill, that is
Ni-Cd or Nickel Cadmium type,
it is best that they are charged
when close to its discharged
state. This is the point where
there is a noticeable
difference in the performance
of the drill. If the pack is
placed in the charger before it
reaches this state, there is a
possibility that the
capacity/life of the battery
pack may not be optimized. It
is also important to note that
a battery pack should not be
discharged past the
performance-noticeable state
mentioned above as this
might irreversibly damage the
battery pack.
• Lastly in order to get the most
out of your battery pack, it is
highly recommended that the
packs not remain in the
charger for more than 3
hours. So once fully-charged
(indicated by the green
charger light illuminating), it
is best to remove the battery
pack at or near that point.
Forward/Reverse Button
This drill is equipped with a
forward/reverse (red) button which is
used to change the direction of
rotation of the drill chuck/bit. It is
recommended that the user check the
direction of rotation prior to
performing the work. If the FWD
button is firmly depressed from the
right side of the drill when the user
holds it, the rotation of the drill will be
in the forward direction, or clockwise
when viewing the chuck from a user
viewpoint. This is the recommended
rotational direction for drilling holes
or driving screws. By firmly depressing
the REV button (on the left side of the
tool), the rotation of the drill will be
counterclockwise. This direction of
rotation is recommended for removing
screws. It is also useful if a drill bit has
been stuck when drilling in the
forward direction.
Do not attempt to change the rotation
unless the drill chuck is completely
stopped. Failure to do so can damage
the tool.
If the FWD/REV button is centered in
the drill housing, that is, not fully
depressed to either side, then the
switch trigger should be locked in the
“OFF” position.
Variable-Speed Switch Trigger
This drill is equipped with a variable-
speed switch. By applying more
pressure to the (red) switch trigger, the
speed of the drill will increase.
Releasing pressure will slow the drill.
This accurate speed control allows the
user to slowly start drilling a hole
without center-punching, or slowly
start driving screws, before increasing
the operational rate.
5
Charger and Battery
DG201900CK