


English
7
Operation
For best results, do not install or operate this unit near conditions of
heat, moisture, dust, or heavy vibrations. (Note: Bright fluorescent lights
may affect the visibility of the speed-indicating strobe dots. If this is a
problem, simply cover the area with your hand, an album cover, etc.)
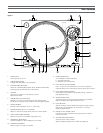
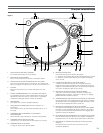
Preparing to Play
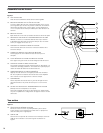
1. Remove the stylus guard from the stylus assembly and unlock the
tone arm rest if it is locked.
2. Turn the power dial to the ON position. The speed selector and
strobe illuminator will light up.
3. If desired, push the stylus target light button to raise and turn on
the light for illumination of the stylus tip position on the record.
4. Place a record on the slip mat, lining up its center hole with the
center spindle. For 45RPM records, place the 45 RPM adapter on
the center spindle before placing the record on the platter.
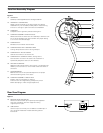
5. Set the platter rotation speed (33/45/78) to match that of the
record. (Note: To set the platter speed for 78 RPM, push both the
33 and 45 RPM buttons simultaneously.)
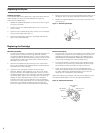
Playing the Record
1. Press the start/stop button; the platter begins to rotate.
2. Raise the tone arm by lifting the tone arm lift control lever to the
UP position.
3. Position the tone arm over the desired location (groove) on
the record.
4. Lower the tone arm by moving the tone arm lift control lever to
the DOWN position. The tone arm descends slowly onto the
record and play begins.
– or –
Use the finger-lift on the headshell assembly to position the tone
arm over the desired location on the record. Carefully lower the
tone arm to the record surface.
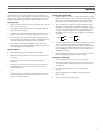
Checking and Adjusting Pitch
1. If desired, select a +/– 10% or +/– 20% pitch adjustment range by
pressing the pitch button. Then move the pitch adjust slide control
up or down to make pitch adjustments. (Note: The pitch adjust
slide control has center detent position for 0% pitch variation.)
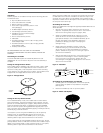
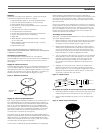
2. As illuminated by the red light coming from beneath the power
dial, observe the strobe dots on the edge of the platter. If the
appropriate row of strobe dots appears to be stationary, the platter
is moving at the precise rated speed. If the dots appear to be
moving to the right, the platter is moving below rated speed; if
they appear to be moving to the left, the platter is moving above
rated speed.
3. If the quartz speed lock button is pressed, the internal quartz lock
will hold the platter at precise rated speed regardless of the
position of the pitch adjust slide control. (Note: The LED indicator
to the left of the pitch adjust slide control’s center position will
illuminate GREEN when the quartz lock is active and RED when
variable pitch is active.)
4. If desired, press the direction button to reverse the rotation of the
platter. The appropriate direction LED will illuminate.
Suspending or Ending Play
1. To suspend play, lift the tone arm with the cueing lever.
2. When play is finished, raise the cueing lever, move the tone arm
to the rest position and secure the tone arm with the tone arm
locking clamp.
3. If using the stylus target light, turn it off by pushing the
light down.
4. Press the start/stop button to apply the brake and stop the
platter rotation.
5. Turn the power dial to the OFF position.
50Hz
33
45
60Hz
33
45