


Owner’s Enjoyment Manual
The Strength of Digital
™
9
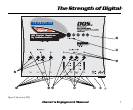
B. DQS Power Wiring
WARNING: Failure to disconnect the negative
terminal of your battery prior to the installation of
your DQS can result in a warm tingly feeling.
Remote Turn-On: Connect an 18 to 22 gauge
wire from the head-unit’s remote turn-on to the
“Remote” connector on the DQS .
Positive (+12V) Connection: Insert a 12 to
18 gauge wire into the connector labeled “Power”
on the nifty connector of your DQS. Connect it
to a good constant source of 12 volts (we suggest
the battery), fused at 2 amps.
Ground Connection: Use the same gauge
wire or larger as you did for the positive connector
and run it from the “Ground” connector on the
DQS to the negative terminal of the battery, a
ground bus, or a verified ground location. The
factory head unit ground is not, not, not a good
ground! When the electrical connections are
complete, you may now reconnect the negative
terminal to your battery.
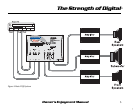
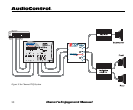
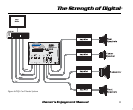
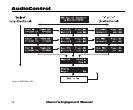
C. DQS Audio Wiring
Planning: As you may already have guessed,
there are numerous ways to configure the DQS in
your audio system. Spend a little quality time
planning out your system and even sketching it
out on paper. The following diagrams are just a
few of the system options: