


Owner’s Enjoyment Manual
AudioControl®
8
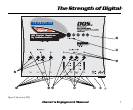
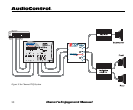
10) Digital Dash Control Input: This
input allows you to connect the optional
AudioControl Digital Dash Control (DDC) which
will allow you to control your DQS from the
convenience of the drivers seat, passengers seat,
back seat or anywhere else the cable will stretch
to. See your authorized AudioControl dealer for
more information about this option.
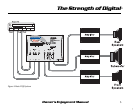
11) Power Connections: This incredibly
handy connector is a godsend to those who have
tried to wire up their gear with their body
crammed in the trunk. You can wire up the
power, ground, and remote turn-on from the
convenience of outside your car and then casually
plug it into your DQS.
INSTALLING THE DQS
Up to this point everything you have read has
served to educate you on the operations of the
DQS. We are sure that you are chomping at the bit
to install your DQS so we recommend you read
the following sections very carefully.
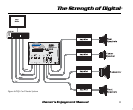
A. Placement & Mounting of your DQS
Placement: The DQS needs to be installed in
the signal path after your source unit but defi-
nitely before your amplifiers and/or any active
crossovers. The chassis is usually mounted in the
rear of the vehicle, as close to the amplifiers as
possible.
Mounting: Once you have selected a perma-
nent mounting location, position the unit and
mark the appropriate mounting holes with a felt-
tip pin or scratch awl. Before doing anything else,
make sure you are not about to drill a hole in a gas
tank or pierce any existing wiring. Nothing ruins
your day more than an expensive repair bill. Drill
a few small pilot holes and secure the chassis of
the DQS with self-tapping screws.