


®
Installation:
The Long Version
8
Installation: The Long Version
What follows is a step-by-step guide to integrating the Archi-
tect into your multi-zone system. If it seems overly detailed, please
forgive us. We would rather tell you too much than too little.
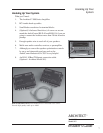
First, check your new Architect for any shipping damage. We
pack ‘em pretty securely, but it’s a vicious world out there and
anything can happen between us building them here in Mountlake
Terrace, Washington and your installation.
PAPERWORK
Yes, filling out the warranty registration card is about as
exciting as cleaning out your sock drawer, but we’d definitely like
the card back after you’ve hooked up the Architect and played
with it a while. We DO read each and every incoming card and
react to your suggestions. That’s how great products like this are
created.
Next, record the serial number on the sales receipt and make
certain the home owner puts it away in a safe place. Stashing the
receipt away is very important in the unlikely event that your
Architect ever needs servicing, or…well things do happen…you
need to prove to an insurance adjuster that something as great as
the Architect was installed in the system.
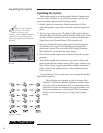
PLACEMENT
The Architect 900 Series is a very efficient amplifier, but it
does need some breathing room to operate properly. Make certain
that the air vents on the rear and sides of the Architect are not
blocked and have at least ½” of air space. Also make certain that
heat sensitive components such as CD or Tape players are not
directly on top of the Architect. Just as a reminder, you should
avoid putting any leaky pipes above the audio equipment stack.
A benefit of having remote power control on the Architect is
that you can install it in another area of the house (such as a
basement or utility room) away from the main component stack.
Make certain that you use a good quality audio line driver to
extend the RCA cables if you choose this type of installation.