


5-245-24
5-245-24
5-24
Chapter 5: Software supportChapter 5: Software support
Chapter 5: Software supportChapter 5: Software support
Chapter 5: Software support
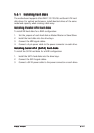
5.5 Creating a RAID driver disk
A floppy disk with the RAID driver is required when installing Windows
®
2000/XP operating system on a hard disk drive that is included in a RAID
set.
To create a RAID driver disk:
1. Place the motherboard support CD into the CD-ROM drive.
2. When the
Drivers Drivers
Drivers Drivers
Drivers menu appears, select the RAID driver disk you
want to create:
• Click
Make ITE8212 DriverMake ITE8212 Driver
Make ITE8212 DriverMake ITE8212 Driver
Make ITE8212 Driver to create an ITE
®
8212F RAID
driver disk.
Or
Browse the contents of the support CD to locate the driver disk
utility.
• Go to
\Drivers\ITE8212\Makedisk.exe\Drivers\ITE8212\Makedisk.exe
\Drivers\ITE8212\Makedisk.exe\Drivers\ITE8212\Makedisk.exe
\Drivers\ITE8212\Makedisk.exe for the ITE
®
8212F
RAID driver disk utility
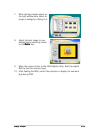
4. Insert a formatted high-density floppy disk to the floppy disk drive.
5. Follow succeeding screen information to complete process.
6. After creating a RAID driver disk, eject the floppy disk, then
write-protect it to prevent computer virus infection.
To install the RAID driver:
1. Install an operating system to the selected hard disk drive. During
installation, the computer prompts you to press the
F6F6
F6F6
F6 key if you
want to install a third-party SCSI or RAID driver.
2. Press <F6>
then insert the RAID driver disk into the floppy disk drive.
3. Follow the succeeding screen instructions to complete the installation.
Refer to section “5.2.2 Drivers menu” for details.