


10
Operating Manual - DPX-200 Parametric Equalizer - Compressor/Limiter
Broadcasting
Compression has long been used as a tool
to make an audio signal appear louder. A
good example is in broadcasting, where
competing stations with identical transmit-
ters and power attempt to sound louder than
each other. Since they are all restricted with
respect to maximum audio level (modulation), their best
tactic is to squeeze the dynamic range of their programs
to just a few dB. The audio output level of the station
virtually never changes, and the listener perceives this
continuous high-level sound as being louder than the same
material in an uncompressed form. Although both com-
pressed and uncompressed programs reach the same peak
levels, the compressed signal stays near peak level more
of the time, and thus sounds louder. This technique makes
the broadcast more intelligible over ambient noise, and
increases the geographical area over which the broadcast
is audible to the listener. Additionally, this compression
technique is extremely useful for FM and infrared trans-
mission systems for the hearing impaired.
8.3 Special Effects
Compression For Feedback Control
A common ritual in sound system set-up is equal-
izing the room to remove feedback. This is generally
accomplished by turning up system gain to purposely in-
duce feedback, searching for the center frequency of the
feedback, and then equalizing at that frequency to remove
the feedback. Once this frequency has been cut, system
gain is again increased to induce another feedback point,
and the whole procedure is repeated until the engineer is
satisfied that the significant problem frequencies have
been corrected. The major problem with this approach is
that the feedback can easily get out control, and the engi-
neer ends up dashing back and forth between the mixer
volume controls and the equalizer controls, while every-
one in the room plugs their ears and prays it will end
soon. The Ashly DPX-200 can turn this procedure into a
fast, painless job, eliminating loud feedback levels and
the possibility of speaker or ear damage.
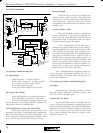
Procedure:
1. Set up the DPX-200 limiter controls
as follows:
a. Output level control to -20dB.
b. Input Gain control to 0dB.
c. Threshold control to -30dB.
d. Ratio control to infinity (∞)
e. Attack time to 5mS.
f. Release time to 1 Sec.
g. Limit switch IN
2. Using a 1/3 octave (31 band) or parametric
equalizer, set the EQ controls to a flat setting, and if the
equalizer has an overall volume control, boost it by 10 to
15 dB.
3. Open up several microphone input channels
to a normal operating level, with typical EQ settings, and
turn the console master fader up to a louder than normal
setting. At this point, the system should be well into feed-
back, but the room volume will be constant due to the
action of the limiter. You can listen to the feedback at
any level you like by simply varying the limiter output
level control, although below a certain monitoring level,
the feedback will stop.
4. Try to determine the feedback frequency, and
then equalize it by adjusting the center frequency, band-
width, and boost/cut controls of your parametric equal-
izer. (Note: a graphic equalizer can also be used, although
with less accuracy.) After eliminating the problem fre-
quency, try to further define it by sharpening up the band-
width, reattacking the frequency control, and making the
cut shallower, if possible.
5. As soon as the first feedback frequency has
been removed, the compressor/limiter will automatically
bring up system gain until another feedback point is in-
duced. Repeat the equalization procedure until it becomes
impossible to distinguish individual, predominant feed-
back frequencies.
6. Write down EQ marks for safekeeping if nec-
essary, and return all mixer, EQ master gain, and com-
pressor/limiter gain controls to normal operational
settings.
Altering the Texture of Musical Instruments
It would be impossible to mention here all the
ways that compression is used to create new sounds with
familiar instruments. Some typical uses are:
1. Creating a “fatter” kick drum or snare sound.
2. “Thickening” acoustic guitars.
3. Adding punch and sustain to electric bass or
guitar.
In general, use a gentle compression ratio, say
4:1, with a 10 mS attack time, 0.1 Sec. release time, and
a low enough threshold to cause 6 to 10dB of Gain Re-
duction. Try using this effect to help bring out a lead
vocal or instrumental solo in a cluttered mix. The com-
pressor is also a great corrective tool when working with