


39
3. SETUP MENU continued …
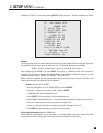
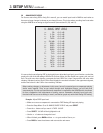
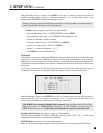
After highlighting Power or a Source, press SELECT and use the buttons to move from one Path to
another. To set the condition, use the buttons to change the ‘–’ to a ‘*’. Don’t forget: In menu 11 you
have to set ALL TRIGGERS to ‘Enabled’ for the triggers to work.
Changes to the trigger setup do not take effect until exiting from the Setup Menu, to avoid unnecessary
rapid turning off and on of triggers while making changes.
Example: Activate Trigger2 when DVD1 is selected in MAIN.
• Enter the Setup Menu. Go to ‘11. TRIGGER/IR/RS232’ and press SELECT.
• Upon entering this menu item, ‘a. ALL TRIGGERS’ will be highlighted in red.
• Use the buttons to change to ‘Enabled’.
• Press the button to go to ‘c. SET TRIGGER 2. Press SELECT.
• Use the buttons to go to ‘DVD1’. Press SELECT.
• Use the buttons to change the ‘–’ to ‘*’.
• Press BACK twice to leave this submenu.
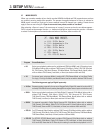
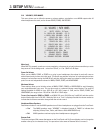
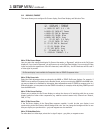
Set IR Inputs:
This allows you to enable or disable the AVM 50’s infra-red inputs. Being able to do so can be useful when
an IR receiver, connected to the AVM 50, is located in the same room as the AVM 50. In such a case, the
AVM 50 can receive two IR signals for the same command – one through the front, and one through the back.
The potential result is that whatever you’re trying to command may not respond. Disabling the Front IR solves
this problem.
The IR signal may also leak into the unit through the vents in the top cover, which could also cause IR
commands to be intermittent or ineffective. If the Rear IR inputs are not in use, try disabling them.
After highlighting an IR input, press SELECT and use the buttons to move from one Path to another. To
turn the input off, use the buttons to change the ‘*’ to a ‘–’. Do this through the Front Panel, since
Remote Control commands are ineffective once an IR sensor is turned off.
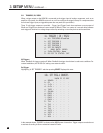
If the AVM 50 does not respond to Remote Control commands, enter the Setup using the Front Panel
buttons, go to menu ‘11. TRIGGER/IR/RS232’, followed by ‘e. SET IR-INPUTS’, and make sure the
FRONT IR settings are set to ‘*’. Try this before contacting technical support (see also section 5.6).
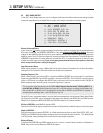
Baud Rate and Flow Control (normally for use only by custom installers):
The Baud Rate (adjustable from 1200 to 115200 bps), and Flow Control (‘RTS’, ‘CTS’, or ‘None’), allow
configuration of the serial port communication parameters.
RS-232 TX Status (normally for use only by custom installers):
When ‘On’, all commands, status changes, and control information are echoed through the RS-232 port.
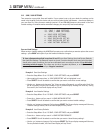
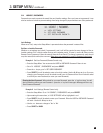
11e. SET IR-INPUTS
MAIN Z2 Z3
a. FRONT IR: * * *
b. REAR IR 1: * * *
c. REAR IR 2: * * *
d. REAR IR 3: * * *