


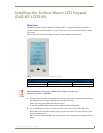


Installing the Surface-Mount LCD Keypad (DAS-KP-LCDS-W)
4
Matrix Audio Controller LCD Keypads
3. Plug the speaker-wire connectors to the “To Speakers” connector and plug the Zone wires into the
“To Controller” connector on the back of the Keypad Connector Board.
Ensure the wiring scheme is correct and that the connector at the Controller is plugged into the Zone
output.
4. Use the provided screws to mount the Keypad Mounting Plate to the j-box in the wall.
Make sure the screws are secure enough that the keypad will not move when touched but be sure not
to overtighten the screws. If the screws are over-tightened, the connection between the LCD Screen
and the Keypad Control board may not be adequate.
5. Reconnect the LCD screen to the Keypad Control board making sure to line up the four screw holes
correctly.
This will ensure that all the pins will plugged into their appropriate receptacles.
6. Secure the LCD screen with the four screws that were removed in step #2.
Make sure the volume buttons are still in place on the switches.
7. Before placing the Front Bezel over the screen, POWER ON the Controller (and Expansion
Controllers, if applicable). The DAS-KP-LCDS-W will start the initialization process immediately.
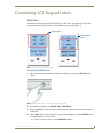
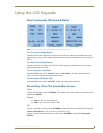
8. If everything initialized correctly you should see the source listing at the top of the screen and “All-
On”, “All-Off” and the time displayed at the bottom of the screen.
9. Remove the protective film from the front of the LCD Touch-screen.
10. Place the Front Bezel on the LCD screen and firmly “click” it into place. It should fit tightly to the
Mounting plate.
When the System is first powered ON, it could take up to 4 minutes to load all the
information to the LCD keypads. Please wait until initialization has completed before
using the keypad.