


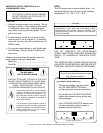
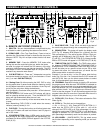
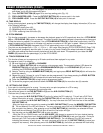


A. The jog wheel will act as a slow frame search control when
the CD is not playing but either paused or set to a cue point.
To set a new frame cue point, spin the jog wheel then press
PLAY when you have determined the proper position. Press
CUE to return to the “CUE POINT”.
B. It also works as a pitch bend, when you turn clockwise the
pitch will rise to 16%, and when you turn counterclockwise
it will fall to -16%. The pitch bend is determined on how fast
you turn the wheel.
14 SHUTTLE WHEEL - (OUTER RING) This wheel has 3 for-
ward and 3 reverse speed positions for speed searching through
tracks. The more you turn the wheel in either direction the faster
you search
15. CUE - Pressing the CUE button during play provides a
return to the position at which play was started. If PAUSE is used
before CUE or a CUE POINT was set, that will become the cue
point. Alternately pressing the PLAY button and the CUE button
allows the CD to be played from the same position any number
of times. The CUE LED will light up from the time the Cue button
is pressed until the CD has reset to the position at which play was
started. Steady lighting of this LED indicates the ready condition.
The CUE button can be held down to play a CD. When you
release the CUE button it instantly returns to the CUE POINT.
You can also tap the CUE button to create a BOP EFFECT (for
definition of BOP EFFECT, see page 5).
16. TRACK BUTTON - This buttons is used to select
your desired track. This is fast BACK SKIP through the tracks on
your CD.
17. IN REALTIME BUTTON - (CUE “ON THE FLY”) This allows
you to set a CUE POINT without interruption of music (“on the
fly”). This button also sets the beginning of a seamless loop (see
SEAMLESS LOOP).
18. OUT / EXIT - Used to set the ending point when looping.
When the OUT/EXIT button is pressed, the player will play the
loop continuously. To exit the loop, press the OUT/EXIT button
again.
19. TRACK BUTTON - This buttons is used to select
your desired track. This is fast FORWARD SKIP through the
tracks on your CD.
20. RELOOP BUTTON - If a SEAMLESS LOOP has been
made, but the CD Player is not actively in SEAMLESS LOOP
mode, press the RELOOP BUTTON (20) to reactivate the SEAM-
LESS LOOP mode. RELOOP will appear in the LCD DISPLAY
(6). To exit loop, press the OUT/EXIT button (18).
21. BOP - This function instantly plays last cue in a stutter effect.
22. DISK 1 SELECT KEY(22) - This button will allow functional-
ity of the NUMBER KEYS (23) on CD Drive 1.
23. NUMBER KEYS (0~9) - These keys are used for direct track
access or jump to a specific time in the selected CD (see Go to
time #9).
24. DISK 2 SELECT KEY (24) - This button will allow function-
ality of the NUMBER KEYS (23) on CD Drive 2.
25. PLAY/PAUSE BUTTON - Each press of the PLAY/ PAUSE
BUTTON causes the operation to change from play to pause or
American DJ® AUDIO • DCD-PRO500™ INSTRUCTION MANUAL • PAGE 7
from pause to play. While in play mode the Green Backlit
LED will glow, while in pause mode the the Green Backlit
LED will flash.
26. (-) PITCH BEND Button - The (-) pitch bend function
allows a momentary “Slow Down” in the CD’s BPM’s (Beats
per minute) while it is playing. This will allow you to match
the beats between two playing CD’s or other playing music
source. Remember, that this is a momentary function when
you remove your finger from the pitch button the BPM’s will
automatically return to SLIDERS (12) selected pitch. Use this
function to catch up to the your other playing music source
and use the PITCH SLIDER (12) to match the BPM’s with the
other playing music source. When each of the two CD play-
ers are playing, the pitch bend function allows the positioning
of the bass beats to be matched, after the pitch of each disc
is matched. Either player can “catch up” or “fall back” to
match the other player. By changing the pitch of one disc
with respect to the other in this way the beats can be
matched.
27. LCD DISPLAY - This high quality LCD display Indicates
all the functions, as they are occurring. This display is view-
able at several comfortable angles. The display ICONS will
be explained in the next section.
28. (+) PITCH BEND Button - The (+) pitch bend function
allows a momentary “BUMP” in the CD’s BPM’s (Beats per
minute) while it is playing. This will allow you to match the
beats between two playing CD’s or any other playing music
source. Remember, that this is a momentary function when
you remove your finger from the pitch button the BPM’s will
automatically return to SLIDERS (12) selected pitch. Use this
function to catch up to the your other playing music source
and use the pitch slider (12) match the BPM’s with the other
playing music source.
29. Pitch Button - This button will change the pitch percent-
age the Pitch Slider (12) will react too. The pitch percentage
can be changed between 8%, 12%, and 16%. 8% will allow
the least amount of pitch manipulation and 16% will allow the
most amount of pitch manipulation. The LED above the
Pitch Button will indicate the function pitch percentage by
flashing red for 8% glowing green for 12% and glowing red
for 16%.
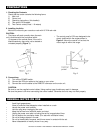
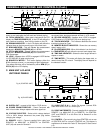
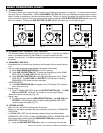
B. LCD DISPLAY (FIGURE 7)
30. PLAY INDICATOR - This indicator will glow indicating
that the the CD Drive is in play mode
31. PAUSE INDICATOR - This indicator will glow indicating
that the CD Drive is in PAUSE mode.
32. CUE INDICATOR - Light when press cue button or flash
when press loop in key.
33. PROGRAM INDICATOR - This lights when program
mode is set or played.
34. SINGLE INDICATOR - This indicates that the CD drive is
in single play mode, the track will play once and return to
CUE mode. If the single indicator is not on the drive is in con-
GENERAL FUNCTIONS AND CONTROLS (Cont.)