


REV
FWD
JOG
SHUTTLE
REV
FWD
JOG
SHUTTLE
CUE
CUE 1
CUE 3
CUE 2
CUE 4 CUE 5 CUE 6
+
_
PITCH
BOP
MEMORY
CUE
RE
LOOP
TIME
PROG.
SGL/CTN.
5
6
7
4
9
8
0
3
2
1
BPM
BPM
COUNTER COUNTER
DISK 1
DISK 2
IN/R. CUE OUT/EXIT
OP/CL
TRACK
PITCH BEND
flip-flop
BEAT
Q-Start
0
0
+
_
+
_
PITCH
8%.12%.16%
SEAMLESS
LOOP
CUE
CUE 1
CUE 3
CUE 2
CUE 4 CUE 5 CUE 6
+
_
PITCH
BOP
MEMORY
CUE
RE
LOOP
TIME
PROG.
SGL/CTN.
IN/R. CUE OUT/EXIT
OP/CL
TRACK
PITCH BEND
0
0
+
_
+
_
PITCH
8%.12%.16%
SEAMLESS
LOOP
American DJ
®
GENERAL FUNCTIONS AND CONTROLS
American DJ® AUDIO • DCD-PRO500™ INSTRUCTION MANUAL • PAGE 6
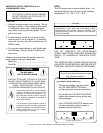
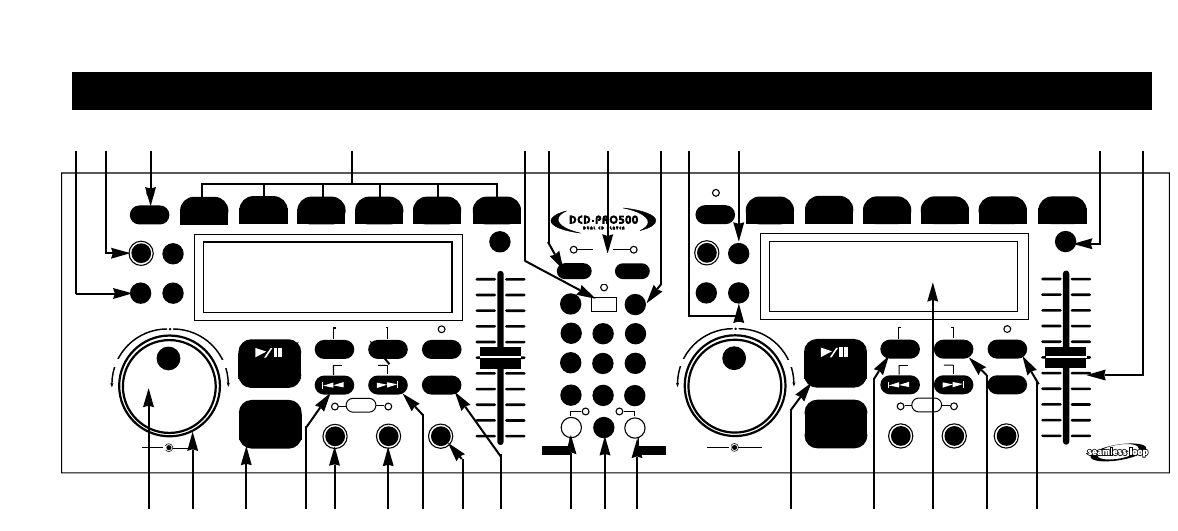
A. REMOTE UNIT FRONT (FIGURE 6)
1. SGL/CTN - You can choose between a single track to play
or all tracks in order by pressing this button once or twice.
2. OPEN/CLOSE - (Disc Tray Open/Close)- Press to load or
eject the disc. Each press will open or close the disc tray on the
transport. NOTE: Tray will not open unless the disc has been
paused.
3. MEMORY CUE - Press the MEMORY CUE button after
loading the new disc and closing the tray, before the tracks
are read, the player will restore the Cue memory of the disc;
maximum of 40 Cue memory per side can be stored. The LED
will indicate “STORE” and sampled loops or Cue points will be
recalled if any memorize were stored.
4. CUE BUTTONS 1-6 - There are 7 independent cue points
that can be stored into memory, six (6) on cue buttons 1-6 and
one (1) on main CUE BUTTON (15).
4-1. Storing Cues: By either pressing the IN/R. CUE or using
the Jog wheel when in pause mode select the frame by turning
the Jog Wheel clockwise or counter clockwise, hit the Play but-
ton to set Cue point when hitting desired frame.
Push the Memory Cue button then press the 1-6 Cue buttons to
store Cue Point.
4-2. The MEMORY CUE button and CUE indicator will light to
wait for selecting desired cue point. Then the MEMORY CUE
button will light automatically after the cue is set.
4-3. The previous cue memory will be recovered when the cue
is reset.
Note: Memorizing CUE1-CUE6 is invalid when the memory
indicator (memory bucket) is full.
5. FLIP-FLOP - Turning this function on will allow instant start
of the next CD when one track has finished and CD player is
set in SGL mode.
6. COUNTER BUTTON - When in BPM mode, tap this button
with the beat of the music to determine the approximate cur-
rent Beats Per Minute (BPM). BPM will appear in the LCD DIS-
PLAY (8, 33).
7. BLUE BEAT LED - These LED’s will flash to the beat of
the music being played through the corresponding CD unit.
8. BPM BUTTON - This button will switch the display mode
(LCD Fig 37) between BPM (Beats Per a Minute) and the
Pitch percentage (%). The active function (BPM or Pitch per-
centage) will be displayed in the LCD display (See LCD Figs.
37 and 38). Use COUNTER BUTTON (6) to change modes.
BPM or PITCH mode will appear in LCD DISPLAY (37, 38,40).
9. TIME BUTTON (GO TO TIME) - The TIME button switch-
es between ELAPSED PLAYING TIME, REMAINING TIME in
a selection and TOTAL REMAINING TIME of the disc.This but-
ton will also take you to a specific minute on your CD by hold-
ing down this button for 2 seconds then you would use the
direct access button to select the minute.
Example: if you are on disc 1 of the CD player hold the time
button fig. 9 on side 1 for 2 seconds then the LCD screen will
read 00 00 00, then use the direct access buttons to select
time. It will automatically go to time selected.
10. PROGRAM - Depress this button to stop the CD and enter
the program mode. Note the word “PROGRAM” is indicated on
the display. Select each track to be programmed with the f. skip
and b.skip buttons (16 & 19). and press the PROGRAM button
after selection of track . You can program up to 20 tracks. Press
PLAY to start the program. To exit and erase program hold the
program button down for more than 2 seconds while the unit is
stopped, open the disc tray, or turn off the power.
11. PITCH LED (Pitch Button)- This button activates the Pitch
Slider (fig.29).
12. PITCH % - The pitch can be changed from
+/- 8%, +/- 12% or +/- 16%. Press the PITCH BUTTON (11) l
make sure the PITCH LED is lit.The pitch % will not be
changed if the PITCH LED is off. Pitch percentage (%) can be
changed by pushing the PITCH BUTTON (11) until desired per-
centage is selected. The LCD screen will show the current
pitch percentage momentarily each time this button is pushed.
13. JOG WHEEL - (INNER WHEEL) This jog wheel serves
two functions depending on the operating mode you are work-
ing in.
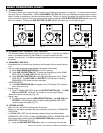
Fig 6
1
2 3 4 5 678 9
10
11 12
13 14 15 16 17 18 19 20
21
22
23 24 26
25
28 2927