


4
No Sound
No Sound/
Distortion/Static
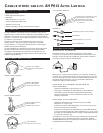
Check that the transmitter AC power adapter (O) is fully inserted into the wall outlet and the power cord from the AC
adapter is firmly connected to the transmitter power input jack (N).
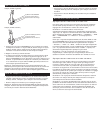
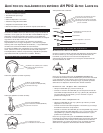
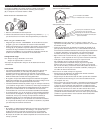
Confirm that the headphones are turned ON and tuned to the transmitter — the amber LINK indicator light should be
glowing steadily.
Confirm that the mute function is off by pressing the MUTE button (F) on and off. The MUTE indicator light (G) should
be turned off.
Check that the AAA batteries are fresh and inserted with correct polarity (+, –).
Check that the audio source component (stereo, TV, etc.) is turned on and transmitting sound as it normally should.
Check that the headphones volume is turned up (H).
If you ar
e using a Tape 2 Monitor output from your receiver/amp as the audio output, check that you have pressed
the Tape Monitor/Tape 2 button on the front of the receiver. This will turn on the Tape 2 outputs, which may not have
been active.
Check that the audio level indicator light (J) is flickering intermittently. If the light is not intermittent and you know you
are using a fixed level audio source, play music on your audio source while adjusting the input level control on the back
of the transmitter. Adjust the level control until the light begins to blink intermittently again.
OR
If the transmitter is connected to a variable output, make sure the input level control (L) is turned up (all the way to the
right — your right when looking at the front of the transmitter), and adjust the volume on the audio source up or down
as necessary to make the light flicker intermittently.
Change the position of the channel select switch (K) to change the operating frequency. The headphones will detect the
loss of signal and retune automatically. However, you can also press the ON/OFF/SCAN button once to make the
headphones retune.
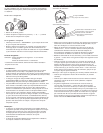
Change the location of the transmitter. Place it as high and away from obstructions as possible. Avoid placing the
transmitter directly on top of or behind a TV.
Move the transmitter and headphones closer together. Sending the signal through certain materials, such as glass, tile,
and metal, can decrease the effective transmitting distance of the system.
Tr
oubleshooting
issue cause and solution
The following troubleshooting guide takes you through some of the more common problems associated with the installation and/or operation of
these wireless headphones. If the problem persists, please call 1-800-732-6866 and a knowledgeable customer service representative will assist you.
Specifi
cations & Features
T
ransmitter
• Omni-directional
• Effective transmitting range: up to 150 feet*
• Adjustable audio level input
• 3 selectable broadcast frequencies (between 912.5 and 914.5 MHz)
•
Line-level, ster
eo audio input with RCA inputs (3.5mm Y-adapter
cable included)
• UL-listed AC power adapter
Headphones
• Push-button, auto-lock tuning
• Volume control
•
40 mm Mylar
®
driver elements
•
Frequency response: 30 Hz – 20 kHz
• Signal-to-noise ratio > 55dB
•
Ster
eo separation > 20dB
• Distortion: < 1.5%
• *Maximum range; results may vary according to environment.
• This device complies with part 15 of the FCC rules. Operation is
subject to the following two conditions: 1) this device may not cause
harmful interference; and 2) this device must accept any interference
r
eceived, including inter
fer
ence that may cause undesir
ed operation.
•
Changes or modifications not expressly approved by the party
responsible for compliance could void the users authority to operate
the equipment.
• Features and specifications subject to change without notice.