


3
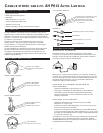
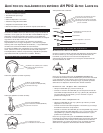
Tuning the Headphones
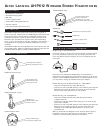
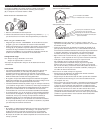
Headphones (left ear cup)
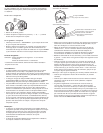
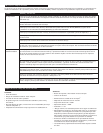
Headphones (right ear cup)
1. Push the ON/OFF/SCAN button (C) on the headphones to turn the
headphones on. The LINK indicator light (E) will turn red. The LINK
indicator light (D) will turn amber, indicating that the headphones
are tuned to the transmitter. You should hear sound coming from
the headphones.
2. Adjust the volume (H) as desired.
3. The headphones will automatically retune if they lose the signal
from the transmitter. However, you can also push the ON/OFF/SCAN
button (C) to retune the headphones at any time. Allow 10 to 15
seconds for the headphones to lock into the transmitter. The amber
“tuned” indicator light will come on after the headphones have
been successfully tuned.
Note: Interference in the form of static and/or distortion can
sometimes be heard. If this occurs, confirm the transmitter/headphone
adjustments and indicators. If the problem persists, refer to the
Troubleshooting section of this manual.
Turning the Headphones Off
• Press and hold the ON/OFF/SCAN button (C) for about 2 seconds to
turn the headphones OFF. The LINK indicator light (E) will go off to
indicate that the headphones have been tur
ned OFF
.
• Place the headphones on the transmitter to recharge the batteries.
Note: Only the rechargeable NiMH and NiCd batteries can be charged.
Please refer to the Charging Batteries section of this manual for
detailed instr
uctions.
Muting the Headphones
• Press the MUTE button (F) to mute the headphones. The MUTE
indicator light (G) will turn on to indicate that the headphones have
been muted.
• Press the MUTE button (F) again to turn off the mute function.
More Helpful Information
About Fixed-Level Audio Outputs:
A fixed-level, or line-level audio output is considered ideal since it
provides an audio signal unchanged by adjustments to the audio
source volume control.
Hint: Fixed-level audio outputs from stereo receivers/amps will typically
be designated as Tape, Tape 1, and Tape 2 outputs, or VCR audio
output connections. These outputs are frequently marked on A/V
equipment as ‘TAPE OUTPUT,’ ‘TAPE OUT,’ ‘TAPE REC, or ‘TAPE RECORD
or REC OUT.’
Please note: Jacks labeled PHONO, CD, LD, DVD or tape or VCR
playback (PB) are INPUTS and will not work with the transmitter. Fixed-
level outputs from TVs are usually marked as ‘Constant,’ ‘Fixed,’ or
‘Select.’ If they are not marked as such, they are probably variable
outputs (see “About Variable-Level Audio Outputs” below). Outputs
from VCRs are almost always fixed.
Hint: When connecting to the audio outputs of a VCR, remember that
the VCR must be playing a tape or showing a TV channel for sound to
be produced.
About Variable-Level Audio Outputs:
A variable-level output, such as a headphone jack or certain line audio
outputs, provides an audio signal that changes with the volume level
set on the audio source. As the volume of the audio source is adjusted
up and down, so does the audio signal strength sent to the transmitter.
This can affect the quality of sound generated by the headphones, and
may require an adjustment of the volume level of the audio source to
produce a signal strong enough for the transmitter.
Hint: On most bookshelf-type or compact stereo systems, inserting a
headphone plug into the headphone jack results in automatic cut-off
of the regular, or hard-wired speakers.
Hint: Most TVs, regardless of age or price, have variable outputs. If you
are unsure which of your TV audio outputs is fixed, refer to the TV
instruction manual. Some TVs have outputs that can switch between
variable and fixed. When given a choice, fixed is always recommended.
ON/OFF
SCAN
LINK
(C) On/of
f/scan button
(D) LINK indicator light
(E) Char
ging contacts
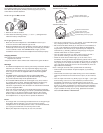
+
–
VOLUME
MUTE
(F) MUTE button
(G) MUTE indicator light
(H) Volume control