


25-EN
SETUP
You can flexibly customize the unit to suit your own preferences and
usage. Choose the SETUP menu from Sound Customizing, Visual
Customizing, etc., to select your desired setting.
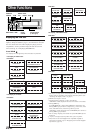
The common operation for SETUP is step 1 to 4 as
follows. See down below for further information
about each SETUP menu.
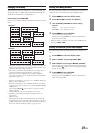
1
Press MENU to select the SETUP mode.
SETUP mode is activated.
2
Press g or f to select the desired SETUP
menu.
(e.g. Select BEEP)
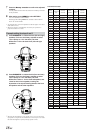
Here is the explanation for CDA-9835 display example.
CLOCK*
1
↔ FM TUNER SET ↔ DIMMER ↔ SUBWOOFER
(ON/OFF) ↔ SUBWOOFER (STEREO/MONO) ↔ PLAY MODE
↔ BEEP ↔ SCROLL ↔ INT MUTE ↔ INT AUDIO ↔ AUX IN
↔ (AUX NAME)*
2
↔ POWER-IC ↔ LCD CONTRAST*
3
↔
FONT SELECT*
3
↔ TUNER AREA*
4
↔ TW SETUP*
5
↔ A-LINK
TEMP*
6
↔ BGV SELECT*
7
↔ OPENING MSG.*
7
↔
CALENDAR*
7
↔ DEMO ↔ CLOCK*
1
*
1
For the CDA-9835 model, refer to “Setting the Time and Calendar
(CDA-9835 only)” (page 6). For the CDA-9833 model, refer to
“Setting Time (CDA-9833 only)” (page 6).
*
2
Displayed only when AUX is ON.
*
3
CDA-9833 only.
*
4
Refer to “Radio” (page 8).
*
5
Displayed only when the 2WAY/3WAY switch (pages 40 to 42) is set
to 3WAY. This function cannot be selected when an external audio
processor is connected.
*
6
Displayed only when an external amplifier is connected.
*
7
CDA-9835 only.
3
Turn the Rotary encoder to change the setting.
(e.g. Select BEEP ON or BEEP OFF.)
4
Press MENU to select RETURN.
The display returns to normal mode.
Pressing and holding MENU for at least 2 seconds will
return to normal mode.
•For the XM Radio settings, refer to “XM Radio (Optional)” (pages
27 to 29), and for the MobileHub™Link settings, refer to
“MobileHub™Link Operation (Optional)” (pages 30,31).
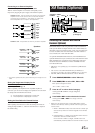
Sound Customizing
Switching the Tuner Mode
NORMAL (Initial setting) / HI-FI / STABLE
This unit incorporates the MAX TUNE SQ for the highest quality
tuner audio. Moreover, you can choose between three settings to suit
your own personal sound preferences and usage.
NORMAL: Standard setting
HI-FI: Sound quality priority setting
STABLE: Noiseless priority setting
• If you find the sound is very noisy while listening to the tuner in Hi-
Fi mode, we recommend you change to Normal mode.
Subwoofer On and Off
SUBWOOFER ON (Initial setting) / SUBWOOFER OFF
When the subwoofer is on, perform the steps below to adjust the
subwoofer output phase and level.
1Press the Rotary encoder repeatedly to select the
SUBWOOFER mode.
SUBWOOFER → BALANCE → FADER → DEFEAT →
VOLUME → SUBWOOFER
• If you set the 2WAY/3WAY switch (pages 40 to 42) to 3WAY, you
cannot adjust the FADER mode.
2Press g or f.
The subwoofer output phase is toggled SUBWOOFER
NORMAL (0°) or SUBWOOFER REVERS (180°).
To adjust the level, turn the Rotary encoder.
Setting the Subwoofer Output
STEREO (Initial setting) / MONO
You can set the subwoofer output to stereo or monaural. Make sure to
set the correct output for your subwoofer type.
STEREO: Subwoofer stereo (L/R) output
MONO: Subwoofer monaural output
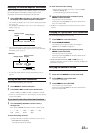
Setting the Response Slope for the High
Range Speaker (TW SETUP)
MAKER’S (Initial setting) / USER’S
Depending on the response characteristics of the speaker, care should
be taken when setting the response slope of the high range speaker to
FLAT in 3-way mode (see “Adjusting and Storing the Crossover
Settings” on page 16), as speaker damage may result.
MAKER’S: As protection from possible speaker damage,
FLAT cannot be set for the response slope of the
high range speaker in 3-way mode.
USER’S: The FLAT setting is possible in 3-way mode.
•A message is displayed when the response slope for the high range
speaker is set to FLAT in 3-way mode.
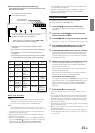
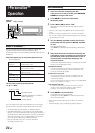
Sound (Beep) Guide Function
BEEP ON (Initial setting) / BEEP OFF
This function will give audible feedback with varying tones
depending upon the button pressed.
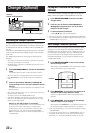
f
g
BAND/
TEL.
MENU
Rotary encoder
SOURCE/
POWER