


22-EN
Erasing Disc Title/Station Title
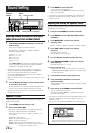
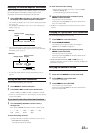
1
Press TITLE to select the Title Display. Then,
press again and hold for at least 2 seconds.
•For details, see asterisk 2 of “Displaying the Title/Text” (page 20).
2
Press and hold -/J for at least 2 seconds.
The title in the display will blink.
3
Press g or f repeatedly until the title you
want to erase is displayed.
4
Press and hold -/J for at least 2 seconds to erase
the title displayed.
5
Press TITLE to cancel the title erasing mode.
•You cannot erase CD-TEXT.
• "NO DATA" is displayed for 2 seconds if the title is not input in
step 2, or if all titles are erased in step 4.
Displaying Time
Press TITLE repeatedly until the time is displayed.
Each press changes the display.
For details, see “Displaying the Title/Text” (page 20).
• Selecting any tuner or CD function while in the clock priority mode
will interrupt the time display momentarily. The function selected
will be displayed for about 5 seconds before the time returns to the
display.
• When the power is off but the ignition key is on, press TITLE
to
display the time. (CDA-9833 only)
Blackout Mode On and Off
When Blackout mode is turned on, the display will turn off to reduce
power consumption. This additional power enhances the sound quality.
Press and hold DISP/B.OUT for at least 2 seconds to
activate the blackout mode.
The display will turn off.
• If any button on the unit is pressed during the blackout mode, the
function will be displayed for 5 seconds to show the operation
before returning to Blackout mode.
To cancel Blackout mode, press and hold DISP/B.OUT for at
least 2 seconds.
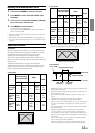
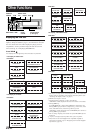
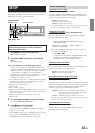
Setting an Amplifier Link
With an external Amplifier Link compatible amplifier MRD-M501or
MRD-M301 is connected, the amplifier settings are adjustable from
the head unit. A maximum of 8 external amplifiers can be adjusted.
1
Press and hold MENU for at least 2 seconds.
2
Press MENU to select A-Link.
3
Press g or f to select AMP-ID (AMP1 to 8), or
BASS VOLUME.
To set the BASS VOLUME
4
Turn the Rotary encoder to adjust the level.
5
When the adjustment has been completed, press
MENU to select RETURN.
The unit returns to normal mode.
Pressing and holding MENU for at least 2 seconds will
return to normal mode.
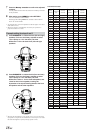
To set the Amplifier
4
Press BAND/TEL. to select from the following
setting items to be adjusted.
INPUT → LOW PASS → SUBSONIC → P-EQ → BASS COMP
→ TCR → PHASE → TURN ON DELAY→ OUTPUT DISABLE
(SAFE) → INPUT
5
Turn the Rotary encoder to change the settings.
6
Press the Rotary encoder if there are other
settings to be changed.
Repeat steps 5 and 6 (above).
7
Repeat steps 4 to 6 (above) if other items need to
be adjusted.
To set another amplifier, return to the step 3.
To store the adjusted contents
1) While adjusting the mode, press either button (1 or 2)
for at least 2 seconds.
The adjusted contents are stored.
To recall adjusted and stored contents
1) While adjusting the mode, press either button (1 or 2).
The adjusted and stored contents are recalled.
8
When adjustment has been completed, press
MENU to select RETURN.
The unit returns to normal mode.
Pressing and holding MENU for at least 2 seconds will
return to normal mode.
To easily recall adjusted and stored contents
1) Press MENU to select A-Link.
2) Press g or f to select AMP 1 to 8.
3) Turn the Rotary encoder to select Preset 1 or Preset 2.
4) Press MENU to select RETURN.
The unit returns to normal mode.
Pressing and holding MENU for at least 2 seconds will
return to normal mode.
•For details of each of the settings, refer to the Owner's Manual of
the external amplifier.
• If amplifier settings are made on the unit, do not then change the
setting with the amplifier buttons as the amplifier display may not
match the operations of the unit.
• "No Link" is displayed if the amplifier is removed or its power
cannot be turned on, etc.
• If multiple amplifiers are connected to this unit, set a different ID
on each amplifier. Otherwise the display may flicker.