


11
MERLIN 232
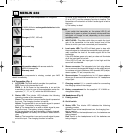
Flickering green: The batteries are nearly dead.
Dark: a) The batteries are dead or inserted the wrong way.
b) The headphones are off and the batteries are not being
charged.
12 Battery compartments (beneath detachable ear pad): As
delivered, the battery compartments contain two 1.2 V
NiMH rechargeable batteries.
13 VOLUME: Sets the loudness level of the headphones.
14 AUTOTUNING: This switch activates the Autotuning
function.
15 Charging socket: 0.1 in. coaxial socket for connecting
the charging cable of the charger.
2.5 Charger (Fig. 3)
16 Charger: The supplied charger (6 VDC, 100 mA) lets you
charge the battery inside the transmitter or the batteries
inside the headphones.
17 Charging cable
18 0.1 in. coaxial connector matching the charging sockets
on the transmitter and headphones.
3.1 Charging Batteries
In order to ensure the longest possible service life for the
rechargeable batteries, we deliver them uncharged. Therefore,
charge the supplied batteries before first operating your head-
phones system.
Important!
• If you operate the transmitter or headphones on
dry batteries, never try to recharge these batter-
ies. This would cause serious damage to your trans-
mitter or headphones. Dispose of dead batteries con-
forming to local waste disposal rules.
• Do not use any charger other than the charger sup-
plied with your headphone system! Using other types
of chargers or AC adapters may damage the transmit-
ter and/or headphones.
3.1.1 Charging the Battery inside the Transmitter
1. Open the battery compartment (8).
2. Insert the supplied rechargeable battery into the battery
compartment (8) so that the positive contact points at the
connector (5). (If you insert the battery the wrong way, the
battery will not be charged.)
3. Close the battery compartment (8).
4. Plug the charging cable (17) into the charging socket (7)
on the transmitter.
5. Check that the AC voltage stated on the charger is the
same as that available where you are going to use the
charger. If it is, connect the charger (16) to a convenient
AC outlet.
The status LED (2) will be lit red or yellow to indicate the
battery inside the transmitter is being charged.
The battery will be fully charged after approximately 10
hours. (If the Status LED (2) was lit red, it will go out. If it
was lit yellow it will change to green.)
6. Unplug the charging cable (17) from the transmitter and
disconnect the charger (16) from the power outlet. (The
charging current is very low, so the transmitter or battery
will not be damaged even if you forget to unplug the
charging cable.)
3.1.2 Charging the Batteries inside the Headphones
1. Pull the protective foil out of the earphone in a straight line
to establish electrical contact between the batteries and
the electronics of the headphones.
2. Plug the charging cable (17) into the charging socket (15)
on the headphones.
3. Check that the AC voltage stated on the charger is the
same as that available where you are going to use the
charger. If it is, connect the charger (16) to a convenient
AC outlet.
The Status LED (11) will be lit red or yellow to indicate the
batteries inside the headphones are being charged.
The batteries will be fully charged after approximately 10
hours. (The Status LED (11) will go out or change to
green.)
4. Unplug the charging cable (17) from the headphones and
disconnect the charger (16) from the power outlet. (The
charging current is very low, so the headphones or batter-
ies will not be damaged even if you forget to unplug the
charging cable.)
3.1.3 Discharging Batteries
In order to maintain full battery capacity for as long as possi-
ble, discharge the batteries completely about once a month:
1. Switch the transmitter or headphones on and leave it/
them on the shelf until the status LED goes out.
2. Recharge the battery/batteries.
3.2 Replacing Batteries
The capacity of any rechargeable battery will decrease over
time. If you feel that you need to recharge the supplied bat-
teries more often than would be convenient, you may consid-
er replacing the batteries with new AAA size 1.2 V recharge-
able or 1.5 V alkaline dry batteries.
3 Setting Up
6235_04_BDA_Merlin-Hex 21.04.2004 10:08 Uhr Seite 11