12
ENGLISH
BEFORE OPERATION
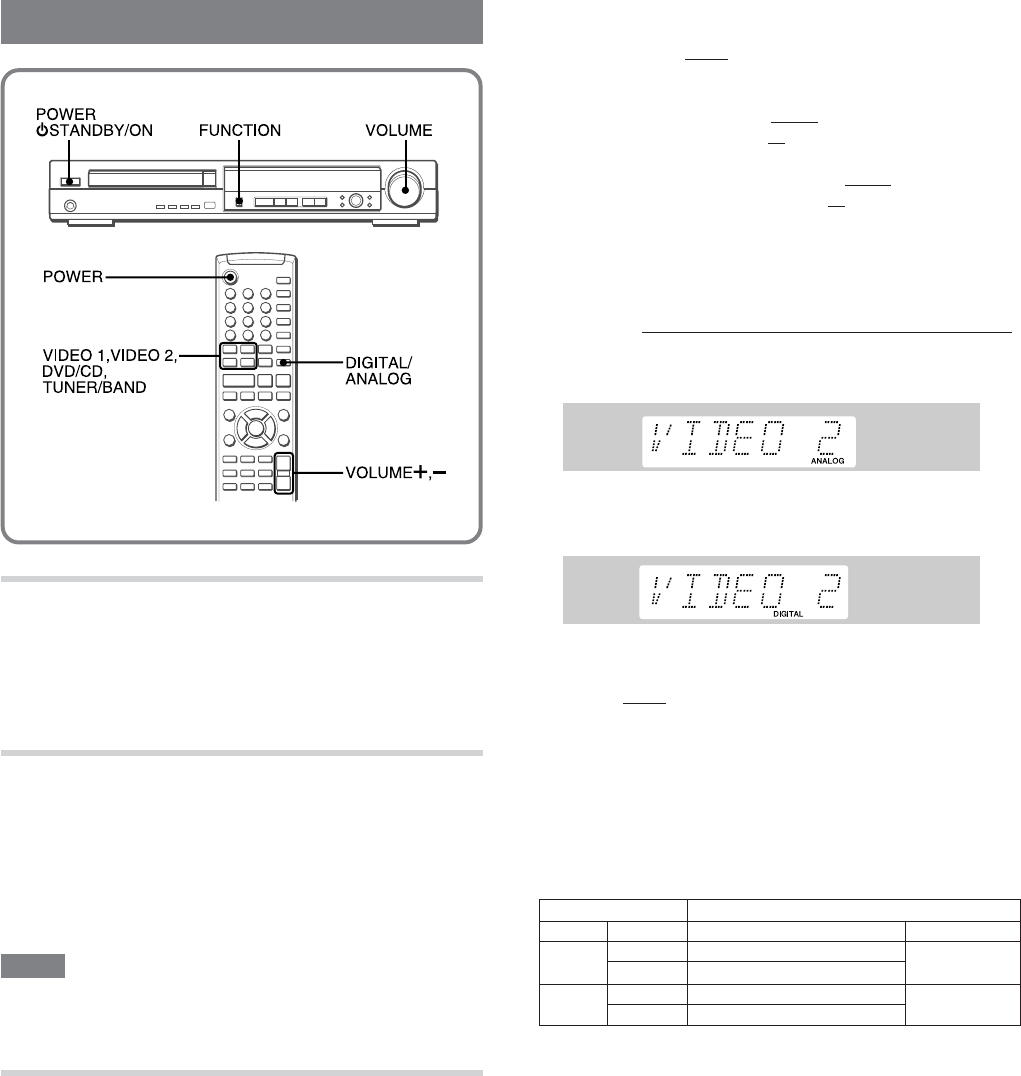
TURNING THE POWER ON
Press POWER 6STANDBY/ON (POWER on the
remote control) to turn the unit on and off.
ADJUSTING VOLUME
Turn VOLUME, or press VOLUME + or - on the
remote control.
The volume level is displayed as a number from MIN(0) to MAX
(80).
The volume level is automatically set to 60 when the power is
turned of f with the volume level set to 61 or higher .
NOTE
• When any one of speaker channel level is set to more than +1
dB (pages 26, 28), the maximum volume level decreases by
the speaker channel level.
SELECTING A SOURCE
Press FUNCTION.
The function changes as following order .
1 DVD/CD
2 FM (AM)
3 VIDEO 1 (ANALOG)
4 VIDEO 1 (DIGITAL)
5 VIDEO 2 (ANALOG)
6 VIDEO 2 (DIGITAL)
The current function name appears on the display .
Selecting with the remote control
Press VIDEO 1, VIDEO 2, DVD/CD or TUNER/BAND.
When VIDEO 1 or VIDEO 2 is selected with the remote
control
The active external
audio
source is selected by a combination of
the VIDEO 1 or VIDEO 2 function button and the DIGITAL/
ANALOG button on the remote control.
• Pressing VIDEO 1 selects
either
the OPTICAL IN VIDEO 1
jack (digital audio input)
or
the AUDIO VIDEO 1 IN jacks
(analog audio input).
• Similarly , pressing VIDEO 2 selects
either
the OPTICAL IN
VIDEO 2 jack (digital audio input)
or
the AUDIO VIDEO 2 IN
jacks (analog audio input).
• Pressing DIGITAL/ANALOG switches alternately between the
selected digital and analog audio inputs.
The DIGITAL or the ANALOG indicator lights up on the display .
For example, to select input from the OPTICAL IN VIDEO 2 jack ;
1 Press VIDEO 2.
The name of the selected input is displayed.
Example: VIDEO 2 is selected
2 If “ANALOG” input is selected, as with the case in this example,
press DIGITAL/ANALOG to switch to the digital audio input.
DIGITAL indicator lights up.
The video source is shared between the digital and analog
audio inputs
The active
video
source remains the same when audio input is
switched between digital and analog.
• When the VIDEO 1 function (i.e., digital audio input from the
OPTICAL IN VIDEO 1 jack) is selected, the video input remains
that from the VIDEO VIDEO 1 IN jack.
• Similarly , when the VIDEO 2 function (i.e., digital audio input
from the OPTICAL IN VIDEO 2 jack) is selected, the video
input remains that from the VIDEO VIDEO 2 IN jack.
If the “OVER LEVEL” indicator lights up
The input level of the analog external source is too high.
Do not input from the external equipment at high level.
[Overview of external input selection]
Buttons Active input jacks
FUNCTION
DIGITAL/ANALOG
Audio Video
DIGITAL OPTICAL IN VIDEO 1
ANALOG
AUDIO VIDEO 1 IN L/R
DIGITAL OPTICAL IN VIDEO 2
ANALOG
AUDIO VIDEO 2 IN L/R
VIDEO VIDEO 1 IN
VIDEO VIDEO 2 IN
VIDEO 1
VIDEO 2


