10
2-1 Front Panel
w
[TIME MODE/SET +/–] buttons
• Use to select the recording and playback speed mode.
Available recording/playback speed modes vary
depending on the setting of menu switch <HDR
RECORDING> on the <VTR MODE> screen.
Each time these buttons are pressed, the recording/
playback speed mode changes as follows. The recording/
playback speed mode is shown on the display.
HDR recording: OFF HDR recording: ON
2H: Standard 2H: Standard
6H: 3x 6H: 3x
L12H: 12-hour SP linear slow L18H: 18-hour EP linear slow
L24H: 24-hour SP linear slow 24H: 24-hour EP timelapse
48H: 48-hour SP timelapse 48H: 48-hour EP timelapse
72H: 72-hour SP timelapse 72H: 72-hour EP timelapse
120H: 120-hour SP timelapse 120H: 120-hour EP timelapse
168H: 168-hour SP timelapse 168H: 168-hour EP timelapse
240H: 240-hour SP timelapse 240H: 240-hour EP timelapse
480H: 480-hour SP timelapse 480H: 480-hour EP timelapse
960H: 960-hour SP timelapse 960H: 960-hour EP timelapse
• Also use these buttons during date/time setting, timer
program setting and menu switch setting to specify setting
values.
e
[ON SCREEN/SHIFT 7/t] buttons
• Use these buttons on the normal screen to move the
display position or recording position of on-screen
information. The position can be moved down by pressing
the 7 button and to the right by pressing the t button.
• Use these buttons on the menu screen to select the desired
item in date/time setting, timer program setting and menu
switch setting.
r
Display section
For details, refer to page 11.
t
[OPERATE] indicator
Lights when the [OPERATE] button is turned on.
y
[HDR] indicator
Lights in the HDR recording and HDR playback modes.
* HDR: High Density Recording
• For details on HDR recording, refer to page 28.
^
[SEARCH] button
Use to search the alarm recorded section or a section
recorded at a specified date and time. In the Stop mode,
select the search mode by pressing this button.
• Press once to engage the Alarm Search mode.
• Press twice to engage the Alarm Scan mode.
• Press three times to engage the Date/Time Search mode.
• Press four times to release the search mode.
After the search mode is selected with this button, press
the [FF] or [REW] button to execute the search operation
in the selected mode.
For details, refer to page 49.
&
[DISPLAY] button
Selects which data
— current time, control tape counter
(00
H
00
M
00
S
— 23
H
59
M
59
S
) or reel tape counter (0
—
9999) — is displayed. Each time this button is pressed, the
display switches to the next item.
*
[LOCK] button
Press to activate the operation lock function.
(
[CNT RESET] button
When the display shows the control tape counter or reel tape
counter, press this button to reset to
“00
H
00
M
00
S
” or “0000”.
)
[RESET/CANCEL] button
• In the Timer Program Setting mode, press this button to
cancel the program settings. For details, refer to
“Timer
Recording” on page 36.
• Also press this button to interrupt alarm recording or to
reset the alarm input data or power loss (power failure)
data. For details, refer to pages 21 and 39.
• Resets the seconds in the currently displayed time to 00
when pressed together with the
(
[CNT RESET] button
(except in menu setting mode).
- When the seconds value is 29 or less, the minutes value
is the same but the seconds value is reset to 0. (eg.
12:34:29 [ 12:34:00)
- When the seconds value is 30 or more, the seconds value
is reset to “00” and the minutes value is increased by one.
(e.g. 12:34:30 [12:35:00)
q
[MENU] button
Press to display the date/time, timer program, and various other
menu setting screens, as well as the hour meter, on the
monitor. Press again to cancel the menu or hour meter display.
2 CONTROLS AND CONNECTORS
^
[SEARCH] button
Use to search the alarm recorded section or a section
recorded at a specified date and time. In the Stop mode,
select the search mode by pressing this button.
• Press once to engage the Alarm Search mode.
• Press twice to engage the Alarm Scan mode.
• Press three times to engage the Date/Time Search mode.
• Press four times to release the search mode.
After the search mode is selected with this button, press
the [FF] or [REW] button to execute the search operation
in the selected mode.
For details, refer to page 49.
&
[DISPLAY] button
Selects which data
— current time, control tape counter
(00H 00M 00S
— 23H 59M 59S) or reel tape counter (0
—
9999) — is displayed. Each time this button is pressed, the
display switches to the next item.
*
[LOCK] button
Press to activate the operation lock function.
(
[CNT RESET] button
When the display shows the control tape counter or reel tape
counter, press this button to reset to
“00
H00M00S” or
“0000”.
)
[RESET/CANCEL] button
• In the Timer Program Setting mode, press this button to
cancel the program settings. For details, refer to
“Timer
Recording” on page 36.
• Also press this button to interrupt alarm recording or to
reset the alarm input data or power loss (power failure)
data. For details, refer to pages 21 and 39.
• Resets the seconds in the currently displayed time to 00
when pressed together with the ( [CNT RESET] button
(except in menu setting mode).
- When the seconds value is 29 or less, the minutes value
is the same but the seconds value is reset to 0.
(e.g. 12:34:29 [ 12:34:00)
- When the seconds value is 30 or more, the seconds value
is reset to “00” and the minutes value is increased by one.
(e.g. 12:34:30 [12:35:00)
q
[MENU] button
Press to display the date/time, timer program, and various other
menu setting screens, as well as the hour meter, on the
monitor. Press again to cancel the menu or hour meter display.
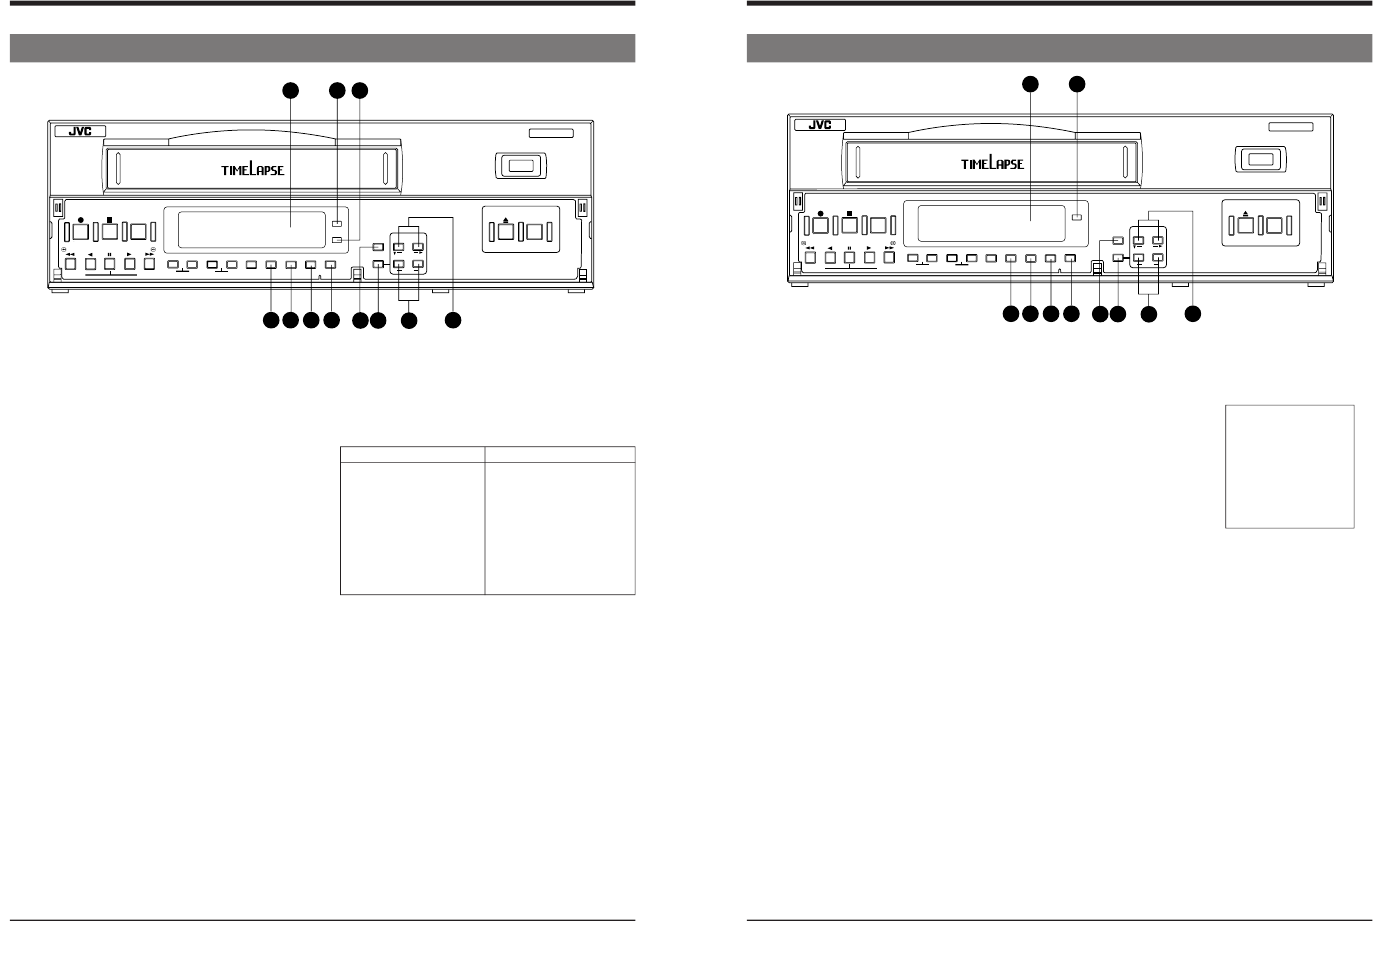
w
[TIME MODE/SET +/
–] buttons
• Use to select the recording and playback speed mode.
Each time these buttons are pressed, the recording/
playback speed mode changes as follows. The recording/
playback speed mode is shown on the display.
3H: Standard
L12H: 12-hour linear slow
L24H: 24-hour linear slow
48H: 48-hour timelapse
72H: 72-hour timelapse
120H: 120-hour timelapse
168H: 168-hour timelapse
240H: 240-hour timelapse
480H: 480-hour timelapse
960H: 960-hour timelapse
• Also use these buttons during date/time setting, timer
program setting and menu switch setting to specify
setting values.
e
[ON SCREEN/SHIFT 7/t] buttons
• Use these buttons on the normal screen to move the
display position or recording position of on-screen
information. The position can be moved down by pressing
the 7 button and to the right by pressing the t button.
• Use these buttons on the menu screen to select the desired
item in date/time setting, timer program setting and menu
switch setting.
r
Display section
For details, refer to page 11.
t
[OPERATE] indicator
Lights when the [OPERATE] button is turned on.
E model
10 (E)