[PROGRAM TIMER]
START STOP SPD
PGM
SUN ––:–– ––:–– –––– –––
MON ––:–– ––:–– –––– –––
TUE ––:–– ––:–– –––– –––
WED ––:–– ––:–– –––– –––
THU ––:–– ––:–– –––– –––
FRI ––:–– ––:–– –––– –––
SAT ––:–– ––:–– –––– –––
DAY ––:–– ––:–– –––– –––
DAYLY SET SUN MON
TUE WED THU FRI SAT
[PROGRAM TIMER]
START STOP SPD
PGM
SUN ––:–– ––:–– –––– –––
MON ––:–– ––:–– –––– –––
TUE ––:–– ––:–– –––– –––
WED ––:–– ––:–– –––– –––
THU ––:–– ––:–– –––– –––
FRI ––:–– ––:–– –––– –––
FRI 21:00
**
:
**
****
**
SAT
**
:
**
––:–– –––– –––
DAYLY SET SUN MON
TUE WED THU FRI SAT
[PROGRAM TIMER]
START STOP SPD
PGM
SUN ––:–– ––:–– –––– –––
MON ––:–– ––:–– –––– –––
TUE ––:–– ––:–– –––– –––
WED ––:–– ––:–– –––– –––
THU ––:–– ––:–– –––– –––
FRI ––:–– ––:–– –––– –––
FRI 21:00
**
:
**
****
**
MON
**
:
**
08:00 –120 RPT
DAYLY SET SUN MON
TUE WED THU FRI SAT
SR-9080E
REC
REC
STOP
REC
CHECK
EJECT
OPERATE
REVERSE
FIELD REV
FIELD ADV
REW
PLAY
TRACKING
TIMER
SEARCH
RESET/
CANCEL
DISPLAY LOCKCNT RESET
MENU
TIME MODE
SHIFT
ON SCREEN
OPERATE
V. LOCK
PAUSE
FF
–
+
–
+
SET
–
+
RESET/
CANCEL
MENU
TIME MODE
SHIFT
ON SCREEN
SET
–
+
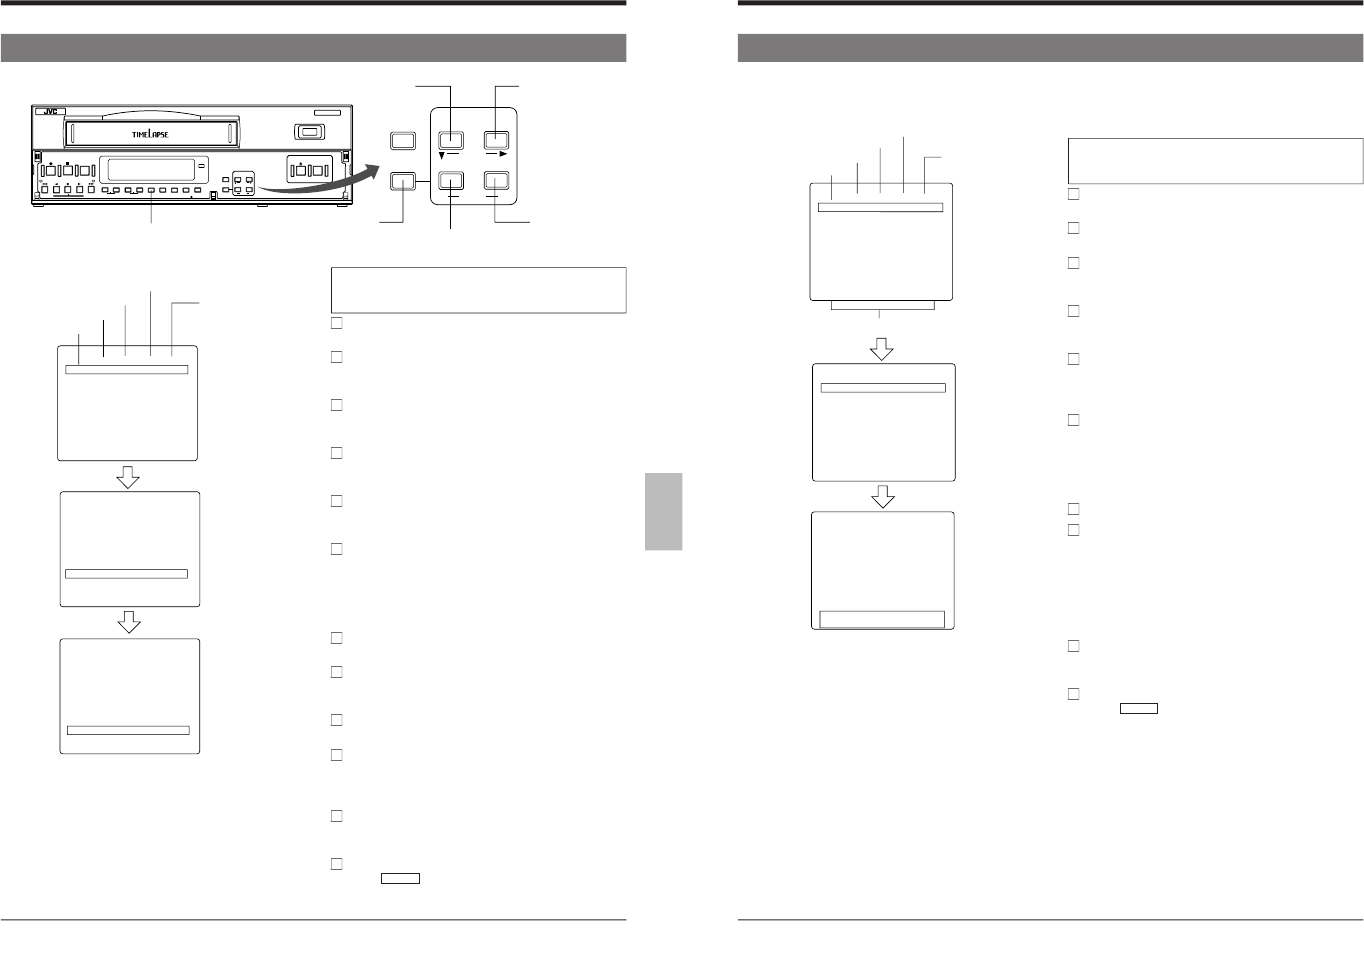
6-3 Timer Recording
6 RECORDING
[TIMER] button
[SHIFT f] button
[SET –] button
[SET +] button
[SHIFT 7] button
[MENU] button
5
Programming timer recording for more than 24 hours
(Example)
Recording is performed in the 120-hour timelapse mode
from 9:00 p.m. on every Friday to 8:00 a.m. on every Monday.
Follow steps 1 to 3 in
“Timer Recording Program Setting
”
on page 31.
Press the [SHIFT 7] button so that the 7th line
“SAT” blinks
on the <PROGRAM TIMER>. Programs lasting for more
than 24 hours can only be set on the seventh line.
Press the [SET +/
–] button to set the day of the week to
“FRI” and press the [SHIFT f] button.
[“Hour” for the start time blinks.
Press the [SET +/
–] button to set the hour of the start time
to “21” and press the [SHIFT f] button.
[“Minute” for the start time blinks.
Press the [SET +/
–] button to set the minute of the start time
to “00” and press the [SHIFT f] button.
[“Hour” for the stop time blinks.
Press the [SET +/
–] button to set the hour of the stop time
to “**”.
[“**:** **** **” is shown for the items after
“STOP”, the
“DAY” on the 8th line changes to the next day of the
week (SAT) automatically and
“**:**” is shown for
“START”.
Press the [SHIFT 7] button so that the day of the week on
the 8th line blinks.
Press the [SET +/
–] button to set the day of the week to
“MON” and press the {SHIFT f] button three times.
[“Hour” for the stop time blinks.
Press the [SET +/
–] button to set the hour of the stop time
to “8”.
In the same way, press the [SHIFT f] button and [SET +/
–] button to set the minute of the stop time to
“00”, the
recording speed to
“120” and “PGM” to “RPT (every
week)”.
End timer program setting.
Press the [MENU] button twice.
[The normal screen is restored.
Press the [TIMER] button.
[The TIMER indication and program number
“7” light on
the display and the operating mode is automatically
turned off to engage the Timer-Recording Standby mode.
Day of the week
Start time
Stop time
Recording speed
OFF : Operation is
disabled.
1ST : 1st week
RPT : Every week
PROGRAM TIMER screen
E model
33 (E)
[PROGRAM TIMER]
START STOP SPD PGM
SUN ––:–– ––:–– –––– –––
MON ––:–– ––:–– –––– –––
TUE ––:–– ––:–– –––– –––
WED ––:–– ––:–– –––– –––
THU ––:–– ––:–– –––– –––
FRI ––:–– ––:–– –––– –––
SAT ––:–– ––:–– –––– –––
DAY ––:–– ––:–– –––– –––
DAYLY SET
SUN MON TUE WED THU FRI SAT
[PROGRAM TIMER]
START STOP SPD PGM
DAY 10:00 17:00
–48 ON
MON ––:–– ––:–– –––– –––
TUE ––:–– ––:–– –––– –––
WED ––:–– ––:–– –––– –––
THU ––:–– ––:–– –––– –––
FRI ––:–– ––:–– –––– –––
SAT ––:–– ––:–– –––– –––
DAY ––:–– ––:–– –––– –––
DAYLY SET
SUN MON TUE WED THU FRI SAT
H
D
[PROGRAM TIMER]
START STOP SPD PGM
DAY 10:00 17:00
–48 ON
MON ––:–– ––:–– –––– –––
TUE ––:–– ––:–– –––– –––
WED ––:–– ––:–– –––– –––
THU ––:–– ––:–– –––– –––
FRI ––:–– ––:–– –––– –––
SAT ––:–– ––:–– –––– –––
DAY ––:–– ––:–– –––– –––
DAYLY SET
––– MON ––– WED ––– ––– SAT
H
D
6-3 Timer Recording
5
Programming timer recording for more than one day
(every day)
This programming is to timer-record at the same time on
specified days of the week.
(Example)
HDR is performed in the 48-hour mode from 10:00 a.m. to
5:00 p.m. on Monday, Wednesday and Saturday.
Repeat steps 1 to 5 in
“Timer Recording Program
Setting” on page 31.
Set the day of the week on <PROGRAM TIMER> to
“DAY” with the [SET +/
–] button.
Press the [SHIFT f] button so that the
“hour” for the
start time blinks and set
“hour” to “10” with the [SET +/
–]
button.
Press the [SHIFT f] button so that the
“minute” for the
start time blinks and set
“minute” to “00” with the [SET +/
–] button.
Press the [SHIFT f] button and [SET +/
–] button to set
the hour of the stop time to
“17”, the minute of the stop
time to “00”, the recording speed to
“H/D48” and “PGM”
to “ON”.
Set the days of the week when timer recording is to be
executed (Monday, Wednesday, Saturday).
Set the days with
“DAILY SET” at the lower section of
the screen.
• Press the [SHIFT 7] button so that
“SUN” in the
lowest line blinks.
Press the [SET +/
–] button to set “SUN” to “– –”.
Press the [SHIFT f] button to select the day of the
week and set the operating day of the week with the
[SET +/–] button.
Set the items for
“Tuesday”, “Thursday” and “Friday” to
“– –”.
• Timer recording will take place on the days of the week
shown on the display. Timer recording will not take
place on days of the week indicated by
“– –”.
End timer program setting.
Press the [MENU] button twice.
[The normal screen is restored.
Press the [TIMER] button.
[The TIMER indication and active timer program
numbers light on the display and the operating mode
is automatically turned off to engage the Timer-
Recording Standby mode.
6 RECORDING
PROGRAM TIMER screen
PROGRAM
NO.
1
2
3
4
5
6
7
8
Day of the week
Start time
Stop time
Recording speed
ON: Enabled
OFF: Disabled
DAILY SET
U model
34 (U)


