


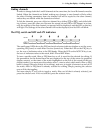
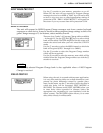

17 – TUTORIAL – Using the notch filters, and the HPF and LPF
YDP2006
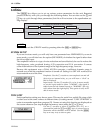
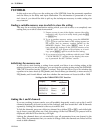
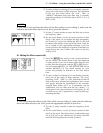
2 To select a filter for editing (if it’s not already selected),
press one of the notch or filter selectors. The indication
in the top left corner below the “Lch”, “Rch” or
“MONO” indication shows the filter that is currently
selected for editing. It will either show NOT1, 2, 3 or 4,
HPF or LPF.
NOTE
If you wish to see and hear the effects of the filter while you are editing it, make sure the
indicator above the filter selector is on. If not, press the selector.
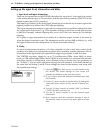
3
Use the F rotary encoder to move the filter up or down
the frequency band.
4 For the notch filters, use the Q rotary encoder to alter
the Q of the notch. As you adjust the filter parameters,
the F (and Q if you’re not editing the HPF or LPF) will
be shown numerically at the top of the screen. If the fil-
ter is turned on (the appropriate indicator is lit), the
screen will show the frequency response of the filter set-
tings. Notice the extra width of the notch on the left,
with Q of 0.5.
III. Editing the filters numerically
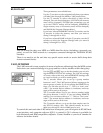
1 Press the [NOTCH] key until you see a screen similar to
the one shown. The screen shown is the one displayed
in stereo mode. If you are in mono mode, there are two
screens like this (accessed with the [L/<] or [R/>] keys)—
one for notches MONO.L 1-4, HPF and LPF, and one for
notches MONO.R 1-4. The actual settings on your
screen will probably be different to the ones shown
here.
2 To select a filter for editing (if it’s not already selected),
press one of the notch or filter selectors. The corre-
sponding “NOT”, “HPF” or “LPF” indication on the left
side of the screen will become highlighted, and a cursor
will appear beneath the parameters for the currently
selected filter (either the F or Q parameter will be
underlined). For any filters that are off, a dash (“—”)
will appear in the second column of the display. For fil-
ters that are on, this is replaced by a small symbol rep-
resenting the filter.
NOTE
If you wish to hear the effects of the filter while you are editing it, make sure the indicator
above the filter selector is on. If not, press the appropriate selector to turn it on.
3
Use the F rotary encoder to alter the frequency of the
filter.
4 For the notch filters, use the Q rotary encoder to alter
the Q of the notch. The figure shown is adjustable from
0.5 to 10.0 (10.0 is the narrowest). Of course, the HPF
and LPF shelving filters do not take Q values.