


15 – TUTORIAL – Making parametric equalizer settings
YDP2006
Making parametric equalizer settings
Here is where the user interface of the YDP2006 really makes parametric equalization easy.
For the most part, you will never need to set any parameters numerically (unless you want
to)—the resulting frequency response of the equalizer, and the notch filters can be displayed
graphically on the screen.
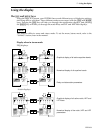
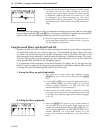
1
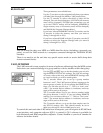
Press the [PEQ] key until you see a screen similar to the
one shown. The number of the currently selected band
is shown below the channel indication in the top left
corner of the display. The actual settings on your screen
will probably be different to the ones shown here.
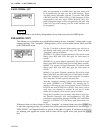
2 Select which equalization band you wish to edit. If the
number of this band is not shown below the channel
indication (“Lch”, “Rch”, “MONO.L” or “MONO.R”) at
the top left of the screen, press the corresponding PEQ
selector to select it. The number of the band will appear
below the channel indication.
In mono mode, press either [L/<] or [R/>] to toggle
between the display of bands MONO.L 1-6 and
MONO.R 1-6.
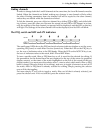
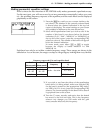
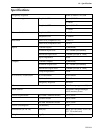
Each band can only be set within a certain frequency range. These ranges are shown in the
table below. As can be seen, the ranges overlap to a large degree, making them very flexible.
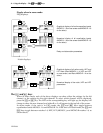
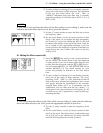
3
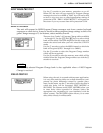
If you wish to see/hear the effects of the equalization
band while it is being edited, make sure that the PEQ
for the band is turned on (the appropriate PEQ indica-
tor LED is lit). If it is not, press the corresponding PEQ
selector. The current settings for the band will be shown
in graphical form on the screen.
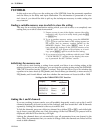
4 Turn the F rotary encoder, and notice how the dotted
bar moves to the left and right. This is the frequency
selector—any changes you will make with the gain
rotary encoder affect only this frequency.
Frequency ranges and Q for each equalizer band
L1, R1
L2 – L5
R2 – R5
L6, R6
Frequency
Band
(Stereo mode)
Band
(Mono mode)
Q
L1
L2 – L6
R1 – R5
R6
20 Hz – 20.0 kHz
LSH, 0.5 – 10.0
HSH, 0.5 – 10.0
0.5 – 10.0