


69
English
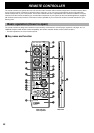
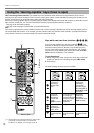
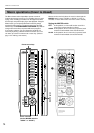
REMOTE CONTROLLER
1 TAPE/MD keys
These keys control tape decks or MD recorders.
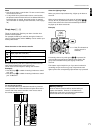
The A/B/C switch (
I) should be set to the “A” position to
control tape decks, and “C” position for MD recorders.
* The DIR A, B and A/B keys apply only to double cassette
tape decks.
* Pressing the DIR A key will reverse the tape direction on a
single cassette tape deck with the automatic reverse
function.
* The and keys work as follows.
For tape decks:
: Rewinds a tape.
: Advances a tape fast.
For MD recorders:
: Locates the beginning of the current or previous
track.
: Locates the beginning of the next track.
2 CD/DVD/LD player keys
These keys control compact disc players, DVD players or LD
players.
Set the A/B/C switch (
I) to the “A” position to control
compact disc players, “B” position for DVD players and “C”
position for LD players.
* The DISC key is used for disc changers only.
* The STOP key is used for DVD players and LD players only.
3 Tuner keys
Control tuners.
The A/B/C switch (
I) should be set to the “A” position.
+: Press this key to select the next preset station number.
–: Press this key to select the previous preset station
number.
A/B/C/D/E: Selects the group (A – E) of preset station
numbers.
4 DSP program selector keys
Press a key to select a DSP program when the built-in digital
sound field processor is on. Includes the Dolby Pro Logic
Surround decoder, Dolby Digital decoder, and DTS decoder.
5 LEVEL key
This key is used to adjust the output level of the center, rear
and front effect speakers, and subwoofer. First, press this key
(several times) to select the speaker(s). The name will be
illuminated on the display. Then press the + or – keys (
D
) to
change the output level.
6 PARAMETER/SET MENU switch
Set this switch to “PARAMETER” to edit a DSP program
parameter. Set to “SET MENU” to adjust or make changes in a
function in the SET MENU mode.
7 TEST key
This key is used when adjusting the speaker balance. (Refer to
pages 32 to 34.)
8 SLEEP timer key
Press this key to turn the built-in SLEEP timer on and off, and
set the SLEEP time. (Refer to page 67.)
9 ON SCREEN display key
Press this key to change the type of display on the monitor
screen. Three types of displays are available.
Each time the key is pressed, the information can be changed
to a full, simple and no display.
0 SYSTEM POWER ON and STANDBY keys
Press the SYSTEM POWER ON key to turn on the power.
Press the STANDBY key to set this unit in the standby mode.
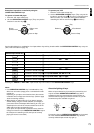
A RESET button
This button is inside the battery compartment.
Press this button to reset the internal microcomputer for
controling remote control operations. This button is used when
the remote controller “freezes”.
* Learned functions will not be erased when this button is
pressed.
B MASTER VOLUME (up) and (down) keys
Press these keys to increase or decrease the volume.
C MUTE key
Press this key to mute the volume. The volume can be
returned to the original level by pressing any remote controller
key which controls this unit.
The indicator on the VOLUME control flashes during the mute
mode.
D / and –/+ keys
The (up) and (down) keys change the parameters or
functions according to the mode selected by the
PARAMETER/SET MENU switch. The – and + keys adjust or
make changes in the parameter or function.
E EFFECT ON/OFF key
Press this key to turn on/off the digital sound field processor,
which includes the Dolby Pro Logic Surround decoder, Dolby
Digital decoder and DTS decoder.
F EXT. DEC. key
Press this key to select the input signals from the EXTERNAL
DECODER INPUT terminals as the input source. This function
takes priority over the input selector key setting. “EXT.
DECODER IN” will be illuminated on the display panel.
The source selected with the input selector keys becomes the
current input source when “EXT. DECODER IN” is not
illuminated on the display panel.
G Input selector keys
Press a key to select the input source.
H A/B/C indicators
One of these indicators will turn to red depending on the
position of the A/B/C switch.
I A/B/C switch
Normally this switch is set to the “A” position. Use the “B”
position to control a Yamaha DVD player with the CD/DVD/LD
player keys (
2
). Use the “C” position to control a Yamaha LD
player with the CD/DVD/LD player keys (
2
), or control a
Yamaha MD recorder with the TAPE/MD keys (
1
).
J TRANSMIT/LEARN indicator
This indicator will be illuminated when a key is pressed on the
remote controller. (Transmitting infrared signals.)
K LIGHT key
Press this key to turn on the light for some of the keys about 5
seconds. The light can be turned off by pressing the key again.
Note
The functions of the keys to control other Yamaha
components are the same as the corresponding keys on
those components. Refer to those components’ instruction
manuals for details.
RESET button