


RECORDING
43
BASIC
OPERATION
Recording adjustments and other operations are
performed from the recording components. Refer to the
operation instructions for those components.
1 Turn on the power of this unit and all
connected components.
See page 28 for details.
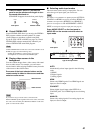
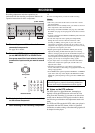
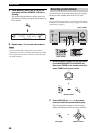
2 Rotate the INPUT selector on the front panel
(or set AMP/SOURCE/TV to SOURCE and
then press one of the input selector buttons)
to select the input source you want to record
from.
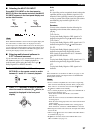
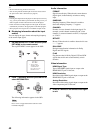
3 Start playback (or select a broadcast station)
on the source component.
4 Start recording on the recording component.
y
Do a test recording before you start an actual recording.
• The source you record and the source sent to Zone 2 can be
selected separately.
• When this unit is in the standby mode, you cannot record from
other components connected to this unit.
• The settings for TONE CONTROL (see page 36), VOLUME,
SP LEVEL (see page 78) and programs do not affect recorded
material.
• A source connected to the MULTI CH INPUT jacks of this unit
cannot be recorded.
• S-video and composite video signals pass independently
through the video circuits of this unit. Therefore, when
recording or dubbing video signals, if your video source
component is connected to provide only an S-video or only a
composite video signal, you can record only an S-video or only
a composite video signal to your VCR.
• Digital signals input at the DIGITAL INPUT jacks are not
output at the analog AUDIO OUT L/R jacks for recording.
Likewise, analog signals input at the AUDIO IN L/R jacks are
not output at the DIGITAL OUTPUT jack. Therefore, if your
source component is connected to provide only digital or analog
signals, you can only record digital or analog signals.
• A given input source is not output on the same OUT (REC)
channel. For example, the signal input at VCR 1 IN is not
output at VCR 1 OUT.
• Check the copyright laws in your country to record from
records, CDs, radio, etc. Recording of copyrighted material may
infringe copyright laws.
• Some HDMI audio signals input at the HDMI IN 1 or HDMI IN
2 jack of this unit may not be output at the DIGITAL AUDIO
(OPTICAL) jacks depending on the type of those HDMI audio
signals.
■ Notes on the DTS software
The DTS signal is a digital bitstream. Attempting to
digitally record the DTS bitstream will result in noise
being recorded. Therefore, if you want to use this unit to
record sources that have DTS signals recorded on them,
the following considerations and adjustments need to be
made.
For DVDs and CDs encoded in DTS, when your player is
compatible with the DTS format, follow its operation
instructions to make a setting so that the analog signal will
be output from the player.
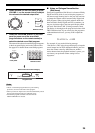
RECORDING
VOLUME
EDIT
SEARCH MODE CATEGORY
PRESET/TUNING
MAN'L/AUTO FM
MEMORY
AUTO/MAN'L
DISPLAY
TUNING MODE
FM/AM
l
PRESET/TUNING/CH
h
A/B/C/D/E
AUDIO SELECT
TONE CONTROLSTRAIGHT
EFFECT
PURE DIRECT ZONE CONTROL
SPEAKERS
PHONES
SILENT CINEMA
OPTIMIZER MIC
ON/OFF ON/OFF
ON :OFF
ON/OFF
MAIN ZONE
MASTER
BA
ZONE 2 ZONE 3
MULTI CH
INPUT
INPUT
PROGRAM
S VIDEO VIDEO OPTICALL AUDIO R
VIDEO AUX
2
1
(U.S.A. model)
INPUT
AMP
SOURCE
TV
DTV DVR/VCR2VCR 1 DVD
V
-
AUX
CBL/SAT MD/TAPE
CD-R
PHONO TUNER CD
MULTI CH IN
SLEEP
AUDIO SEL
A
XM
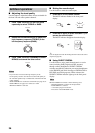
Front panel
or
Remote control
Notes
If you play back a video source that uses scrambled or
encoded signals to prevent it from being dubbed, the
picture itself may be disturbed due to those signals.