


20
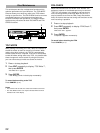
Part Erase
This operation lets you erase part of a track.
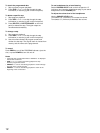
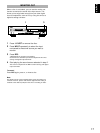
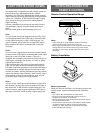
1 Press #/* to play the track containing the part
you want to erase.
2 Use SEARCH ! or ⁄ to locate the beginning
of the part you want to erase (point A), then press
#/* to pause at that point.
3 Press EDIT repeatedly to display “A–B Erase?”,
then press ENTER.
Point A (from step 2) is registered and “Erase A–_” appears in
the display.
4 Use #/* and SEARCH ⁄ to locate the end of
the part you want to erase (point B).
5 Press ENTER to register point B.
“Check” appears momentarily in the display, and two second
segments of the track immediately before point A and after
point B play repeatedly. “Erase A–B?” appears in the display.
To adjust points A and B
Pressing EDIT repeatedly displays “A point” and “B point”
alternately. Adjust the selected point by turning the jog dial in
the direction you want to move the point.
Each point can be adjusted up to 2 seconds (176 steps) in
either direction.
6 Press ENTER again.
The part is erased and “Complete” appears momentarily.
To cancel before erasing the part
Press CANCEL (or &).
To undo ERASE
1 Press & to set this unit to stop mode.
2 Press EDIT repeatedly to display “Undo Erase”, then
press ENTER.
“Undo OK ?” appears in the display.
3 Press ENTER again to undo.
To cancel, press CANCEL (or &).
To erase parts spanning more than one track
Use the COMBINE function described next to combine the
tracks into one track before performing this operation.
Notes
• After part erase, a new track number is automatically
assigned to the section starting after point B.
• Point B cannot be positioned before point A.
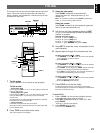
Disc or Track Title Erase
This operation lets you erase the title of the disc or the title
of tracks on a disc. The title of the disc can only be erased
during the stop mode, however, the title of the track can be
erased during play or stop mode. In the stop mode, use
the jog dial to select the track.
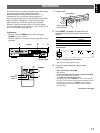
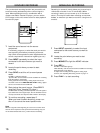
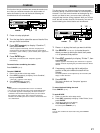
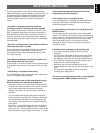
To erase a disc title
1 Press & to set this unit to stop mode.
2 Press EDIT repeatedly to display “Title Erase?”,
then press ENTER.
“Disc Title” and “Erase OK?” appear alternatively in the
display.
3 Press ENTER again.
The disc title is erased and “Complete” appears momentarily.
To erase a track title
1 Turn the jog dial to select the track with the title
you want to erase.
2 Press EDIT repeatedly to display “Title Erase?”,
then press ENTER.
“Track Title” and “Erase OK?” appear alternatively in the
display.
3 Press ENTER again.
The track title is erased and “Complete” appears momentarily.
To cancel before erasing the disc or track title
Press CANCEL (or &).
To undo ERASE
1 Press & to set this unit to stop mode.
2 Press EDIT repeatedly to display “Undo Erase”, then
press ENTER.
“Undo OK ?” appears in the display.
3 Press ENTER again to undo.
To cancel, press CANCEL (or &).
Notes
• Note that the DISC and TRACK indicators appear in the
display when “Title Erase” is displayed to distinguish between
the two operations.
• To avoid mistakes when erasing the disc or track names,
press DISPLAY repeatedly until the title display screen
appears so that titles can be confirmed beforehand.
&#˜*
REC
)
EJECT
POWER
0
10
0
10
RANDOM S/F REPEAT A–B DISPLAY SCROLL TITLE CHARA. DELETE EDIT SET
CANCEL ENTER
REC LEVEL PHONES LEVEL
INPUT
!
SEARCH
⁄
+
›
–
$
TIMER
OFF
PLAYREC
NATURAL SOUND MINIDISC RECORDER MDX–595
ANALOG
DIGITAL
REC LEVEL
2 2,3 1
CANCEL
&#˜*
REC
)
EJECT
POWER
0
10
0
10
RANDOM S/F REPEAT A–B DISPLAY SCROLL TITLE CHARA. DELETE EDIT SET
CANCEL ENTER
REC LEVEL PHONES LEVEL
INPUT
!
SEARCH
⁄
+
›
–
$
TIMER
OFF
PLAYREC
NATURAL SOUND MINIDISC RECORDER MDX–595
ANALOG
DIGITAL
REC LEVEL
2 2,3
1
CANCEL
3,5 3,5,6 5
CANCEL
1,2,42,4
&#˜*
REC
)
EJECT
POWER
0
10
0
10
RANDOM S/F REPEAT A–B DISPLAY SCROLL TITLE CHARA. DELETE EDIT SET
CANCEL ENTER
REC LEVEL PHONES LEVEL
INPUT
!
SEARCH
⁄
+
›
–
$
TIMER
OFF
PLAYREC
NATURAL SOUND MINIDISC RECORDER MDX–595
ANALOG
DIGITAL
REC LEVEL