


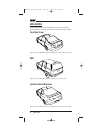
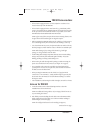
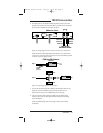

6. If the XM system is not already installed,temporarily connect power and
ground to the system.Connect the TRK-SR2 to your XM receiver,as directed
by the receiver’s manufacturer (see Figure 11 below).
Figure 11.Wiring diagram shows antenna connections to an XM receiver.
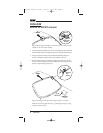
NOTE:For the Sony DRN-XM01 Digital Audio Receiver, use a small jeweler’s
screwdriver to remove the plastic case and inserts from each FAKRA-type SMB
connector,as shown in Figure 12 below.
Figure 12.Removing the plastic case and inserts
.
7. Turn on the XM system and tune to different XM channels.If there are any
problems,review the installation steps and verify that each one was
performed correctly.Also see
Troubleshooting on the next page.
8. After the system has been tested successfully,route the cable from the
antenna to the receiver for best appearance and complete the remaining
system installation.
NOTE: For additional help with cable routing,consult your local mobile
audio dealer.
Installation 9
TRK-SR2 INSTALLATION GUIDE
From TRK-SR2
Roof-Mount Anntena
Green Case
(Terrestrial)
Curry Case
(Satellite)
Black Wire Brown Wire
Antenna
1 2
XM Receiver (Tuner)
Step 1
Step 2
FAKRA-type SMB Connector
(Side View)
Case
Jeweler’s
Screwdriver
Lift Tab
Case
Insert
Insert
TRK-SR2 Install Guide 8/29/01 10:22 AM Page 9