


INSTALLATION
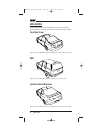
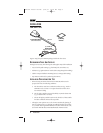
TRK-SR2 PARTS
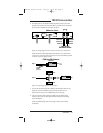
Figure 8.Verify that your TRK-SR2 package includes the above items.
RECOMMENDED TOOLS AND SUPPLIES
Although not necessary,the following tools and supplies may aid in installation:
• Any tool to help cable routing (e.g.,flat dental pick,screwdriver,etc.)
• Lubricant (e.g.,light machine oil to aid cable routing through old molding)
• Cable tie wraps and adhesive mounting bases (to manage cable routing)
• Tape measure and level (for positioning the antenna)
INSTALLATION PRECAUTIONS AND TIPS
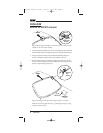
• When selecting an antenna location for the TRK-SR2,make sure the
proposed site meets the following conditions:
a. The selected site must have a conductive surface area (e.g.,metal or
aluminum roof) of at least 2-1⁄4 square feet and be 6 inches from
rear window molding.
b. Line of sight to satellites must not blocked by any metal obstructions
(e.g.,crossbars from a roof rack).
c. Choose the highest possible location on the vehicle’s roof that satisfies
the above conditions and is as flat as possible.
• Although a center position on a roof is the most aesthetically pleasing,if
there is an obstruction (e.g.,skid ribs,protruding brake light on roof line,
etc.) consider offsetting the TRK-SR2 from the center.If this doesn’t work,
use the Terk TRK-SR1 Glass-Mount Satellite Radio Antenna instead.
6 Installation
(1) Roof-Mount Antenna
(with self-adhesive backs)
Cable Cover
Flap
(1) 11' Pair of
Coaxial Cables
(attached to antenna module)
(1) Cleaning
Towelette
TRK-SR2 Install Guide 8/29/01 10:22 AM Page 6