


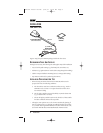

• If the vehicle is equipped with a roof rack,adjust the crossbar so it’s at
least 6 inches away from the TRK-SR2.
• If the vehicle is equipped with a metal sunroof (e.g.,Mazda 626),which
opens to the outside,allow a minimum distance of 6 inches from the edge
of the open sunroof to the TRK-SR2.If this is not possible,use the Terk
TRK-SR1 Glass-Mount Satellite Radio Antenna instead.
NOTE:A glass sunroof does not require this minimum mounting distance,since
the glass does not block satellite signals nor degrade reception.
• Before mounting the TRK-SR2,make sure the vehicle’s roof is above 60 °F,
non-condensing,and dry.This will also allow the molding to soften up.
• At a selected antenna site,survey the planned cable route and look for any
blocked passages.Consider alternate routes to find the best available path.
NOTE: Take advantage of any existing cable channels (e.g.,brake light
opening ) or wiring conduits to route the cables.
• Avoid running cables through components that may cause excessive chafing.
Doing so may erode the jacket and break signal continuity. Also,avoid
kinking,pinching,or twisting a cable during a run.
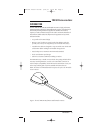
• When routing the cable through small openings,consider removing the
plastic cases and inserts from connectors (see Figure 12 on page 9).
• For convertibles with composite trunk lids,attach an aluminum foil
“ground plane”of at least 2-1⁄4 square feet,centered under the antenna
module,between the lid and liner.
• When pressing the TRK-SR2 onto the vehicle’s roof,apply an initial
contact force of 15 to 20 PSI (i.e.,steady and firm finger-tip pressure) for
60 seconds.Allow 20 minutes for the self-adhesive backing to set before
driving the vehicle.
• After installation,avoid running the vehicle through a car wash for 72 hours.
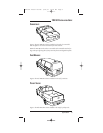
INSTALLING THE TRK-SR2
1. At the selected site,use an enclosed Cleaning Towelette to clean the
installation area on the vehicle’s roof.
NOTE:For additional cleaning solution,only use isopropyl alcohol.Do not use
any commercial glass cleaners.
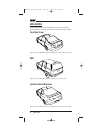
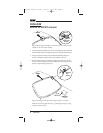
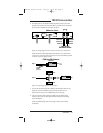
2. Peel off both protective backings from the cable cover and antenna module.
Lightly position the end of the cable cover at the rear window molding,as
shown in Figure 9 on the next page.
NOTE:The end flap should extend over the molding (see Figure 9).
Continued on next page...
Installation 7
TRK-SR2 INSTALLATION GUIDE
TRK-SR2 Install Guide 8/29/01 10:22 AM Page 7