


18
Setting up, using the speaker for the first time
Unpacking
Please unpack your sub-woofer and accessories
carefully. The carton contains the following components:
Fold up the original packaging and store it in a safe
place. The carton and packing pieces are specially
designed for these speakers. They form a secure
container if you ever need to transport the sub-woofer,
and help to maintain the speaker's value if you ever wish
to sell it.
If you do not want to keep the packaging materials,
kindly return them to your dealer who will dispose of
them in the proper way.
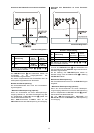
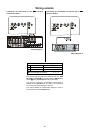
Assembly notes
Some subwoofer models are equipped with threads for
spikes or furniture glides on their bottom sides. To install
the spikes or glides please follow the instructions below:
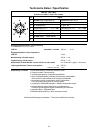
If you wish to fit the sub-woofer with spikes / furniture
glides, place the cabinet in its final position and lay it on
its side.
Screw the nuts onto the threaded shank of the spikes /
furniture glides, and screw the spikes / furniture glides
into the vacant threaded holes in the cabinet bottom. Set
the sub-woofer upright again.
The height of the spikes / furniture glides can be
adjusted individually to correct any tendency for the sub-
woofer to wobble. When the spikes / furniture glides are
set correctly, lock them in place by tightening the nuts
against the cabinet.
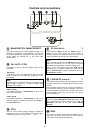
Furniture glides
Spike
Caution:
The spikes are extremely sharp, and therefore capable of
inflicting injury. Please handle them with the greatest
care, and keep them well away from children.
The points of spikes may damage delicate floor surfaces
(e.g. parquet flooring or tiles).
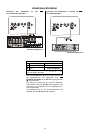
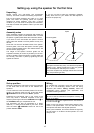
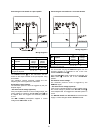
Set-up position
Wherever possible the sub-woofer should be positioned
on the same side of the room as the satellite loud-
speakers.
In most cases the most favourable position for the sub-
woofer is on the floor close to a wall. In this case switch
POSITION should be set to the 'WALL' position.
Positioning the sub-woofer right in one corner of the
room may result in excessive emphasis of the low-
frequency bass signal. Move the POSITION switch
to
the 'CORNER' setting to compensate for this.
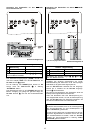
The subwoofer can also be positioned at a bigger
distance (> 1 metre) from the walls of your room. In this
case the switch
POSITION should be set to the
position labelled 'FREE'.
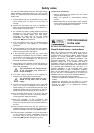
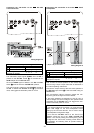
Wiring
To complete the connections invert the sub-woofer and
lay it on a non-scratching surface. From the wiring
diagrams (see section 'Wiring variants') select the
combination which matches your application, and
complete the wiring as shown.
Note:
Be sure to set the switches and adjustors correctly, as
shown in the table!
Connect the mains lead supplied with the sub-woofer to
the mains socket
.
Switch on the unit using the mains switch while the sub-
woofer is still upside-down. You can now test the unit
and optimise the switch and adjustor positions.
When you are satisfied, turn the sub-woofer the right way
up and place it on its feet in the final position. It is now
ready for use.