


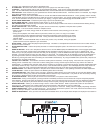

16. FADER START
By connecting the CD player to a mixing board that has the fader start feature, the crossfader will engage playback or cue mode depending
on its’ location. If the CD player is connected to the left side of the crossfader, playback will start once the fader is moved from the left most
position towards the right. The CD player will re-cue itself when the crossfader is brought back to the left most position. Two CD players can
be hooked up in this fashioin to work on both sides of the crossfader.
17. RELAY PLAY USING TWO PLAYERS
When both CD players are connected to each other via their FADER START / RELAY jacks, the players can work in unison by playing tracks
one after another from both units.
• Set both players to single play mode (the SINGLE indicator will be illuminated in the LCD displays).
• Begin playback on the first player.
• When the first track ends, playback will automatically start on the second player and the first player will automatically enter standby mode.
• When the track on the second player ends, the first player will play the next track. The players will continue to
perform continuous relay play until stopped or until the last track is played.
• By setting a cue point on the standby player, you can perform relay to any desired cue point on the selected
track.
NOTE: Relay play may not work properly if the audio outputs on both players are not connected to the same
audio input, amplifier, or if the mixing board is not set up properly.
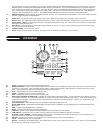
19. STUTTER EFFECTS
Similar to the sound of a CD skipping, this effect can be created and controlled in a variety of ways.
• Rapidly pressing the CUE button.
• By storing a cue point to one of the four BANK buttons and pressing them rapidly.
• By creating a seamless loop, and rapidly pressing the RELOOP button.
• By creating a seamless loop with a very short duration.
• By pressing PAUSE while audio is playing in CD Jog mode.
20. REVERSE PLAY
This allows you to play a track, loop, or sample backwards. This function is activated by pressing the REVERSE button (#31) and will react
differently to different modes of operation.
• Reverse track / disc play
In this mode, the unit will playback in reverse until the reverse function is turned off. If the reverse function is
left on, the unit will continue to play the remainder of the disc in reverse mode until it reaches the beginning of
the disc. If the unit is paused in this mode, it will continue to play in reverse when playback begins again.
• Reverse loop play
If the loop is less than 5 seconds long, then playback will continue in reverse until the reverse or loop function
is turned off. Otherwise, the loop will play in reverse once and then turn off. If the reverse function is turned
off at this point, the loop will continue to playback normally (forward). If the OUT button is pressed during
reverse loop playback mode, playback will continue in reverse until the reverse function is turned off.
21. USING FX
The six DSP FX can be used to creatively modify and manipulate the way music sounds. They can be used individually, or in unison
(stacked). However, only three FX can be used simultaneously, as Filter and Phase, Echo and Flanger, and Pan and Transform are linked,
meaning that only one of the linked pair can be used at a time. For example, it’s possible to use Filter, Echo, and Pan, simultaneously, but it
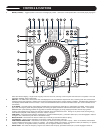
is not possible to use Filter and Phase at the same time. FX are engaged and disengaged by pressing their corresponding button (section
#10 in the Controls & Functions section). Ultimately, it is up to you to experiment with these various FX, their parameters, and combinations
to hear what they are truly capable of and to get familiar with their finer points.
• Time based FX
FX will respond according to the selected TIME DIVISION INDICATOR (#7). For example, if 1/1 is shown and the Filter FX is selected, the
Filter will modulate one complete cycle over the course of one measure, or four beats. If 4/1 is shown, the Filter will modulate one complete
cycle over the course of four measures, or sixteen beats. When in BEAT SYNC MODE, the modulation will occur according to the time
frame dictated by the BPM of the track being played.
• Using the TIME knob
This knob is used to dial in specific values for the time in which FX modulate, other than the strict values in the
TIME DIVISION INDICA
TOR
(#7). This allows for a more free-form application of the various FX and how they change over time. For example, if you want your track to
pan back and forth in a manner which doesn’t necessarily conform to the beat, turning the
TIME knob will display the new value in the LCD
screen, and will also light the two TIME DIVISION INDICATORS that the new value falls between. Time divisions such as 1.5/4 and 3/4 and
3/1 can be achieved in this way, as well as being able to smoothly adjust the time parameter, instead of jumping between values with the
MINUS (#5) or PLUS (#9) buttons.
• Using the RATIO knob
This knob is used to dial in specific values for the depth in which FX modulate. For example, when using the Filter FX, this knob is used to
adjust the width of the affected frequency range. Turning the knob clockwise causes the Filter to affect a greater frequency range, while turn-
ing it counter-clockwise af
fects a narrower frequency range.
• Hold mode
When engaged (illuminated) any FX as well as their parameters will be “frozen” so that whatever modulation is occurring at that time will be
held until the HOLD button is pressed again. Since any changes made with the TIME or RATIO knob instantly return to their original value
when the Hold mode is not engaged, use this mode to maintain these settings.
22. SLEEP MODE
The CD player automatically shuts of
f the transport and laser and displays “SLEEP
MODE” in the LCD screen after being left in pause or cue
mode for 15 minutes. This will lengthen the life of your motor drive, laser, and LCD screen. To wake up your unit from sleep mode, simply
press CUE, or PLAY/PAUSE.