


changes to lock, otherwise they will return to the default valu].
9. PLUS BUTTON – Moves the time division indicator (#7) to the right [for use with DSP FX (#10)].
10. FX SELECT – These six buttons refer to each of the individual DSP effects. Press once to engage (illuminated) and press again to disen-
gage. Use the TIME KNOB, RATIO KNOB, MINUS BUTTON, and PLUS BUTTON to fine tune the parameters used for these FX.
11. HOLD BUTTON – Sets and locks any new parameters set with the TIME and RATIO knobs. If the hold function is not selected, any changes
to the effect parameters will be momentary.
12. BPM BUTTON - Tap to enter manual BPM values for use with the TIME DIVISION INDICATOR and FX. This is generally used to manually
calculate BPMs when the Auto BPM function is unable to lock onto a consistent beat. You must tap several times in order for a calculation to
occur, and the calculation will only be as accurate as your tapping. Using this button will disengage the Auto BPM function.
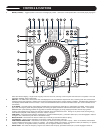
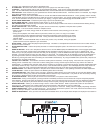
13. PITCH RANGE INDICATORS – Indicates the pitch range in percent as selected by #14.
14. PITCH RANGE BUTTON – Selects between a pitch range of +/- 8, 16, 25, or 100%.
15. KEY LOCK BUTTON – Enables the key lock function, which allows the tempo or BPM of the music to be altered without affecting the key.
This button is illuminated when enabled.
16. PITCH LOCK BUTTON – When illuminated, the pitch control is locked at 0%, regardless of the pitch slider’s position.
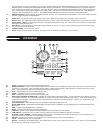
17. JOG WHEEL – This touch-sensitive wheel has multiple functions:
• When in pause or cue mode, the jog wheel can be used as a frame search control, allowing you to set it to a
specific point.
• During normal playback, the wheel works as a pitch bend, similar to a “push” or a “drag” on a turntable.
Turning the wheel counter-clockwise temporarily slows down the playback speed according to the speed,
velocity, and duration that’s applied to the wheel. Turning the wheel clockwise temporarily speeds up the
playback speed.
• When in VINYL or TOUCH REWIND mode, the wheel acts just like a vinyl turntable, moving the playback
position forward or back in response to your movements.
18. PITCH SLIDER – Used to adjust the playback pitch percentage. The slider is a set adjustment and will remain set until it is either moved, or
the PITCH LOCK is turned on.
19. PITCH BEND BUTTONS – Used to temporarily decrease or increase the playback speed. Pitch will return to the current setting when
released.
20. SAMPLER BUTTON – Once cue or samples are saved to one or all of the BANKS (#22) the SAMPLER button can be engaged (illuminated
blue). Once in this mode, sounds stored in the BANKS will play regardless of whether the unit is in CUE, PLAY, or PAUSE mode. This
means that you can play samples at the same time that your CD is playing. Press the SAMPLER button again to disable and stop sample
playback. The audio sample can even play when there is no disc inside. The sampler pitch can be adjusted by turning the TIME KNOB, or
by pressing the button down and rotating the JOG WHEEL simultaneously. The sampler volume can be adjusted by turning the RATIO
KNOB or by pressing the button down and rotating the JOG WHEEL simultaneously. By using the MODE button (section #30), samples can
be played once, or looped continuously.
21. LOOP IN / OUT / RELOOP – These buttons control the marker points for seamless, on-the-fly looping. Press IN to set a cue point or the
starting point of a seamless loop. Press OUT to set the ending point of a loop, and the loop will continue to play until the OUT button is
pressed again. If a seamless loop has been made, but the CD player is not actively in loop mode (not playing), pressing the RELOOP button
will instantly reactive the loop. Press OUT to exit the loop. LOOP and RELOOP will appear in the LCD display when the reloop function is
available. During play mode, pressing the RELOOP button will instantly return play to the last set point without interrupting playback.
22. BANK BUTTONS – Four different cue points or samples can be saved to these buttons. See operating instructions for further explanation.
23. CLEAR BUTTON – Clears cue points stored in the BANKS (please refer to item #22).
24. LOOP SAVE BUTTON – After creating a loop point (#21), pressing this button allows you to store the loop to one of the four BANKS. While
the SAVE button is flashing red, press one of the BANK buttons to store the loop in that location. Cue points can also be saved by following
this procedure. BANK locations can also be overwritten in the same way.
25. PLAY/PAUSE BUTTON – Press to play the CD from the current location, or to pause it at the current location.
26. CUE BUTTON – During normal playback, pressing the button immediately returns the track to the last set cue point and pauses playback
when released. Pressing CUE again will engage the cue monitor, which plays the track from the cue point until you release the CUE button.
If you press pause (#25) at any time other than the currently stored cue point, pressing CUE will reset the cue point to the new position.
27.
SEARCH BUTTONS
–
Allows you to search through a track or a CD in either direction. While in pause mode, tracks can be moved one
frame at a time. Holding down one of these buttons will cause the search in that direction to occur at a faster rate.
28. TRACK BUTTONS – Tapping one of these buttons will skip to the previous or next track. Holding it down will rapidly skip through the tracks.
29.
OPEN/CLOSE BUTT
ON
– Opens or closes the CD tray
.
The CD will only eject while in pause or cue mode, and will not work while a CD is
playing. If the tray is left open, it will close automatically after a brief time.
30. SAMPLER SEQUENCER – Once you have more than one bank loaded with a cue or sample, these samples can be played in succession in