


20
GB
Recording a disc by specifying
track order
— Program Edit
You can record tracks from all the discs in the
order you want. Between step 2 and step 3 of
“CD Synchro Recording” (page 19), perform
step 1 to 6 of “Creating your own program”
(page 15). When programming, make sure the
playing times for each side do not exceed the
length of one side of the tape.
Notes
• You cannot use Tape Select Edit for discs containing
over 20 tracks or MP3 audio tracks.
• You cannot listen to other sources while recording.
• Game Mixing does not function during CD Synchro
Recording.
Tip
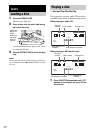
To check the required tape length for recording a disc,
press EDIT after you have loaded a disc in CD
function. The required tape length for the currently
selected disc appears, followed by the total playing
time for side A and side B respectively (Tape Select
Edit).
You can record just the portions you like from a
disc, tape or radio program on a tape. You can
also record from connected components.
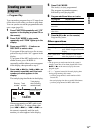
1 Load a recordable tape into deck B.
2 Press FUNCTION or TUNER/BAND
repeatedly (or press CD or press TAPE
repeatedly on the remote) to select the
recording source you want to record.
3 Load the disc or tape or tune to the
station you want to record. To record
from connected component, connect
the external audio sources.
4 Press REC PAUSE/START.
Deck B stands by for recording.
REC PAUSE/START indicator flashes.
If you want to record on the reverse side,
press h (TAPE B).
5 Press DIRECTION repeatedly to select
“g” to record on one side. Select
“j” (or “RELAY”) to record on both
sides.
6 Press REC PAUSE/START, then start
playing the source (for disc or tape).
Recording starts.
To stop recording
Press x (TAPE B).
Recording to a tape
manually
— Manual Recording